Welcome to Our Community

Some features disabled for guests. Register Today.

3D Printer

Discussion in '3D printers' started by Cuong Vu, Nov 27, 2013.
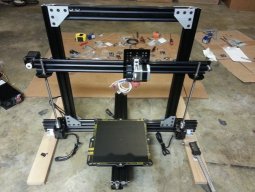
  1. Cuong Vu

    Cuong Vu New
    Builder

    Joined:
    Nov 27, 2013
    Messages:
    12
    Likes Received:
    37
    Ridgeback likes this.
  2. blindflight

    blindflight Well-Known
    Staff Member Builder Resident Builder

    Joined:
    Sep 19, 2013
    Messages:
    53
    Likes Received:
    56
    This is a fantastic build in record time for first time build plus you had to engineer the design yourself. Your building skills are great. Really good to see the evolution of the prints to where you have refined them. Look forward to your future builds.
     
  3. Robert E. Nee

    Builder

    Joined:
    Dec 5, 2013
    Messages:
    7
    Likes Received:
    8
    Great design and implementation.
     
  4. Cuong Vu

    Cuong Vu New
    Builder

    Joined:
    Nov 27, 2013
    Messages:
    12
    Likes Received:
    37
  5. rhondaviolachurch

    Builder

    Joined:
    Dec 14, 2013
    Messages:
    1
    Likes Received:
    0
    Awesome build! What are you running it with??
     
  6. JZatopa

    JZatopa New
    Builder

    Joined:
    Dec 6, 2013
    Messages:
    11
    Likes Received:
    0
    Great build. I am working on something that is very similar. Mind if I asks you a whole bunch of questions :)

    Are you having any z-banding issues?
    Is there anything you would do different if you had to do it over again?
    Your printer is the first I have seen using a metal chain drive, how do you like it?
     
  7. Cuong Vu

    Cuong Vu New
    Builder

    Joined:
    Nov 27, 2013
    Messages:
    12
    Likes Received:
    37
    At first I used Marlin firmware and ReplicatorG host for awhile then I tried with Repetier firmware with Repetier host, then Marlin with Cura host, but finally I end up with Marlin firmware and Printrun host.
     
  8. Cuong Vu

    Cuong Vu New
    Builder

    Joined:
    Nov 27, 2013
    Messages:
    12
    Likes Received:
    37
    Are you having any z-banding issues?
    I don't see any problem with the Z.

    Is there anything you would do different if you had to do it over again?
    I like that way so far, haven't got any issue yet. Right now I just want to make it enclosed so I can control the chamber temperature. So I won't change.

    Your printer is the first I have seen using a metal chain drive, how do you like it?
    I tried the belt first on this project:
    http://openbuilds.com/builds/camera-slider-for-stacking-focus.224/
    But I found out it took too much space between the moving plate and the rail, it noisy when running, and need to keep lot of tension to make it run good.
    Then I decided to go with the synchromesh cable. Things I don't like with that cable is the price and not much place sell it. But i love it.
     
    #8 Cuong Vu, Dec 15, 2013
    Last edited: Dec 15, 2013
  9. bill

    bill New
    Builder

    Joined:
    Jan 3, 2014
    Messages:
    17
    Likes Received:
    4
    What is the approx build area for this setup?

    Assuming the parts from the openbuilds and panucatt get restocked I think I'll be building one based on this design. ( only thing I think I would change is a base to put the power supply and controller in )

    Also curious about your experience with the syncromesh. That seems like some really cool stuff!
     
  10. Cuong Vu

    Cuong Vu New
    Builder

    Joined:
    Nov 27, 2013
    Messages:
    12
    Likes Received:
    37
    20140105_175627.jpg The frame I made for X: 15", Y: 10", Z:15"
    But i'm using the short lead screw and small bed 8x8, so right now it can make 8x8x8 max

    The power and the board are mounted at the bottom on the back, they are attached to the frame (see picture)

    With the synchromesh cable, I'm loving it: quiet, smooth, precise, and use less space.
     
  11. Cuong Vu

    Cuong Vu New
    Builder

    Joined:
    Nov 27, 2013
    Messages:
    12
    Likes Received:
    37
    Just replied above
     
  12. CBG

    CBG New
    Builder

    Joined:
    Jan 27, 2014
    Messages:
    1
    Likes Received:
    0
    If you dont mind how did mount the extruder to the vslot carriage.
     
  13. Cuong Vu

    Cuong Vu New
    Builder

    Joined:
    Nov 27, 2013
    Messages:
    12
    Likes Received:
    37
    Hi,
    Sorry for the late respond,
    I just cut a V aluminum bar the drill a hole on it to make the bracket to mount

    Cuong
     
  14. MechEng

    MechEng New
    Builder

    Joined:
    Mar 2, 2014
    Messages:
    15
    Likes Received:
    4
    Hello,

    I noticed in some of your initial pictures you had a QU-BD style extruder/ hotend mounted, and then when you began printing, you were using a j-head hot end.

    Did the QU-BD style extruder not function very well? I'm just curious why you made the switch. I was looking at buying this extruder/ hotend:

    http://www.ebay.com/itm/0-4mm-Dual-...041?pt=LH_DefaultDomain_0&hash=item51b9c36009

    but I might not if they don't function very well.

    Regards
     
  15. Tim Petrillo

    Builder

    Joined:
    May 24, 2014
    Messages:
    4
    Likes Received:
    0
    How are you putting tension on the v wheels for the z axis? I know you can mount the wheels directly to the extrusion but the eccentric spacers dont look like they fit. The build looks nice as I am building something similar but enclosing it.
     
  16. Rylan Delap

    Builder

    Joined:
    Oct 13, 2014
    Messages:
    1
    Likes Received:
    0
    I noticed you technically use Qty:6 cast 90 degree corner brackets for the build even though your final result may contain only 4. I also have noticed while attempting to build a similar model that more of the M5 8mm screws are required than your BOM designates. Just a heads up for anyone else trying to put this together.

    Do you have more pictures/details for how you went through the build? I am trying to build the same type of design but I am completely newbie-status and need the "for dummies" instructions.
     
    #16 Rylan Delap, Oct 16, 2014
    Last edited: Oct 22, 2014
  17. A J

    A J New
    Builder

    Joined:
    Mar 24, 2015
    Messages:
    7
    Likes Received:
    0
    Hi, congrats on your build. I've been looking at building one, and was wondering, leaving labor aside, what would it cost ballpark to build one of these babies?

    Thanks
     
  18. Cuong Vu

    Cuong Vu New
    Builder

    Joined:
    Nov 27, 2013
    Messages:
    12
    Likes Received:
    37
    Hi,
    It was about $800
     
  19. A J

    A J New
    Builder

    Joined:
    Mar 24, 2015
    Messages:
    7
    Likes Received:
    0
  20. DarkAlchemist

    DarkAlchemist Well-Known
    Builder

    Joined:
    Aug 2, 2014
    Messages:
    401
    Likes Received:
    22
    My I3 Rework is a piece of poo. Very little printing on it with a ton of issues I can't work out (mostly Z and bed related) so my next printer will not have a single printed part on it and this is why I like your design. I want a 3d printer not a reprap.

    The principles of a 3d printer are very simplistic from a design standpoint but getting everything to mesh together with pre existing parts and you don't have a DP and basically just have a 24t hack saw it does make it harder. One thing I would do differently on your design, same as any i3 or variant, is kill the two Z motors. A horrible Prusa design that was. Yes, it should be within acceptable error but eventually it has to be tweaked then eventually tweaked again and again and again, etc... A few people have went to lead screws and one belt driving both sides and they never have to touch Z again.

    How did you get the bed to fit? Closeups of the parts fitted together (like the extruder and the bed) would have been great. Basically this is a cool project but you did not give enough information, or detailed pictures, on what goes where and why stuff was purchased (like Nema 23 threaded rod plates (link you provide takes me there) when Nema 17 motors are used).
     
  21. Chazz

    Chazz New
    Builder

    Joined:
    Jan 21, 2016
    Messages:
    1
    Likes Received:
    0
    I'm trying to replicate your build. What lengths were the 3 linear rails cut to?
     

Share This Page

  1. This site uses cookies to help personalise content, tailor your experience and to keep you logged in if you register.
    By continuing to use this site, you are consenting to our use of cookies.
    Dismiss Notice