
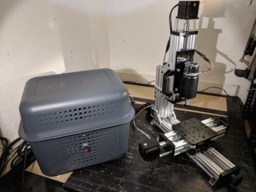
Two Power Supplies under there:
![[IMG]](proxy.php?image=http%3A%2F%2Fonefoursix.com%2Fimages%2Fcnc%2F2ps.jpg&hash=f6c7774f6907fda9323e7f39ddd5d903)
--Feb 25, 2018
Completed! Buttoned up the power supply, finished all cabling. Time to start carving!
-- Feb 20, 2018
Finished the dual Power Supply with separate PS for the spindle and the stepper motors. Variable speed control for the spindle. I moved the terminal blocks away from the edge for protection and the enclosure has a removable top and slots to route the cables through. The enclosure courtesy of The Container Store including the matching top (see pics).
-- Jan 27, 2018
Finally mounted the new spindle after trying many different approaches. I wound up using the matching spindle mount but had to enlarge the mounting holes in it (which were 70mm) to fit the 60mm holes in the MiniMill's Z plate. I also had to drill out the Z axis mounting plate to recess the mounting bolt's heads (a hack job; should have taken more time). But at least the new spindle is mounted! Next step is to hook up all the wiring to my now external power supply. Added some new pix to files and drawings section
-- Jan 22, 2018
Decided to go with a quiet spindle, which required an additional Power Supply, which led me to slap together a little enclosure to house both Power Supplies, the logic board and the speed controller with its large heatsink. I brought all the connections out to a terminal block and I will wrap the whole thing in some clear plexi with ventilation holes for the Power Supplies to prevent accidental contact. I posted a couple of pix in the files and drawings section
-- Dec 29, 2017 ----
Just finished basic mechanical build and prototype wiring. It works! G-code Sender moves x,y & z correctly. I mounted the logic board using cable ties against an old metal project box plate with the pink plastic padding the logic board came with as padding... and then quick and dirty routing of wires behind the PS
Not sure if I'll ever redo that work as it seems to hang together OK. We'll see how it works once the CNC is in use.
Hats off to OpenBuilds for a fantastic first time customer / end-user experience! Building it was like building the Lego Death Star... and there were NO MISSING PIECES! Great packaging and instruction video!
I will probably drop in a small spindle and may need another power supply for that...
In the meantime I have to learn Fusion 360!
Some close up pix in the Files section
Yamm (Yet another MiniMill)
Build in 'X/Y Table Style CNC Mill' published by onefoursix, Feb 26, 2018.
First time CNC user having a good time with a MiniMill
-
-
Build Author onefoursix, Find all builds by onefoursix
-
- Loading...
-
Build Details
- Build License:
-
- CC - Attribution - CC BY
-
Attached Files:
-
![[IMG]](proxy.php?image=http%3A%2F%2Fonefoursix.com%2Fimages%2Fcnc%2Fcnc-1.jpg&hash=3c12a56afbca9b4950b8017b980adf60)
![[IMG]](proxy.php?image=http%3A%2F%2Fonefoursix.com%2Fimages%2Fcnc%2Fcnc-ps.jpg&hash=12e11c7a669f84f7ed45c4178245478d)


