
Hi Everyone!
First time Dutch CNC Amateur over here!(but willing to learn)
For my work I do a lot of 3D design ( mostly retail interiors, but sometimes constructive stuff like counters, cabinets etc.)
I'm also a guitarist and building guitars of my own. Furthermore interested in all kinds of (technical) stuff.
After searching the internet and openbuilds to get information on a DIY CNC I decided a full kit would be the most convenient to me.
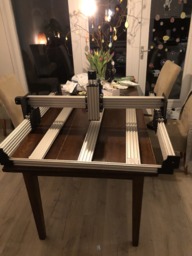
So I bit the bullet and ordered a 1000x1000 Workbee Screw driven from the guys at Ooznest.
(about the great service you read everywhere on this site.. it's true! Got 2 screw blocks that wouldn't run smoothly, and they've send new ones in a day! )


I got it finished in 3 evenings, the manuals were pretty clear. But you do have to read it is not like your Swedish Allen wrench furniture where you can rely on the images itself.
I'll try to put a more detailed description over here with more pics.


But for now, I've put it together, installed the electronics. triple checked the wiring and test it with UGS on a Mac.
got the appendix B settings copied..
So far it works. Positive directions on all axis are ok.
Jog works
except.. $h homing... But it's fixed now! (explained after purple txt)
When I hit the $h home button it starts the sequence with the Z-axis.
it travels up nicely, hits the limit switch.
At this point I believe it should do the same with the X-axis, but instead it plunges the Z-axis into the base frame,
I can't get my head around why it does that....
If anyone got suggestions, please share
Okay, two days later and still wondering why $h does this strange thing.
Already took a screenshot of the $$ settings and while composing an email to Ooznest, I had to check it one more time. Turned out that $27 was on 3000 instead of 3.000. $27 is for the offset after it hits the limit switch, So basically it wanted to dive 3 meters into the base.
Some of the values in Appendix B may look different because of the added ".000". I had to check 4 times to get it right.
I guess after a 10 hour workday checking a list of settings isn't the brightest thing to do. But it works now! Off to clean up the wires!
Update! 13th of april
OK, I think I got it ready

After cleaning up wires, I got the machine set up in the garage. Aaand it was a bit bigger than I thought it would be

Hooked the DeWalt up with an EU plug instead of an UK version. It was a fairly simple job.

After doing some test runs with a marker on paper, my 3 yr old wanted to do an elephant. instead of circles and letters
So far I've cut several test pieces, even a birthday present! but I notices that my baseboard wasn't flat.


Today I've made a test cut with a 20 mm flat routerbit and it was indeed a bit off.
It was a nice opportinity to test the squareness and travel distance as well.
For some reason I couldn't let it cut a 70x70 cm square through makercam because it exceeded machine travel, which is a bit strange. so I cut a 50x70 rect manually. (I've got a 50cm ruler so this it would be easier to measure.)

the Y was 1.0 mm off (701 instead of 700) the X was off by 1.75 mm (501,75 instead of 500mm)
this was fixed by altering $100-$102. I did the same thing with the z axis but with calipers ande used the aluminum plates. A clock gauge would be more accurate, but I'm happy so far.
For squareness I used good old Pythagoras, since I don't trust my €1 square. and it was square yay!
Things I have to fugure out:
- The machine starts up in alarm state every time. $X unlocks it, but is it normal?

- Halfway through the y axis when moving it gives a wringy sound. I've checked the bearings and used the 1 turn loose method on the endplate. but it's still there.
- today one of the Y steppers started later than the other one
- I noticed that my circles aren't perfectly round, they have straight bits in the Y direction. Maybe it has to do with the y screws not being properly. I'll have to check them.
Would haves:
leveling base/wasteboard
make a foldable wall mounted frame for storage
new tiny ball endmill, I broke mine today..:'(
It's still fun to tinker with it, and I hope to sort out the minor(I think) issues so that I can make stuff.
I hope my post can inspire the next guy or girl to get a great maker machine.
I think it's really exciting to have this technology within reach of "ordinary" people and to have the ability to make or even invent something!
Workbee 1000x1000 mm screw driven Full Kit From Ooznest
Build in 'Cartesian Style CNC' published by Vincent Walsarie, Apr 13, 2018.
A short summary of my Workbee CNC Build. I try to update it where I can
-
-
Build Author Vincent Walsarie, Find all builds by Vincent Walsarie
-
- Loading...
-
Build Details
- Build License:
-
- CC - Attribution - CC BY
Reason for this Build
I'm hoping to use it for building guitars and other stuff
-
Parts list
Qty Part Name Part Link Comments 1 Ooznest workbee full kit http://ooznest.co.uk/3D-Printer-CNC-Kits-Bundles/WorkBee-... Link
