
Ok, a quick build upgrade for the Eleksmaker A3's Laser X-Carriage using Openbuild parts.
First of all the problem - I have seen several Eleksmaker threads about 3D printing an adjuster for the x-carriage wheels. Probably because everyone has the same problem that I did, the X-carriage is just too tight. You push on it and the whole build slides across the bench.
3D printing X-Carriage adjusters is... Well, that's all great and I'd say good on you, but that approach just seems kind of a cludge, especially since I've been using the Openbuilds carriages with adjustable wheels for some time now.
The biggest hindrance to my approach I think would be the fearof ruining the acrylic carriage plates. Well, if push comes to shove I am also building the Mini Mill and then I would just make more.
But fear not, as I think "all you all" can drill acrylic if you take some careful steps.
The Parts List (QTYs are each):
The Tools List:
- Drill Press
- Machine vise
- 6 Drill bits from 13/64", 7/32", 1/4", 17/64", 7mm, to 9/32"

- 5mm and smaller Hex head drivers
- Patience!
Here is a picture of my Eleksmaker A3 X-Carriage acrylic plates.

The first thing I noticed was that the existing holes were not aligned with each other from one plate to the other. Well duh, even fixing that might help some.
Lets get started...
Take out the 8 Eleksmaker plastic spacers and put them into your parts drawer
I took a 13/64" (5.04 mm measured with my calipers) drill bit and stuck it into one of the TOP holes of both plates stacked together with the TOP edge aligned, as you see in the above picture to keep the plates aligned in that direction. Then I clamped both plates flat in the machine vise on my drill press.
I took out the drill bit after the plates were securely clamped and put it into the Jacob's chuck and aligned that hole set with the drill bit and clamped down my vise with a c-clamp.
Then I SLOWLY drilled out the hole using the existing bit at the slowest drill press speed (900 RPM or so). Too fast would melt the acrylic or worse, crack it.
I then repeated the same step over 5 more times changing the bit each time using 7/32", 1/4", 17/64", 7mm, and finally 9/32" (7.04mm measured with my calipers).
The 9/32" size bit worked great for the OpenBuilds eccentric spacer. It was an exact fit in my case.
Now we do all the above steps over again for the second TOP hole.
Yep, by now both sets of top holes should be an exact fit for the OpenBuilds eccentric spacer. You need 4 of these eccentric spacers, one pair for each plate.
Whew!
Mark the same side of all 4 of the OpenBuilds eccentric spacers using a permanent marker or dab of paint.
Assembly:
Now, lay out the plate that the is laser mount bracket attached to. Attach the laser mount to the carriage plate and MAKE sure to put all 3 Low Profile M3 screws into the mount.
If you don't use low profile screws, then the Eleksmaker supplied Laser mount M3 screw heads on the inside of the x-carriage plate will drag on the ALU extrusion.
Lay out the stepper motor plate and attach the Nema 17 stepper motor with the Eleksmaker supplied M3 screws. Note that while 2 of these screws come close to the ALU extrusion rail, they will/should not touch or drag. You could get extra low profile M3 screws for the stepper motor, but I think you might want slightly longer ones than 10mm.
Now you put the 4 of the Eleksmaker 5mm bolts followed by a 5mm washer that same plates where the plate lays flat with the laser mount down.
Next follow up with the 2 of the eccentric spacers on the top holes and 2 6mm ALU spacers on the bottom two holes.
Then put the 4 precision shims on, followed by the 4 Eleksmaker V-Wheels. I suppose you could change these out for 4 of the OpenBuilds Delrin V-Wheels if you wanted.
Now put 4 more precision shims on, followed by either an eccentric spacer for the top two holes or a 6mm spacer for the bottom two holes.
Put the stepper motor plate on with the stepper motor on the up side - and then the 4 Eleksmaker supplied 5mm nuts. Do NOT tighten these more than figer tight at this time.
Make sure the eccentrics are all turned the same way/direction to their lowest point, with the least tension of the wheels for the next step.
Slide the X-Carriage assembly you just put together onto the X-Slide Extrusion 20x40mm Rail.
Screw the rail onto the Y-carriage plates using the supplied Eleksmaker screws.
Adjust the eccentrics for proper sliding tension with no X-carriage play. This did not take more than a very small turn of each of the eccentrics for me.
Next tighten the 4 Eleksmaker 5mm screws using the Hex driver. DO NOT over tighten at this point as you could crack the acrylic!
Check out your X-Carriage sliding action:
Mine is now smooth as butter
Of course last you attach the drive belt as shown in the Eleksmaker A3 assembly instructions. Or you can remake the belt tensioners using a 3D printer where they are designed to keep the belt flat rather than sloped down from the motor.
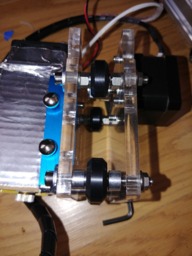
Here are some more pictures of the work:


Update Eleksmaker with Openbuild eccentrics for X-Carriage
Build in 'Laser Cutter Builds' published by Lindsey Lewis, Jan 10, 2018.
A simple approach to making the Eleksmaker A3 Laser build have a better functioning X-Carriage! Of course this assumes you bought an Eleksmaker A3 or plan to.
-
-
Build Author Lindsey Lewis, Find all builds by Lindsey Lewis
-
- Loading...
-
Build Details
- Build License:
-
- CC - Attribution - CC BY
Reason for this Build
To improve the accuracy and precision of the Eleksmaker Laser Tool! -
Parts list
Qty Part Name Part Link Comments 4 Eccentric Spacers http://openbuildspartstore.com/eccentric-spacer/ Link 4 ALU 6mm Spacers http://openbuildspartstore.com/aluminum-spacers/ Link 4 Slot Washer http://openbuildspartstore.com/slot-washer-15x5x2mm/ Link 8 Mini V-Wheel Precision Shim http://openbuildspartstore.com/mini-v-wheel-precision-shim/ Link 3 Low Profile M3x10mm Screw https://www.grainger.com/product/6DY81 Link
