The main reason for the build of my macro imaging stacker slide was the cost of a commercially available unit but even then it did not have the control I required and was based on a basic LCD screen.
1) The first stage was the slider itself, this was purchased in kit form and formed the basis of the build, the connecting wires for the stepper motor were changed to coiled cable, this eliminated any risk of snagging during slider movement, this cable was then terminated with a connector ready for the control unit.
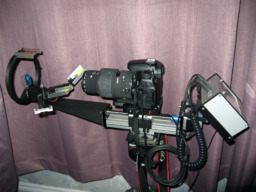
2) The second part was adapting the slider to accept the camera which in my case was an SLR. I did not want a direct mounting but opted instead for a quick release version which entailed the manufacture of a bespoke adaptor, this was manufactured in aluminium and polished to achieve a professional finish.
3) Next came the slider extension, specimen mounting and lighting. 12 volt COB LED panels were used for the lighting (Power supplied by the control unit) and 4 panels were used to eliminate any possibility of shadows and provide all round illumination. The extension, panel mounts (Adjustable) and specimen mount were all 3D printed in black PLA to avoid glare.
4) The final part and certainly the most difficult was the control unit itself. This took countless hours of programming and testing before I was happy with the stability and control I required.
The unit is aluminium and houses the processor, stepper motor driver, power supply for the lighting, opto coupler for the camera trigger connection sockets for the stepper and camera trigger, indication :LED's and of course the touch screen itself.
The screen also required extensive programming to not only display the needed controls but to also work in harmony with the processor which is the brains behind it all.
5) Control is a two screen setup, all controls are touch operated as buttons or sliders, the first screen is split into two, the left enables the jogging of the slider forward or backward to achieve a rough position.
The right sets the aperture activation time and the wait time which is required to ensure all movement has settled before taking the image, a separate button takes you to the second screen where the imaging data is entered.
The second screen is also split into two areas, the left contains increase and decrease buttons for fine adjustment of the number of images required and the distance over which these images will be taken, sliders for both settings enable rough setting before final adjustment.
The right of the screen holds a counter that displays the number of images to be taken and the number of images actually taken, an on screen indication of the shutter activation, separate touch screen buttons control the counter zeroing, start, reset and return to the first screen.
Two buttons at the top of the screen enable either forward or backward movement whilst taking images.
The total travel achievable is 100 mm with the smallest movement available being 0.02 mm, this results in a possible 50 images for every 1 mm of movement.
Once the sequence of images has completed, an alarm indicates the completion.
Touch screen macro imaging
Build in 'Camera Sliders - Rigs' published by stepper, Sep 12, 2018.
This is a brief overview of the build of my macro imaging slide.
-
-
Build Author stepper, Find all builds by stepper
-
- Loading...
-
Build Details
- Build License:
-
- CC - Attribution NonCommercial - CC BY NC
Reason for this Build
The main reason for the build of my macro imaging stacker slide was the cost of a commercially available unit but even then it did not have the control I required and was based on a basic LCD screen -
Attached Files:
-


