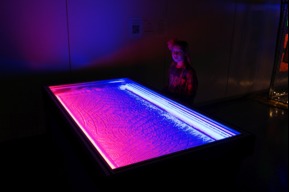
This is a 1.9 x 1 m table that uses a corexy mechanism to move a magnet to draw patterns in sand with a steel ball I built it at the MIlwaukee Makerspace in August/September of 2018 for the Milwaukee MakerFaire.
The mechanism uses 45 mm square t-slot aluminum (purchased at a local scrap yard for $2/lb) as the base of the table with the slots serving as guides for the Y axis and to mount the parts of the drive mechanism. The sand box fits on top of the base, so it can be lifted off for access to the mechanism. There is also a top cover that fits into the sand box to keep curious fingers out of the sand.
The magnet is a 1" cube N52 neodymium type, drags a 15 mm steel ball through sodium bicarbonate sand blasting medium (Harbor Freight Tools, 50 lbs, $30, about 15 lbs on the table). I used 1/2" plywood on the bottom of the sandbox so the super powerful magnet was needed to keep the ball under control. In hindsight, I could have used a thinner material for the bottom of the box, allowing a smaller, cheaper magnet to be used.
Overall structure:
The table consists of three main parts- the base/mechanism, the sandbox, and the cover. The base and cover both use 45 mm square t-slot aluminum. The sandbox is made with a 1/2" plywood bottom (should have used thinner material), and 1x6" pine sides, and some 1x2" furring strips.
The mechanism:
I started with a cable driven mechanism and quickly switched to belts on one level, and finally stacked belts. After the MakerFaire, inspection of the mechanism revealed a lot of wear on the magnet carriage, so I have just redesigned it for greater reliability (I hope).
The motor mounts, Y axis sliders, and corner pulley blocks are all 3D printed. The Y axis sliders have UHMW PE bearings that fit into and slide in the slots in the frame. The X axis guidance is provided by a 16 mm square aluminum tube on which the magnet carriage slides on recently added UHMW bearings.
I used a couple NEMA-23 motors I had handy, but NEMA-17 should easily be able to drive the mechanism. The motors have 40 tooth drive pulleys moving 6 mm wide GT2 belts. There are two endstop switches mounted on the frame so I wouldn't have to connect any wires to the magnet carriage. The Y axis must always be homed first, then the X axis, so the controller's firmware has been set up to do that.
Electronics:
I used a Smoothieboard controller that I recently took out of my 3D printer. The mechanism runs with acceleration set to 1000 mm/sec^2 and speeds set to 500 mm/sec. The motors are a bit noisy at that speed, so changing to a controller with 256:1 interpolated microstepping (like the Duet) might be a good way to reduce the noise.
The table has a 24V power supply to run the motors and controller, and a couple DC-DC converters to power red and blue LED strips that light up the sand from a low angle. The LED strips are self-adhesive type with 60x 5050 size LEDs per meter. They are mounted on some 1" x1" aluminum L stock to dissipate heat and block direct vision of the LEDs.
Generating patterns:
I used Sandify to generate a bunch of patterns to run the table at the MakerFaire. I put the patterns on an SD card and set it up so that it would draw three patterns on top of each other with a 1 minute pause between patterns, then erase the whole thing and run a different 3 pattern sequence. Each pattern takes 5-15 minutes to complete and the file I was running would take about 12 hours to finish.
I also worked with Michael Dubno to get his pattern generating software to work on the table. It uses a Raspberry Pi board to talk to the smoothieboard via USB. Michael's software will generate patterns interactively using any web browser, and once you like what's on the screen, will send it to the table. It can display text, images, or different formula based patterns.
More:
There are more details and photos on my blog, here.
There's an update on the magnet carriage design, here.
Fusion360 model for the table is here.
The new magnet carriage design file is here.
The Spice Must Flow: a coreXY Sand Table
Build in 'Other Style DrawBot' published by Mark Rehorst, Nov 4, 2018.
A 1.9 x 1 m table that uses a magnet to move a steel ball and draw geometric patterns in sand. The magnet is moved using a corexy mechanism driven by 3D printer controller board reading the patterns in the form of gcode files.
-
-
-
- Build Progress:
-
- Build Complete!
pipimonster, sharmstr, Rob m simpson and 5 others like this. -
-
Build Author Mark Rehorst, Find all builds by Mark Rehorst
-
- Loading...
-
Build Details
- Build License:
-
- CC - Attribution NonCommercial - Share Alike - CC BY NC SA
Reason for this Build
This was built as a demo for the Milwaukee MakerFaire which was held in September 2018.


![[IMG]](proxy.php?image=https%3A%2F%2F1.bp.blogspot.com%2F-FFT7rQDTwWk%2FW4V-Kvwr85I%2FAAAAAAAAW58%2FwhTZqkKPZ30of4zkjAXCjHXVkHM2BeyfwCLcBGAs%2Fs1600%2Ftable%252Bexploded.png&hash=58527685f978bb2a5e83af419db0e4ba)
![[IMG]](proxy.php?image=https%3A%2F%2F3.bp.blogspot.com%2F-vUGpLcQTOJ4%2FW2Q-3C4s9bI%2FAAAAAAAAWl0%2F1sFlZwqP71saYUmv1DoGtpHd5BVHBaF7wCLcBGAs%2Fs1600%2Fcorexy%252Bcables.jpg&hash=14a5cc4247f37e3ed03e1fed55fd3396)