

*** WORK IN PROGRESS! CHECK THE DISCUSSION TAB FOR THE MOST RECENT UPDATES!***
Basic Specifications:
- Cutting Volume: 24" x 16" x 6.25" (with a motorized Z-axis even!)
- Machine Footprint: 35.5" x 26.4" x 16.5"
- Laser: 40 Watt CO2 Laser
- Electronics/Software: Arduino UNO + CNC Shield + GRBL 1.1 + LaserWeb3
- Rough Cost (Should be pretty close to the final cost at this point): $1,400
The SOLAC is the result of an Engineering Senior Design project group (consisting of me and one other student) at the University of Southern Indiana. I've wanted a laser cutter ever since I was in high school, and while my 3D printer is great for some items, it would make a lot of sense to have machine capable of rapidly creating 2D features.
I initially investigated the cheap K40 laser cutters available all over the internet back in September of 2016, but it very quickly became apparent that I would essentially need to do a complete overhaul on the electronics in order to bring it up to the standards that I would want (vector file capability, not having to deal with the apparently horrendous software, etc). At the same time, I wasn't impressed with the fact that a 31" wide machine had a 12" wide cutting area, not to mention the generally sketchy mirrors, low-quality linear motion components, terrible exhaust efficiency, etc.
The result of my searching and investigating was that I determined that I would really just be better off building my own laser cutter. This worked out great, as I knew that I would be able to use this machine for my capstone design project come Spring of 2017. The first month or so of the semester was spent working on several things:
The ideas of keeping the cost low + maximizing the ratio of cutting area to overall machine footprint were paramount throughout the design process. You might have noticed that the SOLAC doubles the cutting area width (12" of additional room) of a Chinese K40 laser cutter with only a 4" increase in the width (!). This was done by moving all of the electronics to the "dead space" under the laser tube in the back, rather than housing the electronics in a side compartment. This essentially cut 8" of width, with no additional increase in the depth (front-to-back) of the machine as compared to a K40 (besides the extra 8" required by adding 8" more of cutting depth!)
- Setting major requirements in stone (Size, capabilities, software support, etc)
- Examining current Laser Cutter designs, and figuring out what was good/bad about each of them
- Deciding on major components (Motors, Electronics, Laser Wattage, what to use for the linear motion, etc)
- Creating the 3D Model (required many iterations to get the machine as compact as possible)
- Ordering Parts (And confirming dimensions that we had gotten online once the parts came in!)
Additionally, the SOLAC was designed with the ease of other people reproducing it in mind. This means that if you have access to a desktop 3D printer, have the equipment to cut the OpenBuilds V-slot, and have some basic electronics knowledge, you can build 95% of this machine. The exception is the enclosure - we've designed it around having access to a water jet & sheet metal bender here at our university - though you could cut it out with a drill and some tin snips if you were motivated.
And that about brings us up to date on where the project is at currently (2/18/17). We have all of the parts (with the exception of the sheet steel for the enclosure), and we've started building the frame. The 3D model was created in SolidWorks and is pretty much 100% inclusive of everything that's on this machine. The only thing left to do with it is to adjust the sheet steel enclosure to include some mounting holes for the 12 volt power supply and the water flow switch. Once I finish that (and do some cleanup to my file structure haha!) I'll upload the files for your use. I'll also make sure to create a final parts list, and a separate list of parts you would need to 3D print.
SOLAC: Space Optimized LAser Cutter
Build in 'Laser Cutter Builds' published by Lumberjack Engineering, Mar 9, 2017.
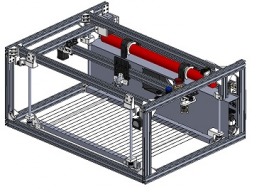
The Space Optimized LAser Cutter is a 40 watt CO2 laser cutter that supports a maximum part volume of 24" x 16" x 6.25". It consists of a V-slot frame + brackets/mounts designed to be 3D printed on a consumer desktop printer. Total cost of the machine is ~ $1,400 USD.
-
-
-
- Build Progress:
-
- Build in Progress...
Olaf Peters, OliverFox, Peter Gamache and 20 others like this. -
-
- Loading...
-
Build Details
- Build License:
-
- CC - Attribution Share Alike - CC BY SA

