This build is based on the OX build that is located at http://www.openbuilds.com/builds/openbuilds-ox-cnc-machine.341/
I am substituting the geckog540 controller and have made some software changes. There is an enormous amount of information about this particular build already, so I will focus on the things that are different about this build and the things that I as a beginner am running into. It is my hope that this will provide a different viewpoint about this build that will be appreciated.
To begin with, I read a lot about CNC and CNC Linux here http://www.linuxcnc.org/index.php/about. I read a lot about different software and although Mach3 seems to be the standard I did note that there were several CNC Machine Manufacturers that use Linux CNC so I decided to try it. If it works it will save me the cost of the operating system and the CNC software.
I downloaded the Linux CNC to my Mac from http://dsplabs.upt.ro/~juve/emc/. I clicked on Finder, selected utilities from the go menu and then selected disc utility. From the disk utility I burned the image downloaded to a dvd-r.
I placed the dvd into the drive on the target computer and started the pc. I pressed the button to enter the bios and selected boot from dvd. (It is a good idea to set your parallell port to EPP while you are in the bios so that you won't have to do it later when you set up your gecko drive)


Simply follow the prompts to install Ubuntu Linux and CNC linux is automagically loaded at the same time. (It is recommended that you not upgrade the Ubuntu installation as it will break the LinuxCNC program). Directions for the installation can be found here. http://wiki.linuxcnc.org/cgi-bin/wiki.pl.
Wow!! It only took about 20 minutes from the time I inserted the DVD to have a fully functioning Ubuntu Linux installation with Linux CNC installed.
Next I ordered a set of gantry plates from Chris L. who had a very reasonable ebay auction. After receiving them within 24 hours!!! Chris emailed me to tell me that through a series of lucky events that I had recieved my plates faster than anyone ever. (Don't get pissed if you don't get yours that fast, it really was a series of lucky breaks)
Next I found an Ebay auction for A Gecko G540, 3 stepper motors, cables and power supply. I paid 410 USD plus shipping. I think if I had it to do over again I might buy new as I don't think I saved that much. I got excited and let it go too far. Somebody got top dollar for their used Gecko 540 kit. On the bright side. I saved a little and saved some time on wiring the DB9 connectors.
While waiting on the shipment of the Gecko I placed an order with openbuilds for the materials to make the OX,the list is attached. Openbuilds is out of M5 x 65MM screws so I have to figure that out. Almost everything else they had on the site.
While waiting on the Openbuilds shipment, I recieved the Gecko and other electronics hardware. I went to the local computer store to find a parallel cable but ended up getting one from Amazon. Parallel cables just aren't that common anymore. (Make sure your parallel cable is straight through and not a crossover cable.)
I downloaded the initial setup guide from the Gecko website http://www.geckodrive.com/g540-initial-setup-guide. Wow, it was incredibly easy to follow the instructions and get a green light. (Until you run the CNC Linux wizard, you will need to turn the charge pump switch to the off position to get a green light. After running the wizard you can turn it back on and you will continue to get a green light.)I powered everything down and plugged in all of the connections. (follow the instructions about where to wire the stop button or you will be EXTREMELY disappointed as it will blow the board) After restarting everything and booting back into linux I tried to get the motors to move by using the arrow keys. I got nothing... After googling "setup linuxcnc" I saw that there was a setup wizard. I clicked on the applications menu in Ubuntu and then clicked on CNC. Boom! there it was, a setup wizard for CNCLinux
I went though the setup wizard and was amazed that the steppers started moving when testing them. ( Make sure that you turn off the power supply to the Gecko while making the parallel and DB9 connections) (You can turn it back on after everything is plugged in) I even managed to get the program to run through the sample file of LINUXCNC. So far I have been extraordinarily lucky as well as the recipient of the combined knowledge of a lot of people who have done a lot of work on these programs. It amazes me that I have not yet run into anything that I could not handle by simply reading online and using youtube. GO INTERNET!!
Got my Openbuilds order today. It contains most of the parts from the BOM. Openbuilds was good to make sure that the three separate orders arrived on the same day and it was VERY WELL PACKAGED. It took me almost 15 minutes to get into it and the products inside appear to be in pristine condition. According to the BOM I have everything mechanical except the double hole angle brackets. I ordered them today after swapping a couple of emails with Openbuilds. They are not on the website yet but Openbuilds emailed that they will ship sometime this week.
Holy stair master Batman!!! How did I forget to order the Nema 17 stepper motor. Hopefully Openbuild will get them back in stock soon. I had assumed that because it was three axis I would only need three motors. I need to make sure I pay closer attention and make no more assumptions.
I will cut the extrusions and assemble the gantrys tonight and post more pics.

I spent a couple of hours painstakingly cutting the extrusions and putting the right and left side wheel kits on the gantry plates. The videos that are posted about assembling this are terrific. When putting the wheels together, I simply watched the video, hit pause and put my new found knowledge to work.
I cut the extrusions on a chop saw and then squared them on a belt sander. I took a lot of care to ensure that the measurements were correct and that the ends were square and even. I don't want any more errors than necessary magnified at the end. (Make sure there is no light peeking between the square and the end of the extrusion and you will know it is square)


The aluminum plates I purchased from Chris L. are freakin stellar!!! The fit and finish really stand out when you are assembling them. I thought they looked good when I recieved them. It wasn't until I began to assemble the gantry sides that I saw the real precision that these parts were cut with.


I took a little time to make sure that there was no play in the gantry sides. The eccentric spacers are a really well thought out detail of the design and makes it easy to tune out any play.
Made some more progress today. The only notable things were.
The holes in my steppers are not small enough to thread. I will need to order some M5x.8x12 low profile socket cap screws and accompanying locknuts. The regular height won't work as it will interfere with the machine movement.
I also have a lot of play in the Z axis that I can't tune out with the eccentric spacers. I am using a 2x40 extrusion. I will order a 20x60 and 3 more eccentric spacers. between the two I should be able to tune out the play. Here are some pics.


Got a little more of the mechanical part done tonight. There are some more pics below.
The only real note here is that in the video he talks about a tapping bit from Harbor Freight for tapping the aluminum extrusions. It only cost around 14 bucks. (Don't go cheap here. Get the bit)
I felt like I was going to kill myself after doing the first two. The bit makes the tapping process for the OX manageable. Set your torque setting on your cordless lower to keep you from breaking a bit if it gets away from you a little. I broke one by having the drill torque set on drill. My Milwaukee cordless is pretty snappy for something that runs on batteries.


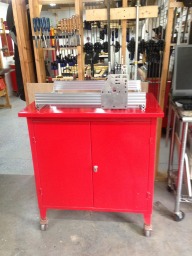
So I have this old cabinet that was in my house when I bought it. I have sanded and painted it.
I am going to dedicate it to the OX and I am going to bolt the OX down to give it more rigidity. I will also mount the controller and computer inside to protect it from chips. I will have to ventilate it with some type of fans.

I had a box from a power supply that has been in my shop for some time. I cut holes in it to accomodate the Gecko G540 and an outlet for my router. I haven't wired it up yet because I am waiting on my emergency switch, but I did mount it on the cabinet.

I am unable to go further on the mechanical part of the build until I get some 15mm screws. I decided to look into how I was going to make the two y axis steppers work. I have all of these pretty red pre-made cables and didn't want to ugly the build up by jumping the cables between stepper motors.
It is amazing what you can do with google. I googled LinuxCNC xyyz setup and found my answer on a Linux CNC forum about three lines down. The solution was to run Stepconf and set ports 8 and 9 to also be y axis and click the box to invert the drive so that both your motors turn in the correct direction. Here is a screenshot of the stepconf setup
Today I got to the point of being able to run some g code and get the OX to go through the motions. LinuxCNC made it easy to get all of the steppers going in the right direction and get everything homed. Here is a video of the first steps.
Obviously there is a lot of little stuff that needs to be done not to mention the whole router mounting and all of the headaches that go with that but I am pumped. Stay tuned.
So.... about the little stuff. It turns out that it all adds up. I have been frustrated for some time with stepper motor timings and whatnot. I thought that I was missing the information that I needed to set up the stepper motors and timings but then after taking a lot of time to sit down and read more of the linuxcnc documentation and fully understanding some of the terms involved I found that I actually did have all of the info.
I highly recommend that anyone wanting to get into CNC build at least one machine. I don't think that I would have been able to understand it as well if I had purchased an off the shelf machine.
Here is an important aid that I found to help me get set up.
A calculator RepRap Calculator - Prusa Printers
Additionally, if you are using the open builds pulleys and linuxCNC you will need to Calculate the inches per revolution to enter into Stepconf. It is actually quite easy once you figure out that you need to do it and that you have the information. Personally I had overthought things and was looking for some kind of spec sheet. All you really need to know is the size of the pulley and how many teeth are on it.
I finally made the first cut using a router. I need to figure out how to calibrate the dimensions but at least I have it cutting![[IMG]](proxy.php?image=http%3A%2F%2Fwww.openbuilds.com%2Fattachments%2Fimg_3839-jpg.13080%2F&hash=ce284dc2f7b1e3e97f47e30817bf9e7f)
Ox with Gecko Controller and CNC Linux
Build in 'Cartesian Style CNC' published by Bmoz, Dec 26, 2015.
This build is the documentation of someone with no experience building the OX cnc machine with a Gecko G540 controller and CNClinux
-
-
Build Author Bmoz, Find all builds by Bmoz
-
- Loading...
-
Build Details
- Build License:
-
- CC - Attribution - CC BY
Reason for this Build
I want to be able to make cool stuffInspired by
The OX CNC Router -
Attached Files:

