
CNC routers have some obvious advantages compared to 3D printers. CNC routers can be used for parts that are huge by 3D printer standards, allowing creators to work on a human scale. Unfortunately, unlike the software tool-chain for 3D printers, an open source software tool-chain isn't obvious for CNC routers. At least, not one that can be used for more than 2D profiles.
For a creator who has access to a CNC router, the cost of software and the risk from closed licensing, is a barrier to realizing their vision. Most should see that anyone with the drive to create should be able to do so, regardless of means. A fleshed-out open source software tool chain is one way to support creators everywhere.
The open source tools are evolving towards the point where there are several useable software tool chains for CNC routers. I want to explore and document those options as part of this build.
For anyone running Linux as their primary operating system (ie. myself), this build should be a boon.
Mechanical Status
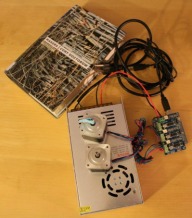
At the moment, I have some computers (desktops, laptops, Raspberry Pis), some Arduinos, a GRBLShield, a couple of stepper motors, and a 24V power supply. Proper stepper motors are on their way from China (to Canada). The computers and Arduinos have allowed me to begin exploring the software for this build.
Software Tool-Chain Status
For CAD, I am proficient in OpenSCAD, FreeCAD, LibreCAD, and Blender (which isn't really CAD). All of these tools have their place in tool-chains, work fairly well, and have healthy communities behind them. They should be considered for any CNC router open source software tool-chain. HeeksCAD is a possibility, but I don't have enough experience to recommend for or against.
Generating G-code from the models in these CAD programs has been interesting and challenging. For 2.5D profiles, MakerCAM is simple, quit popular, supported by the Shapeoko community, and seems to work well. For anything requiring more than simple 2.5D profiles, the choices are BlenderCAM, HeeksCAM, Skeinforge, and PyCAM.
I have experimented with BlenderCAM and it seems to work reasonably well. I seem to have a talent for crashing it, but can usually generate G-code successfully. HeeksCAM looks interesting and parts of it actually underlie BlenderCAM's G-code generation, but I have only just installed it and generated G-code to cut a cylinder using the default settings. I have a fair bit of experience with Skeinforge, but from a 3D printing perspective. Haven't put too much effort into using it for CNC routing yet. Unfortunately, Skeinforge seems to have been abandoned. PyCAM looks interesting, but also seems to have been abandoned.
For the stepper controller, GRBL running on an Arduino Uno is a nice fit and has the backing of large and healthy community, mostly as a result of the Shapeoko project. GRBL is massively popular, not just in the CNC routing community, but also the 3D printing community, where it has been modified to become the Marlin firmware. Although my initial plan was to use external drivers, the expense has turned me off that option. Instead, I have opted for a gShield from Inventables. Assuming I get addicted to CNC routing, a TinyG would make a better long-term alternative, but it is pricey at more than double the price of a gShield.
Sending G-code to GRBL is straight-forward using Universal G-Code Sender. This program is simple and straight-forward to use. Since it is Java-based, it may have a large foot-print, but I haven't checked just how large as of yet. This is a concern if a modest computer, like a Raspberry Pi were to be used to provide a friendly interface to a CNC router. I believe an ordinary terminal emulator, like Minicom, or perhaps even screen, could be used in a resource constrained environment.
Octoprint provides an astonishingly nice interface to 3D printers. Personally, it transformed the use of my 3D printer. Being able to control and monitor a printer from another room can save one from stepper-whine-induced insanity. Something similar would be nice for CNC routers. Luckily, a fork of Octoprint that supports GRBL has been made. It's development seems to have been quiet of late. Perhaps it is reaching maturity. It has definitely not been integrated into the main Octoprint code-base.
Michael pointed out the Chilipeppr project, which looks similar to Octoprint, but with better support for CNC routers. It seems like it can run on a Raspberry Pi connected to the Arduino Uno running GRBL, since the heavy-lifting for the interface is handled by the web-browser. Very interesting.
Assembly Videos
These are indexes into the OX assembly videos. I find the OX videos to be excellent, but painful to search through for that particular bit of information that is holding up my build. As I'm watching the videos, I'm building up the following indexes:
Mechanical Build
Electronics Build
- Introduction to the OX - 0:14-1:25
- Assembling the gantry plates and wheels - 1:25-6:00
- Adding motor to the gantry assemblies - 6:00-9:14
- Adjusting gantry assembly eccentrics to fit 20x80 rail - 9:14-11:28
- Back of X/Z-axis assemblies - 11:28-19:39
- Front of X/Z-axis assemblies - 19:39-28:20
- Initial adjustment of X/Z-axis assembly eccentrics to fit 20x60 rail - 28:20-30:48
- Installing ACME block on X/Z-axis assemblies - 30:48-31:38
- Z-axis motor assembly - 31:38-34:32
- Fastening Z-axis motor assembly to 20x60 rail - 34:32-35:45
- Initial insertion of Z-axis ACME rod - 35:45-36:28
- Assembling the Z-axis assembly from the motor assembly and the gantry assembly - 36:28-38:10
- Final fastening of Z-axis ACME rod - 38:10-45:36
- Installing the motor into X/Z-axis assembly - 45:36-46:56
- Tapping ends of frame rails - 46:56-49:40
- Mounting the gantry assemblies to frame - 49:40-59:24
- Attaching corner brackets to gantry assembly and final adjustment of X-axis movement - 59:24-1:03:42
- Attaching 20x40 circuit-board cross-brace to the gantry - 1:03:42-1:07:19
- Inserting Y-rails into the gantry and attaching the front and back table supports - 1:07:19-1:16:47
- Inserting the center table support - 1:16:47-1:21:25
- Adding the missing corner brackets to the back of the main gantry rails - 1:21:25-1:23:32
- Installing the belts for Y-movement - 0:09-10:58
Note that the descriptions I've used here are pretty embryonic, and might be inaccurate or meaningless. As I work through the videos, and explore the SketchUp models, I'm going back and improving the descriptions.
- Installing Arduino and GRBLShield into the electronics enclosure (complete with fan) - 10:58-19:45
TODO
Continue indexing the OX Youtube videos. At the moment, it is painful to hunt through for the details of a particular construction detail.
Measure the foot-print of Universal G-Code Sender compared to something like minicom.
Check what the deal is with the GRBL-enabled fork of Octoprint. Why is the project so quiet? Has development ceased because it works?
OS OX
Build in 'Cartesian Style CNC' published by Rural, Nov 15, 2014.
Mechanically, a scaled up OX build (1500x1500). Electronically, GRBL on an Arduino and a gShield. From a software perspective, the focus is on useable open source software tool chains.
-
-
Build Author Rural, Find all builds by Rural
-
- Loading...
-
Build Details
- Build License:
-
- CC - Attribution - CC BY
Reason for this Build
To explore an, as near as possible, open source CNC router.Inspired by
Shapeoko, the OX. -
Parts list
Qty Part Name Part Link Comments 1 TOSDuino Uno R3 http://www.tinyosshop.com/index.php?route=product/product... Link An Arduino Uno R3 clone. Have had good experiences with these at almost half the cost of true blue. 1 gShield https://www.inventables.com/technologies/gshield Link Should work fine with the steppers spec'd for an OX. A TinyG would be a better (and pricer) alternative. 1 24V 15A power supply http://www.ebay.com/itm/351105796408 Link Make sure to select the 24V 15A (350W) part. Cheap. No on/off switch. Seems to work fine. 1 NEMA 17 Stepper Motor, 70 oz-in, 4-lead http://www.ebay.com/itm/130829857263 Link About the right size. Cheap. Shipping doubles the price. Same seller as the NEMA 23 motors (saves shipping). 3 NEMA 23 Stepper Motor, 185 oz-in, 4-lead http://www.ebay.com/itm/140902535471 Link A little more powerful than in the OX specs, but should work fine. Cheap. Shipping doubles the price. 1 600W spindle and power supply http://www.aliexpress.com/item/CNC-600w-Air-cool-Spindle-... Link Recommended on the Shapeoko forums. (Haven't bought this yet.)