The first requirement for my huge CNC router table was that it had to be transportable - therefore easy to put up and take-down. I wanted a timber frame that would support just the spoiler board,

The dimensions of the frame were such that the cross-pieces support the table approximately 1/4 and 3/4 along the length of the (long) Y axis.
Because this table was originally designed to be used in my garage (which has a sloping floor) it was important I put in a mechanism to level the bed. If you look carefully, I have put adjustable feet on all four legs of the timber frame,

so that the frame can be put into its' final position and levelled horizontally with a spirit level. As I live out in the countryside I had to build this table on my own, so I had to think carefully about the order of the build as I had no help with lifting. Next, a series of holes were marked out across a standard 8'x4' chipboard and hand-drilled at 20cm intervals for attaching a series of ribs to the spoiler board,

I used a countersunk drill bit (with a depth guide to avoid making the holes too deep) for 12mm M5 bolts and t-nuts. The nuts were loosely threaded onto their respective bolts, and each rib was basically slid along the nuts from right to left,

Despite being such a large table, it was then a simple matter to position the bed up onto the frame (even on my own!)

At this stage, the ribs are not exactly square - a simple tap with a soft mallet was sufficient to gently knock each rib (left or right, millimeter by millimeter) into position - checked by attaching a v-slot end-piece and carefully inspecting each joint to see how closely the rib meets the end piece,

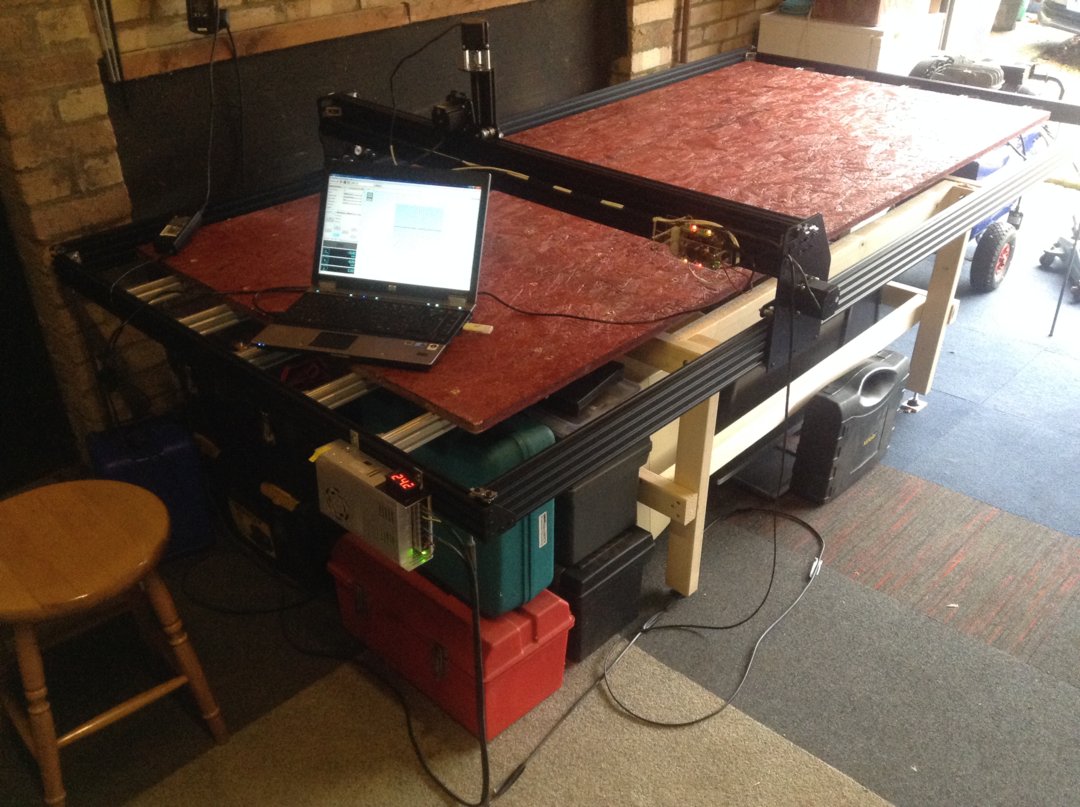
At this stage, the bed was thoroughly checked for squareness - on both diagonals - and then the bolts were all tightened up. The bed was now all square and steady, allowing the level to be checked again. Next, the other end piece went on, and I was ready to put on the sides. However, this was not as easy as it sounds - the (X axis) gantry has to go onto the (Y axis) sides, before the sides can be properly attached to the bed. The gantry was already pre-assembled, using the extended height (Z axis) ox build. This photo shows the 2-meter long 80x20 v-slot sides being lined up together with the gantry, before assembly,

The two (long) Y axis v-slots are attached to one end, and the gantry assembly slid on from the open end and pushed up the table, and then the other end attached. I had to do some 'fettling' as the gantry needed to fit the width of the Y axis side pieces. At this stage, the bed was now properly attached to the sides, and the gantry freely running up and down. However, one of the issues I knew was going to happen was the weight of the gantry (plus router etc) would cause the table to distort. Again, if you look carefully, I have added four metal tubes at each corner, attached to a simple nut-and-bolt arrangement to make fine height adjustments,

It is these four rods that give the table its' ultimate geometric stability. The table was not intended for fast gantry motion and so side-to-side wobble was not going to be an issue (otherwise I would have bolted the table to the wall!)
The final build included tightening up of the GT3 belts, adjusting all the eccentrics, the wiring up of an xPro controller to the steppers and a 24V power supply. As it happened, my first attempt at using Mach3 ended in failure (note: Mach3 does not interface to GRBL). However, Universal G-Code worked a treat first time - I even got the correct directions and stepper distances for all 4 steppers first time. Setting the microsteps to 1/32 was more than sufficiently accurate for my needs. At this speed, the motion of the gantry is quite slow. After two or three trial cuts, the table was found to be rock solid - job done!
As you can see, the spoiler board fits well within the footprint of the bed - which allows me to clamp the workpiece easily around the edges. The 'overhang' at the ends also allows me to cut right up to (and across) the edge of the workpiece, if needed. As you can see, the space underneath the table also allows me to store all my tools and accessories,
All in all, a simple solution. I was well pleased with the overall result - a low-cost and accurate table. My initial concern about the table movement turned out to be unfounded. Plus, the table can be easily dissembled and moved.
By the way - if you want to know what I'm working on - I design doors!
Opening into doors
Build in 'X/Y Table Style CNC Mill' published by ShockingTops, Jan 29, 2018.
Construction of a CNC table for a specific project that could cut an area larger than a door (>8'x4'). Much thought went into how to avoid the weight of the gantry bending the (long) Y axis, whilst still keeping down the complexity and cost.
-
-
Build Author ShockingTops, Find all builds by ShockingTops
-
- Loading...
-
Build Details
- Build License:
-
- CC - Attribution - CC BY
Inspired by
Big up's to Ox (RepRap 3D Printer Parts Supplier - V-Slot CNC - Ooznest) -
Parts list
Qty Part Name Part Link Comments 5 2.64m 60x20 V-Slot http://ooznest.co.uk/V-Slot/Linear-Rails/V-Slot-Linear-Ra... Link Ribs (placed underneath spoiler board) 2 2.64m 80x20 V-Slot http://ooznest.co.uk/V-Slot/Linear-Rails/V-Slot-Linear-Ra... Link Sides (Y axis) 2 1.32m 60x20 V-Slot http://ooznest.co.uk/V-Slot/Linear-Rails/V-Slot-Linear-Ra... Link Sides (X axis)
