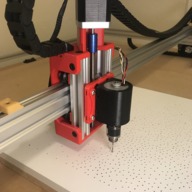
This is a Z-Axis for OpenBuilds ACRO system. I designed it with a few key requirements in mind:
I am very happy with how it turned out and I hope you like it too.
- has to be sturdy enough to able to carry a small drill. I drill small holes (2mm in diameter, 15 mm deep, plywood / MDF) with it. This was very important to me. This is why I tried to get the drill to be as close to the 20x40 bar as possible.
- simple tool changing. For example, I want to quickly go from using a drill to using a laser.
- should not deviate from original ACRO design too much
- most parts should be be 3D-printable or easily sourceable.
Here's a brief story about how I built it:
Step 0 — Design process.

This z axis was primarily designed to carry a small drill, so my main goal when designing it in a way that would get the drill to be as close to the center of the 20x40 extrusion as possible. I think this design gets as close to that goal as possible if we're talking using openbuilds hardware.
Step 1 — Cutting the extrusions.
So to give you some context, I'm doing all of this in a 1 bedroom apartment and I don't have any large tools. So my best option was to use a hacksaw (btw I didn't have a hacksaw either so I made one).
To make the cut as good I could, I used a modified extrusion cutting jig designed by Grégoire Saunier.

The shortest profile you can get is 250mm and the size I needed 2 parts at 124mm. So I figured I'd just cut them in half using the jig and they would come out perfect. I was wrong of course — parts looked good after the cut but were not equal lengths. So I made this other little jig and finished the job with a file.


That got the job done well.
Step 2 — Printing the parts.
Printing all the printed parts was pretty straightforward, except for the biggest one — the shell. That part has a pretty large surface and it warped during the process. I wasn't too bad so I ended up using the warped part, but if was printing it again I would have probably added some brim.
Step 3 — Assembly.
Unfortunately, I don't really have pictures from the assembly process. It's pretty straightforward, you just put things together in the right order — nothing too complicated.

Final results.


OpenBuilds ACRO Z Axis
Build in 'Laser Cutter Builds' published by petethepig, Jun 3, 2019.
Z-Axis for OpenBuilds ACRO system. It is sturdy enough to carry a small drill.
-
-
-
- Build Progress:
-
- Build Complete!
Jose L Cuevas, Tobias Fletcher, hardly and 28 others like this. -
-
Build Author petethepig, Find all builds by petethepig
-
- Loading...
-
Build Details
- Build License:
-
- GNU (GPL3+) General Public Licence
Reason for this Build
I needed a z-axis for my ACRO build to drill small holes. -
Parts list
Qty Part Name Part Link Comments 2 V-Slot® 20x20 Linear Rail Link Length: 124mm 1 8mm Metric Acme Lead Screw Link Length: around 140mm, depends on the motor 3 Screws M3, Length: 35 - 40 mm. Link This one also depends on the motor 1 5mm to 8mm Flexible Coupling Link 4 Aluminum Spacers Link Size: 3mm 2 Precision Shim - 10x5x1mm Link 8 Low Profile Screws M5 Link Length: 35mm 4 Low Profile Screws M5 Link Length: 10mm 12 Tee Nuts - M5 Link 4 Self Tapping Screw Link 1 Nut Block for 8mm Metric Acme Lead Screw Link 2 Eccentric Spacer Link Length: 6mm 2 Aluminum Spacers Link Size: 6mm 4 Xtreme Mini V Wheel Kit Link 4 Low Profile Screws M5 Link Length: 27mm 2 Low Profile Screws M5 Link Length: 25mm 4 Screws M4 Link Length: 12mm -
Attached Files:
-

