Some Background
I started building my first CNC device around 2008.
(More pictures on my blog CNC Router Progress | David Lively's Blog. All of the videos are on youTube. Playlist at My DIY CNC Build - YouTube.
I bought some 282oz NEMA23 motors and drivers from eBay, a C10 parallel breakout board and unsupported linear rail. I got as far as getting the X and Y axes set up before running into some issues with the Z - as in, how to make one, and a pre-built Z wasn't in my budget at the time.
About the same time, I met my lovely wife, and shortly thereafter, had our first son. So, all of the parts went into boxes and sat there, mostly forgotten, until late 2017.
We now have four kids, and that's too many for the small circular dining room table we'd been using for years. My father's neighbor had taken down an old red oak tree the year before and, in typical Bruce fashion, had it hauled to the local saw mill and quarter-sawn. That wood sat for a year.
Practical upshot? I had access to a ton of quarter sawn red oak, 3" x 12" x 10' long, for the price of some beer. (This stuff would costs thousands of dollars, if you could find it.)The problem with rough lumber, though, is that it needs to be planed and jointed before you can really do anything with it.
I don't have access to a planer. So, out came the linear rails.


That worked out really well once I figured out how to process stock that was longer than my work bench.


The CNC would have helped here. There's no metal of any kind in the table, and I had no idea how to do any sort of joinery before I started this project. A year and a half later, the top still isn't glued together - and it works fine.
Of course, now what this thing needed was a Z and some motors!
Version 1-2
Lots of things have changed in 10 years. For instance, not every computer has a parallel port. Fortunately, in the same box as the motors, etc., I found an old Thinkpad T42, with its docking station. That had been in the box for about 7 years, I think.
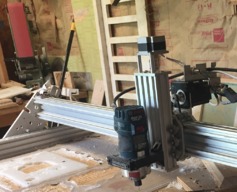
So, I went ahead and built out the rest of the machine using a combination of scrap 1/4" aluminum, plywood and Walmart plastic cutting boards.
That was hideous, but it moved - at least in X and Y. I wasn't really sure what to do about the Z. Eventually, I wound up making some motor mounts out of red oak scraps and cobbled together a linear actuator from a cheap "optical stage" kit from Amazon.
I still didn't have a way to mount my router, and the 400W spindle I have is pretty weak. So, I used a 1/8" drill bit (yes, really!) to "mill" a router mount out of some plastic WalMart cutting boards. I cut three identical 1/4"
pieces and screwed them together. Necessity is the mother of invention...
Version 3
I wasn't happy with the plywood, and removing the spindle from the machine was a horrendous pain. At this point I started to learn a little bit about the challenges of mechanical design, and swore to never again curse the engineers who placed impossible-to-remove bolts on my car. (That resolution did not withstand the next major maintenance task on my track car.)
So, I made new plates for the Z and gantry out of 1/4" and 1/2" aluminum plate:
And I built a torsion box, since having the whole thing taking up my workbench all the time was inconvenient.
Version 4 and 5
At this point, I came to the conclusion that the unsupported linear rail had way too much flex in the middle of the gantry, and having the gantry sides connected under the table cost too much travel.
So, I caved, ditched the linear rail and bought a ton of toys from OpenBuilds, including c-beam extrusion, a bunch of wheels, and carriage plates. At this point, I replaced the threaded rod drive system with chains and lead screws.
That lasted about a week, before I succumbed to temptation and just replaced all of the rails with c-beam. I used my OB MiniMill to make most of the end plates for the c-beam, and did the rest on my drill press and miter saw. I re-used the 1/2" AL gantry end plates from the previous build, at an angle of about 45 degrees. I also decided to make the long side of the machine, with the two Y axis rails on the short ends of the table. This lets me slide 4' stock into the machine. With some alignment pins, I could cut an entire single sheet of plywood or MDF in two stages.
Finally Making Suff!
At this point, the machine is pretty reliable and accurate. So, I decided to make a plexiglass box for my CNC xPro (LOVE that board). I ran into some issues with the A axis driver shutting down. I rewired the motors as bipolar parallel instead of series, which reduced the load on the board. I haven't had any issues since.
Prototyping the panels from 1/4" plywood:
And, the box:

I need to do some cable work, but everything works on 2D cuts. I'm having an issue with 2.5D cuts where the Z occasionally stops for ~200ms. I've ordered a stronger motor for the Z axis; we'll see how it goes.
Update 2018-09-16
I replaced the tiny Z motor with a larger 282oz model, and my Z issues are fixed. Thanks to the forum for the insight.
NotAnOx
Build in 'Cartesian Style CNC' published by Techvette, Sep 16, 2018.
From plywood and linear rail to c-beam. I probably should have bought a kit.
-
-
Build Author Techvette, Find all builds by Techvette
-
- Loading...
-
Build Details
- Build License:
-
- CC - Attribution Share Alike - CC BY SA
Reason for this Build
Fun.Inspired by
Although I did not see the Ox before I started this, the design gradually converged to something very similar.