Mechanical Build
Purchased an xl version of the cnc kitset c- beam . July 2017
Purchased a 4 axis motor stepper kit set complete with
2x dc supplies 36VoltElectrical Controls
4x stepper drivers
4x nema 23 motors
1x mach3 breakout board (parallel version )
Purchased a Dell optiplex 755 completeBegin assembly of c beam following step by step instructions - August 2017
Purchased a Dell optiplex 755 case only
Purchase win 7 pro license for above.
Down loaded trial version mach 3
Down loaded trial version Inkscape software
The Dell had a license to the school that sold it so I had to reformat the hard drive and load a legitimate win 7 pro.
The Dell case was a stroke of luck as it provided a faraday cage to house and protect the controls from unwanted noise (spikes).
Cables - I was able to make use of a lot of cable and materials I had in my shed. Any sundry and extra items have been source through local market in New Zealand
this part of the build was really good as long as i followed the instructions precisely but I had to back track a couple of times after I decided to wing it on my own.
Thank you for clear instructions , they saved my life!!!!!.
A welcome break was when I thought I'd see how the controls fitted into the dell case. This started when I stripped out the mother board and power supply and cd player.
It was not long before I realized that I could not wire up an partly finished build, so returned my efforts back to the c beam assembly and the trolleys. .
A warning here - I was often times caught up in the build to the detriment of my garden and lawn.
Safety Circuit
I purchased limit switches and emergency stop button, and was able to build a led array to show status along with a reset button to reinstate the safety circuit. I used an 8 channel relay board of arduino fame to interface the 5 volt inputs and the 24 volt safety circuit.
I used a buck converter c/w voltage display to reduce 24v to 5v dc for input relays and circuit
The above safety circuits were housed within the Dell empty drive enclosures and kept away from the motor circuits.
Dc to Dc conversion
An extra I didn't forsee, was the mismatch of dc voltages of the supplies at 36v when drivers and break out bout required 24v dc.
5x buck converters c/w display , with adjustable output ,input range 0-37v dc.
The live commissioning was delayed when I realized that the 36 volt dc supplies that were in the kit were incompatible with the stepper drives 24v input, this was causing the drivers to shutdown under over voltage protection. To make good and not waste the 36v supplies I have invested in another 5 buck converters for $16.00 each ( which was the cheapest remedial option).
Date 4-11-2017 - Have taken time while waiting for buck converters to arrive to get some records down here.
The interesting stuff is to come.
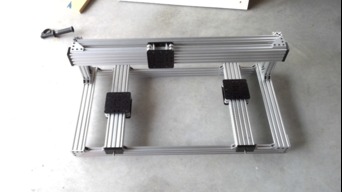
my version of xl
Build in 'X/Y Table Style CNC Mill' published by Kiwi Kevin, Nov 5, 2017.
A table top version of the open build xl router kit set build. This use of c - beam and xl kit set was coupled with Mach 3 controller running on Dell opti -plex 755 and win 7 pro licence. A Dell opti-plex 755 empty case was used to house the controls and wiring , including the limit switch and emergency stop safety circuits
-
-
Build Author Kiwi Kevin, Find all builds by Kiwi Kevin
-
- Loading...
-
Build Details
- Build License:
-
- CERN (CERN-OHL1.2+) Open Hardware Licence
Reason for this Build
needed doingInspired by
An article promoting a build using wood and mdf for a frame -
Attached Files:
-


