Hello,
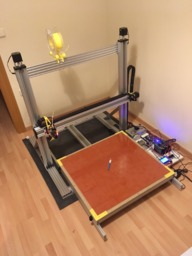
Here is my very first build. I named it Hebus.
It is a large printer, to build large parts for a big ambitious personal project. Maybe I could have gone the CNC route (not sure), but the idea of building a 3d printer was simply more appealing to me.
I started thinking about this printer about 18 months ago, looking for ideas to build a large printer. I started building it mid-February, and got my first (really bad) print mid-April. Now, the prints are much, much better, although still not perfect (but I’m a bit of a perfectionist).
I was (and still am) a very beginner in the 3D printer world with no knowledge whatsoever. And you will see that my printer have limitations. Please, propose ideas for improvement (as long as it doesn’t cost me my last kidney) !
What I was looking for was a large, easy to build printer (“Lego style” assembly) with the minimum custom parts, and the maximum parts available on one store (to avoid having to search for parts for hours/days on multiple stores). Plus, I was looking for reliability, accuracy, and repeatability. Not so much speed, although the goal was 50 mm/s printing speed.
I found great ideas on Openbuilds, but the design that caught my eyes was evilc66’s design : easy to build/assemble, no belt to deal with (yep, dealing with belts, pulleys, tension,… was worrying me a little), burly chassis, and most hardware parts on one store!
So I stole his design, and scaled it up a bit. Basically, I went from 500mm C-beam linear actuators to 1000mm ones.
Of course, because of the size, I had to make a few changes, mainly on the Y axis. I have now a carrier that rolls on two 1500mm rails, while motion is still ensured by a 1000mm C-beam actuator.
The result is a big printer with a 700x700x700 mm^3 build volume. Note that I can go higher, probably 800mm, and with a few design tweeks, I could go slightly larger or longer. But I do not need more than that for now so I’m happy with it.

The Y carrier consists of a frame made of V-slot rails, a 10mm thick wood board, and a 5mm thick borosilicate glass, with a silicone heatbed stuck underneath (more on that later).
Yes, this carrier is big and (very) heavy. And yes, it poses problems. As many people expect, I have ghosting problems on the Y axis (the waves we can see on the picture below)

I’ve done a few modifications on the Y-axis to try to suppress this defect.
The first one was to switch from a regular C-beam gantry with one anti-backlash nutblock, to a XLarge gantry with 2 regular nutblocks. It did help a little (maybe because I didn’t set the anti-backlash properly in the first place ?).
The second one was to stabilize the 1000mm leadscrew with additional bearings. So I designed and printed a part with one bearing inside, and mounted one on each side of the screw :

The ghosting effect is still present, but reduced:

Now I am running out of (simple) ideas to reduce this phenomenon, without compromising acceleration or speed.
The best way would probably be to reduce the weight of the Y-carrier, but I don’t really know how. I can’t change the heatbed or the glass (which weighs 6kg alone!). Maybe get a thinner and lighter board, or changing the design of the aluminum frame.
Another way would be to add a second 1000mm C-beam actuator. But I am really not sure it is going to work, and it is an expensive bet.
The cleanest way would probably be to change the entire design and have the hotend move along the three axis, and not only X and Z. But this is a major modification that I am not really willing to make. I’d rather decrease acceleration or speed (although not really happy about that).
Regarding electronics, I have a 24V power supply, Rumba board running with Marlin v1.1.5, Nema 23 motors running with M542 external stepper drivers, e3d Titan direct extruder and v6 hotend, BLTouch auto bed leveling sensor, 220V 2500W silicone heatbed controlled by a Fotek SSR-25DA. All this is mounted on a simple wood board. Wiring was quite nicely done at the beginning, but with repairs and modifications, it got a bit messy.

Note that I am using a PID setting for the heatbed ! Yes it is scary with all that power (220V 2500W), but so far it works well. Please, tell me if there is a major risk of failure (or worse: fire) using this method.
Why do I use PID ? Because I was having a problem of bed “breathing” when I was using the regular bang-bang setting. Basically, every time the heatbed would be powered on/off, the whole bed would slightly raise. While the movements were minor (tenth of millimeter magnitude), it was enough to mess with the layer height and have really bad quality prints.
I printed a few parts to make the wire chains run smoothly :


I am thinking of upgrading to TMC2130 stepper drivers (yes, because I saw Tom’s video) to decrease the noise of the printer (because my apartment is really really badly soundproofed), and to get all the smart features of this type of driver.
I just don’t know if it will be able to handle the Y-axis…
This is where adding a second 1000mm C-beam actuator would be interesting as well (the Rumba board has enough room to have two stepper drivers for Y)…
What do you think?
To conclude, I wouldn’t choose this design if I had to do it again. It is not suited for large printers, because of the Y-axis carrier. However, I have no regrets : I started this build without any knowledge, and because it was such a simple design, I got it to work quite well. Not perfect for sure, but well. And I am trying to getting it perfect.
This build was (and still is) a very exciting project! I am learning a lot thanks to it. I put it as “Build Complete!”, but we all know that a 3D printer is never really finished.
For the beginners out there, note that this is not a cheap build. It’s in the ballpark of 2000€ (but prices for Openbuilds parts in Europe are up to 25% higher than in the US, I had to buy some tools, and I made some mistakes and bought some useless stuff that increased unnecessarily the final cost).
My first printer
Build in 'Cartesian Style Bots' published by Jacques D, Dec 13, 2017.
My first printer! I went for a simple cartesian design, based on evilc66 one. It uses 1000 mm C-beam linear actuators. The build volume is 700x700x700 mm^3.
-
-
Build Author Jacques D, Find all builds by Jacques D
-
- Loading...
-
Build Details
- Build License:
-
- CC - Attribution - CC BY
Reason for this Build
I need this big printer for an ambitious personal project. Building this printer was a project within the project, and it was fun!")
Inspired by
My C-Beam 3D Printer