
This is a work in progress, I am still in the design mode...
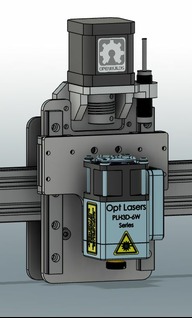
I am building a OpenBuilds ACRO with an OPT laser head that I have taken off on another machine. I would like to have a somewhat portable machine that is easy to put away when not in use. I have designed a compact z-axis with just enough travel to make focusing and working with different materials easy.
The the z-axis back plate is made from 4mm aluminum plate with mgn12 rails. This is driven with a nema 17 motor and lead screw. I have notched the back plate and mounted the motor on a 3d printed mount in order to keep the whole assembly compact.
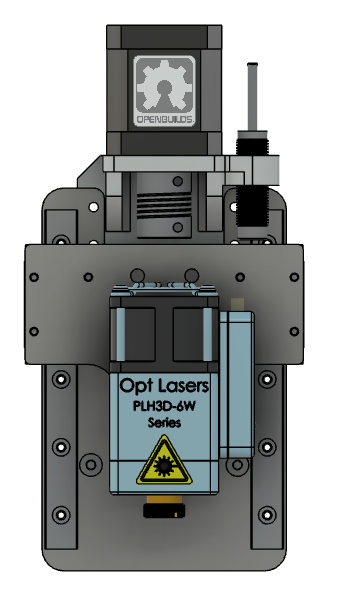
The motor mount also includes the provision for mounting a inductive limit sensor that is triggered by the laser mounting plate.


I have made a few of the plates needed for the build. I had some 4mm aluminum plate left over from another project so I am using it up. I know that the acrylic plates from openbuilds would work perfectly but I guess I thought this would look cool. Here are some detail about how I go about cutting these plates.
First I start out with my plates laid out to fit the stock I have in Fusion 360. If you properly set up the stock size in Fusion this makes the whole process go smoothly. The origin is set to the lower left at the top of the stock. I do an XYZ probe at this point using the tool that is set up for my first operation.

My first set of operations is to bore any holes and 'interior' features in the plates with the plate clamped to the waste board.

After the first operations I now have holes to secure the stock to the waste-board. I prefer screws to any type of adhesive work-holding.

Next I do the contour cuts around the perimeter of the part. If this requires a bit change I only probe my Z I do not touch the X or Y.

If I want a chamfer on the parts this would require a tool change and a Z probe. When chamfering I do all of the parts from the setup on the first side. Then I flip and chamfer the parts individually using clamps to mark the parts position as I flip it.
I want to be able to easily store this machine so mounting the controller and power supply on the machine seems like the way to go. I also want a to have a spot for an easy power switch, laser arming button and lights. So I am planning on building sort of a control box and panel on the side of the machine. This would put the lights and buttons to the left of where I would normally stand when operating the machine. This would look something like this.


The control panel will be a 3d printed part that attaches to two 20x80 extrusions to form a box. I will close the sides of the box with some acrylic panels.


This is a work in progress so please check back as I will be making updates as I progress with the build.
My ACRO Build
Build in 'Laser Cutter Builds' published by that-jim, Jun 7, 2023.
An ACRO laser put together with some repurposed and some new parts.
-
-
Build Author that-jim, Find all builds by that-jim
-
- Loading...
-
Build Details
- Build License:
-
- CC - Attribution - CC BY


