
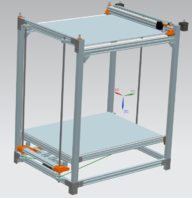
This build is based off my InDoreXY build that I designed a while ago, that is just narrow enough to fit through a doorway, but never bought the parts for. Hopefully this one actually goes somewhere, and now I'm almost ready to buy the parts. I've made several improvements (hopefully) to that design, but I'll describe it from the ground floor.
I'm naming it "Mushu" after the mini dragon thing from 'Mulan'...because a lot of the parts are from China….and it's a great movie.
-It has roughly at 20x26x28 inch build volume
-CoreXY design
-Uses 2040 Aluminum Extrusion
-Zesty Nimble Extruder (Remote Direct Drive) + E3D V6 Hotend (no knock-offs here)
-Duet 2 Wifi Controller Board
-Uses MGN Guide Rails (knockoffs) for linear motion
-2x Nema17 65ozin motors for X-Y motion
-10mm belt for X/Y axis
-1x Nema23 165ozin for Z motion
-6mm belt for Z axis (couldn't find an inexpensive wider one in the length I need)
-Z-Axis (bed raise/lower) is done by 3x 12mm Lead Screws, using Ball Transfers to move the bed vertically, but decoupling it in the X/Y plane. This will hopefully eliminate 'Z-Wobble'.
-2x MGN Guide Rails along 2 vertical frame pieces will hold the bed in X/Y plane.
-The bed will have a full frame underneath it and consist of thin glass on top of 1/8-1/4in thick Aluminum. The Aluminum will rest on 1/4" PTFE to insulate the Aluminum frame from the heated bed.
-100ft of NI80 wire connected to mains with a thermal fuse, Ammeter, and 600W Dimmer switch to control the current/temp. A SSR will be controlled from the Controller Board. The Wire will be separated into 3 Zones so the entire bed does not have to be heated.
-The bed will have about 1/3" easy manual adjustability.
-I plan to counter-weight the bed with some frame-wire and an exterior (probably wood 2x4) frame to help keep much of the weight off of the Lead Screws and Ball-Transfers (I worry that the brackets may bend)
-To combat warping due to thermal growth of the bed I'm...letting the bed grow. I'll be screwing the glass+aluminum to the bed-frame in one corner. Along 1 X-Axis side there will be one plate/guide to keep it from rotating that direction, and the same along 1 Y-Axis side. Therefore it will be fully constrained but allowed to grow away from the screw. Ball Transfers may be used to clamp the aluminum and glass to the bed-frame, along the edges. These will still allow the plates to move/grow, but keep them down and flat as much as possible.
What is NOT shown in the Images:
-Sheet metal and Plexiglass Sides
-X/Y Belts (Z is shown as a line sketch)
-Extruder Motor and Flex-Cable
-Wires
-Some of the Pulleys are incorrect since I haven't reverted all of them in the model from 6m to 10mm
-Glass sheet on the Aluminum sheet
-Ball Transfers "clamping" the glass/aluminum to the bed-frame
-Plates preventing the bed from rotating, and forcing it to grow in the correct X/Y direction, thermally.
-Shroud for the 5015 Part/Nozzle Blower; I haven't designed this yet and don't have enough room for the Diicooler.
Mushu - Large Scale CoreXY
Build in 'H-Bot and Core XY' published by Shortyski13, May 6, 2019.
20x26x28 inch Build Volume CoreXY. Unlike many builds, I've decoupled the XY movements from the Z-Axis lead screws to help prevent Wobble, will be using linear guide rails, and mains powered bed heater, and a bed that is Allowed to thermally grow. This build is JUST narrow enough to fit through a standard sized doorway.
-
-
Build Author Shortyski13, Find all builds by Shortyski13
-
- Loading...
-
Build Details
- Build License:
-
- CC - Creative Commons Public Domain (CCO 1+)
Reason for this Build
For Fun


