
This build should be pretty straightforward, as most of the parts are just laser cut and glued/assembled. There are a couple of 3D printed parts as well, but they are simple and mostly enhancements. The electronics can be a bit complex if you want a more professional setup.
However, if you just want something that works, the same can be achieved with a breadboard and some wire nuts (I assembled it this way before making the custom PCBs), as long as you follow the circuit schematic.
MDF 3mm:
MDF 6mm:
- Inner Box
- Inner Box Structural Support
- Outer Box
The machine is composed of one box inside the other.
- Plastic Frame/Tray
- Inserts
One thing that you'll probably need to change in the design if you're not from Brazil, is that you'll need to change the size and/or shape of the holes for the sockets (at the side and back of the machine). I included the original files (from Affinity Designer), as well as SVGs and PDFs, so you can change them freely to fit your needs. You'll also need a large-format laser cutter to cut a lot of the parts, I used a makerspace for this.
Note: I didn't include all the cables needed to assemble it, but be sure to use one that can handle at least 10A for the AC part of the machine, and be safe when dealing with electronics and any heat source of your choice.
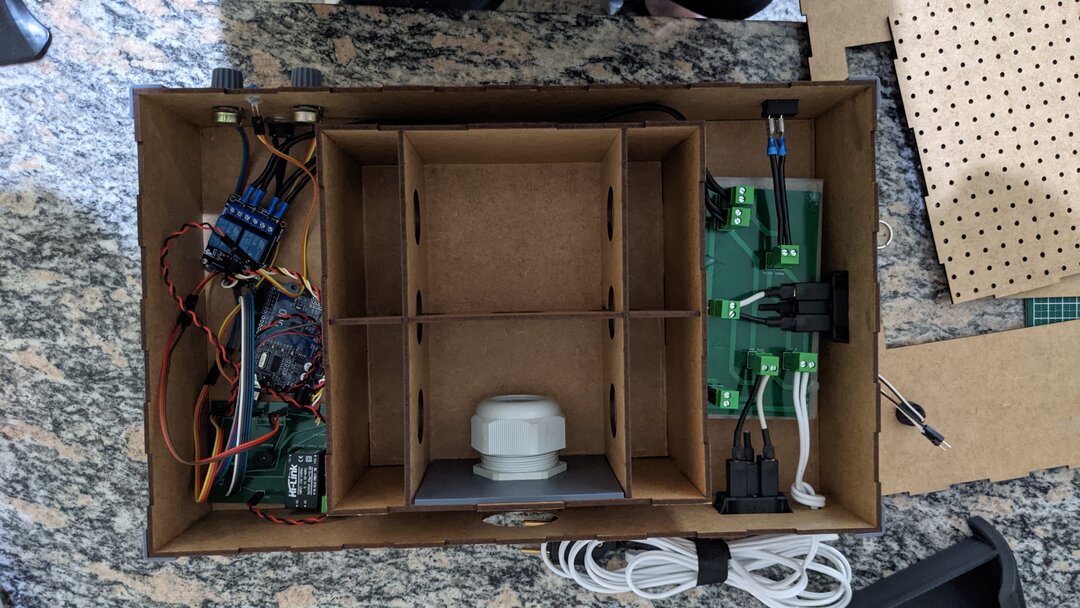
The first step is to assemble and glue each box separately, making sure NOT TO glue the lids. After that, you can assemble the inner box's structural support, place it inside, and attach the cable gland as shown in the picture. The gland makes it so that the shop-vac hose attachment is adjustable.
Apart from that, it is also a good time to glue in the insert with a hexagonal hole, because it keeps the gland from rotating as you screw the cap to adjust it. After that, you can close the inner box and that part is good to go. If you don't want a "smart" vacuum forming table, you can even stop the build here, and you'd have an elegant and adjustable mini vacuum table. The outer box is mostly done as well, apart from all the electronics and 3D printed parts (I'd say to print at least the little corner feet thingy).
There is an insert with a rectangular hole, that should be placed inside the outer box. It is used in order to keep the inner box in place. At this point, you can already place one box inside the other.
Attaching the electronics to the MDF box should also be pretty simple if you got the same ones from the parts list, but you'll need some hot glue here and there. Just take a look at the drawings, pictures (I included a makeshift manual in the files with lots of pictures, although it is in Brazilian Portuguese), and the size/shape of the holes.
After that, you can flash the code to the Arduino, place it inside the machine, and connect everything following the schematic. Cable management can be though since space is constricted. This part is much faster if you made the custom PCBs, but you'll have to solder quite a bit. After this, you can close the lid, and the outer box is done as well.
Last but not least, to assemble the plastic tray you just need to glue the two trays you cut, to get a 12mm thick tray. I also lined the square hole in the middle (as well as the square frame) with some foam to help hold the plastic. To install the clamps a bit higher than the tray itself, I used the 6mm rectangular parts that we cut to make the handles of the tray and some M3 bolts, nuts, and washers to secure them. Inside this same file, there are also some large forks I made to lift the tray above my heat source, but you'll probably have to test and see what works for you.
And there you have it! Your bivolt, desktop, modular vacuum former!
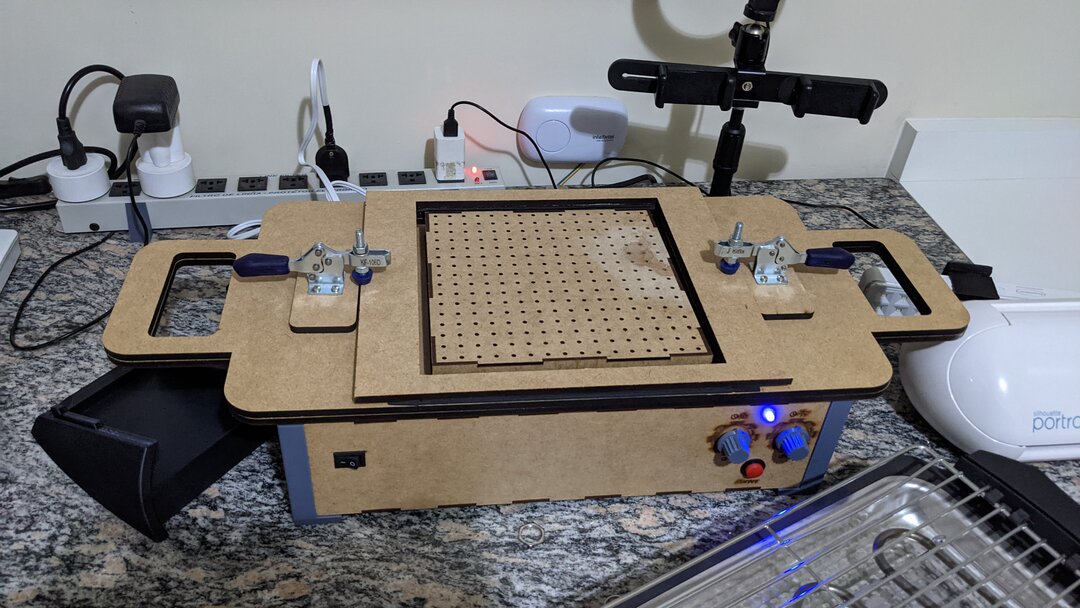
Modular Desktop Vacuum Former
Build in 'Small Vacuum Former' published by lekey, Nov 24, 2021.
This is a small desktop vacuum former that can be connected to a shop-vac and an electric heat source (like a grill for instance). You can control the time each appliance stays turned on, and the vacuum is automatically turned on when the tray is placed on top of the model. The vacuum table is 20x20cm wide, and I've tested it mostly with 1mm thick PET sheets.
-
-
Build Author lekey, Find all builds by lekey
-
- Loading...
-
Build Details
- Build License:
-
- CC - Attribution Share Alike - CC BY SA
Reason for this Build
I think vacuum forming should be broadly available to everyone, since it is a simple process that can be very useful. Currently, it's easier to find a crazy expensive industrial machine than a portable desktop version, so a lot of people build their own.Inspired by
Adam Savage, Bill Doran, Bob (from ILTMS), Mayku Formbox -
Attached Files:
-
Attached Files: