This is a build I made a year ago to laser engrave anodized aluminum parts for a new premium desk fidget toy that I brought to market. Please take a look at www.untwist.com for the finished products.
I love the Openbuilds community, and I could not have done this without you! If you have any questions, please email me at [email protected].
-Todd
On to my build!
IMPORTANT: LASERS ARE SERIOUSLY DANGEROUS. Please make sure you know what you are doing.
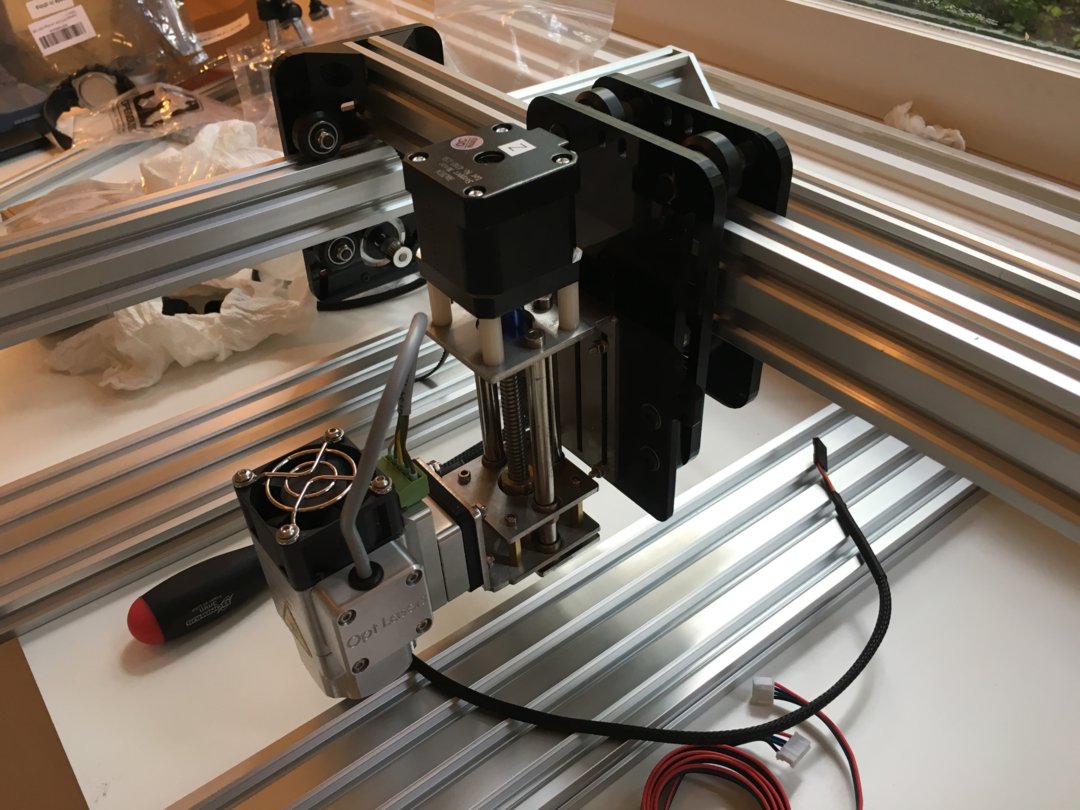
So, in a nutshell, I took a standard 20"x20" Acro and added some additional height, a very sturdy build plate for attaching part fixtures, a Z-Axis, and an OPT Lasers PLH3D-6W-XF (I got the laser kit because... why not. It included quality goggles. I didnt need all of the mounting parts that came in the kit, and I wasn't clear at the time how I was going to mount it.)
I purchased one of the Z-axis actuators suggested by WildBill in an old post in the forums. This is a brilliant idea, and works nicely. Small, sturdy. You can overpay slightly for one on Amazon and get it quickly (or pay a reasonable price at Alibaba/Aliexpress if you do not mind waiting a while for shipping and paying a possible import tariff)
Please see the attached diagrams and STL files of the mount plates that I created for the OPT laser and the Z-axis. I 3D printed these out, but I dont remember what infill I used. I think I used 50% or 75% infill, but this was likely set way too high. In hindsight, I would bet a 25% infill would have been fine.
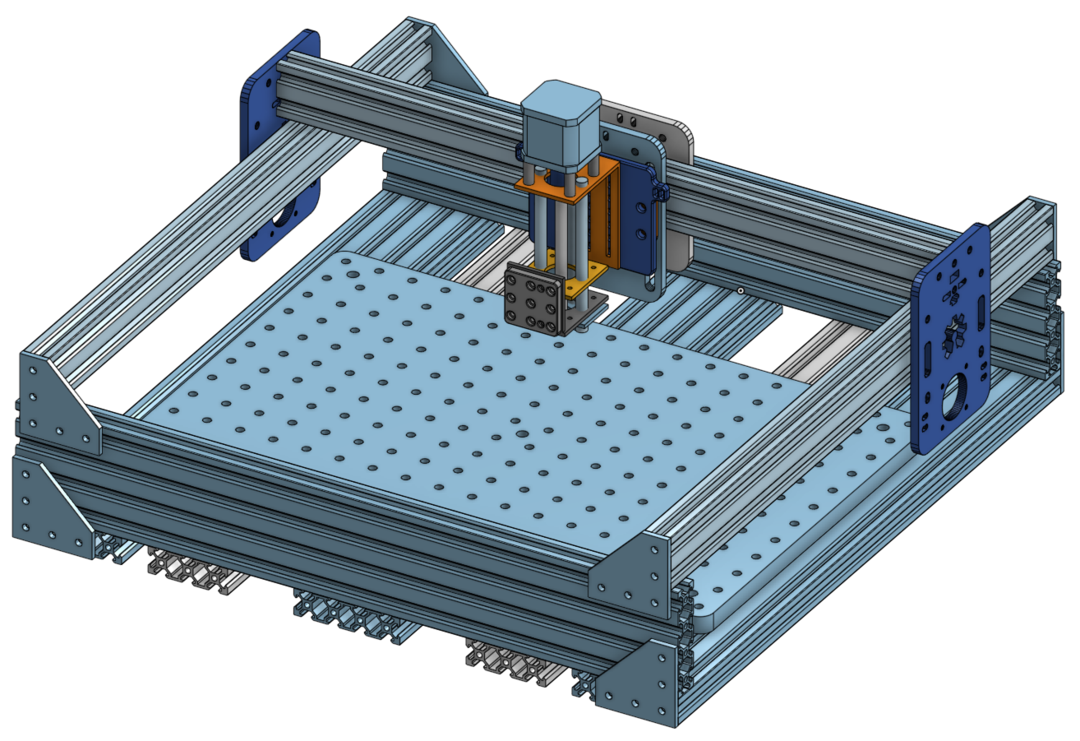
I use Onshape for all of my CAD and design. Cloud based CAD. Totally awesome. I used to use Solidworks, but once I switched to Onshape I will never go back. Onshape is the future. Solidworks is like a myspace page. The below images are screengrabs from Onshape. I tried to layout most of the parts to make sure everything would fit before I purchased parts. I didnt include all of the belts, wheels, and motors in the CAD because I'm lazy and I was not planning to modify the core Acro mechanical design. Note the extra height, the base, and the Z-axis. That's basically all I added.
Also, I never purchased the optical breadboard plate that is shown in the CAD diagram. I honestly can't remember why I thought I needed this? It's seriously easy to screw fixtures into the aluminum extrusions with T-nuts. I guess I overthink things sometimes. Does anyone else ever do this, or is it just me?
Closeup of the two mounting plates I designed to attach the Z-axis to the Acro plate (dark blue part), and the OPT laser to the Z-axis (grey part).

Software: Lightburn (LightBurn Software) . You need to use this software. It's fantastic. You will not regret it. Lightburn doesn't have a few features that I would like (such as serial numbering and barcoding) but it's amazing. It can control the Z-axis of the laser so that the focal point is properly adjusted for any individual "drawing layer". However, it doesnt allow me to adjust the focal distance "on the fly" to map to a 3D surface such as a cylinder or tumbler. (I believe that 3D surface engraving would require a galvanometer and an automated focus adjustment system. I would love to have something like this, but I'm not sure where to start.)
Controllers. Controllers. Controllers. Ok. I spent a lot of time and money testing out controllers. Perhaps too much time and money. I have some strong opinions on controller boards, and I think the solutions from Openbuilds are simply not good enough for anything "small and intricate" with tight tolerances. I want to stress the "small and intricate", because the controllers are great for other purposes.
One word: Trinamic.
Controller, First try. I used an Openbuilds SparkConcepts xPro v3 Board, running GRBL 1.1f. This was a nightmare on many levels. Not a quality board for accurate laser engraving. Very noisy. Not smooth. In my opinion, this was a junk controller for a laser engraver. (NOTE: this build was started in July of 2018, and I had the v3 xPro, not the current v4 xPro. However, I did test the DRV8825 drivers that are used on the v4 xPro. See below.)
Controller, Second Try: I did a test with an Arduino UNO and a CNC Shield v3 with A4988 drivers (purchased on Amazon), and it was also a mess. Very noisy. Wrong board version. Troubles all around getting the laser to work properly.
Controller, Third Try: Using a new Protoneer v3.5.1 CNC Shield and some Pololu DRV8825 drivers (same driver chips as on xPro v4). Still noisy. 1/32 microstepping is ok. Better... but not where I want it. The new v3.5.1 CNC Shield is a requirement. If you go this route you MUST make sure you have the new v3.5.1 board or you are in for a headache until you go buy the correct board. Beware of whats available on Amazon. These are probably not the droids you are looking for.
Controller, Fourth Try: For the final build, I eventually used the above mentioned Arduino + Protoneer v3.5.1 CNC Shield with some SureStepr SD2224 Trinamic drivers from Panucatt. TRINAMIC MAKES THE BEST DRIVERS AVAILABLE. There are a few Trinamic versions available, but I picked these first because they were newly released at the time. Honestly, I see no reason to use any other brand driver with stepper motors. Yes, the Trinamic drivers are slightly more expensive than the alternatives ($9.99 each, vs $2.49 each for the DRV8825.) but the quality is unbelievable. Engraving lines are super smooth. The stepper motors run silent! However, the fan on the laser is a freaking JET ENGINE... so... noise!
If you are using any CNC Shield controller board that is compatible with these drivers, then I suggest swapping them out today. Your motors will stop making noise, and you will have a quality engraving that is better than you can imagine.
(Side thought: I do not understand why Openbuilds doesn't use Trinamic drivers for their controllers. Anyone?)
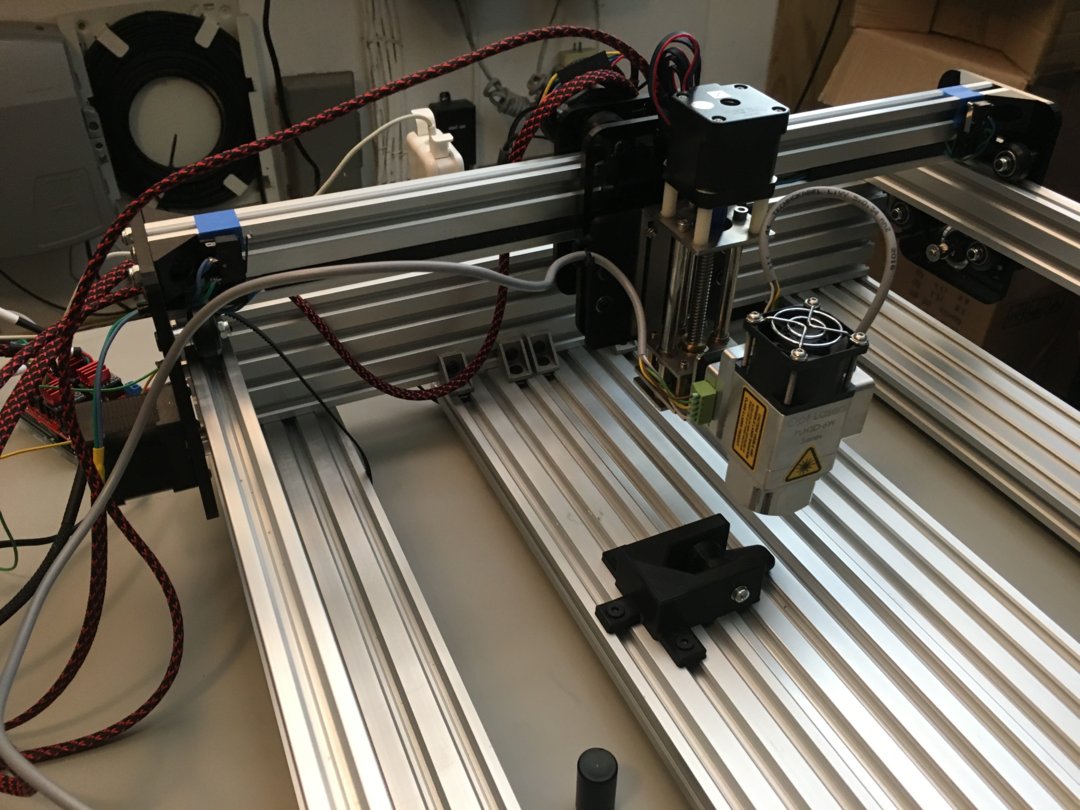
Completed build showing a 3D Printed "part holding fixture", and a total mess of cables that have not yet been placed into cable drag train. The blue painters tape was used for marking the minimum and maximum X travel distance so I could screw in the limit switches. I should really clean this mess up...
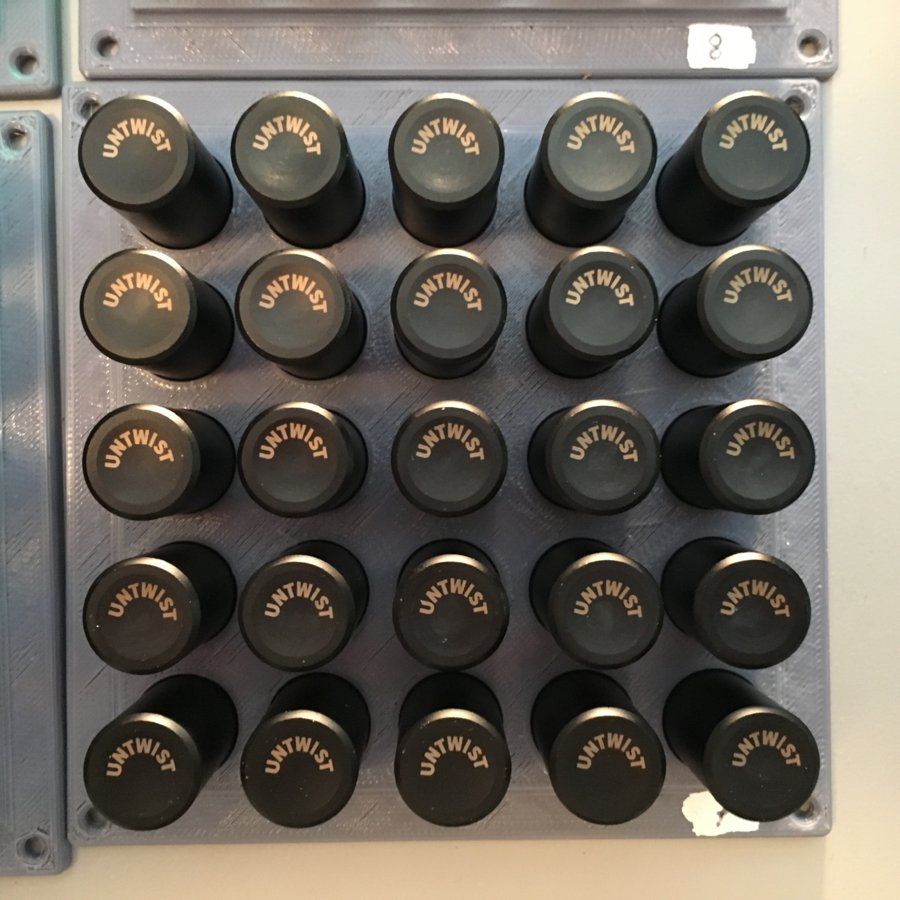
Some example parts. "Untwist" engraved on anodized aluminum handles. Note: I am not using the trays for engraving because they do not hold the parts perfectly aligned. I just put the parts in the trays for nice part photography, and for future robotic assembly. It's hard to see in the above photo, but parts are held in a little jig one at a time. It's slower than desired, but the quality is amazing, and alignment is perfect. I should also add that if I was engraving multiple parts at a time, then I would be more likely to leave the engraver unattended, and that would be a mistake.
Final thoughts:
The mounting for the Z-axis takes up a lot of build space. Almost half, actually. Keep this in mind if you are going in this direction. If you look closely at my photos, you can get a sense of this. For my application I really didn't need anything larger, but one can easily swap out longer Y-axis rails.
The Z-axis and laser sticks out rather far from the X-gantry. This places a torque on the X-axis carriage, but I haven't noticed any issues with this yet.
Not that I need it for my current application, but I think I could have increased the vertical height of the X-axis gantry. With the Z-axis mounted better I could probably double my vertical work volume.
DO NOT LEAVE A RUNNING ACRO LASER ENGRAVER UNATTENDED. EVER. Also, keep a proper fire extinguisher close by. These machines do NOT have any industrial safety systems in them that one would find in a professional solution. Make sure you have an Emergency Power Off (EPO) switch handy. I still need to wire up a proper EPO, and the next time I use my engraver I will relocate the power strip to the front so it is more easily accessible in case of an emergency.
Also, ventilation. Nothing but nasty fumes when engraving. I am currently running this engraver in my garage with the door open and a fan on. There is an important reason that many laser engravers have large enclosures with fancy ventilation systems. The best ones come with professional air filtration systems. There are lots of toxic vapors coming off these materials. Do not breathe this poison.
Laser light is seriously dangerous! I cannot fully express how serious this is. You can be blinded in an instant, and this is permanent eye damage. The risk for injury is very high. If you have an accident, then there is absolutely no going back. It's all over. Pack it in. You are done. All of these Acro laser systems are open air, and do not have any light shielding. These are Class 4 lasers, and are incredibly dangerous. Ideally, I should build an enclosure that will protect from light leakage and have proper ventilation, and as I increase production I will invest in making a proper enclosure. Also, make sure your eye protection is from a reputable source, and that you have the proper lenses for the wavelength of your laser. When you are working, make sure that NO LASER LIGHT IS REFLECTING BEHIND YOUR EYE GOGGLE LENSES. Reflected laser light can be just as dangerous as a direct beam.
If you found this helpful, then please help me out and buy an Untwist or two! Tell your friends! Please share! I can really use the help. www.untwist.com
Also, please do not hesitate to reach out with questions! I would love to hear from people doing similar laser builds.
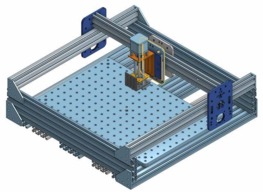
Modified Acro with build plate, Z-axis and OPT Laser
Build in 'LASER - PLASMA BUILDS' published by Todd Brous, Jun 16, 2019.
Modified Acro for laser engraving. Extra height and and a sturdy build surface for part fixtures, custom mount plates, OPT Laser, and a Z-Axis.
-
-
Build Author Todd Brous, Find all builds by Todd Brous
-
- Loading...
-
Build Details
- Build License:
-
- CC - Attribution - CC BY
-
Attached Files: