Update 26AUG - Figured out the DWP611 internal wiring mod. Removed the On/Off rocker switch and connected the wires together to allow power control from the SuperPID board, then removed the two wires that go into the thyristor and connected them together, eliminating the onboard speed control. Voltage goes onto the board only to pass through the LED power supply then directly into the motor.
Drilled the hole to fit the included guide tube and secured the IR speed sensor inside the tube pointing at the rotor, which is painted with white out halfway around to create the IR pulse when the contrast flips to the dark half of the rotor surface. Gives the exact RPM, works perfectly.
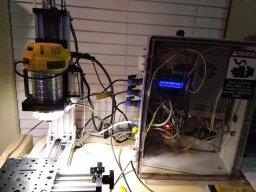
Powering everything on, the PID display says "mains found - 60Hz" and shows the spindle position based on the IR light meter. Switched my DPDT switch to manual Pot and Run bridged to ground, and the spindle automatically soft started up to 5000 RPM, the default min RPM.
Turned the knob up and down went to 30,000 and it's perfect. Switched to the position for PWM / VS bridged to POT to enable the smoothie spindle control, and gave an M3 S5500 command -- nothing. Tried M4 S9000 and nothing again. Uploaded my config file so that maybe someone can assist... reading lots of forums now. New video link will follow with the manual spindle test.
![IMG_20170826_203930[1].jpg](https://openbuilds.com/attachments/img_20170826_203930-1-jpg.26302/)
![IMG_20170826_203945[1].jpg](https://openbuilds.com/attachments/img_20170826_203945-1-jpg.26303/)
Update 25AUG, after testing the G-Code command G28.2 and making it successful a few times, here:
I got my SuperPID from "Down Under" and re-read all the instructions and literature online and mounted the sucker. Fits nicely, I found my heat sink compound and mounted the heat sink and got all the wiring figured out until...
...
On the far right, you can see under the "QC PASS" sticker on the Smoothie Board, a bare white wire ("RUN" signal for SuperPID spindle controller) and a bare green/yellow wire (E-Stop wires). Not totally certain how to wire and configure them yet.
To get the correct "RUN" signal for the SuperPID using the Smoothie config file, I read the spindle-module page from smoothieware's website, and think it is possibly the signal one gets from this:
spindle.switch_on_pin 2.6 # the pin which is used to enable the VFD (optional)
Need to confirm this. The E-Stop, I know there's instructions to use pin 2.11 or 2.12, but what is the 2nd connection is it switching? Just any random 0VDC ground? Maybe I'm brain fried on this. Three wires to connect and I'm up and fully running.
![IMG_20170825_151849[1].jpg](https://openbuilds.com/attachments/img_20170825_151849-1-jpg.26289/)
![IMG_20170825_151909[1].jpg](https://openbuilds.com/attachments/img_20170825_151909-1-jpg.26290/)
Above view shows the DPDT center off switch, 2 exhaust fan outlets, 3 DIN connectors for steppers, 3 LANs for end stops and 1 LAN for, well, LAN. Air inlet holes in the far back right corner of the enclosure, I affixed an outer screen filter, it has a magnetic rectangle stuck to an area and the filter screen is framed in an exact-sized magnet. They stick, and voila! a quick, easy to clean inlet. Below photo I offset them on purpose to show the removability.
Good view of the electrical box I used to mount the IEC switched AC sockets and the 2-pin connector for the 24VDC OpenBuilds LED Spindle Light Ring.
Open Loop selector is that small SPST toggle switch, the manual speed pot is there, and another 4-pin DIN socket - 2 wires are AC live and neutral power from the managed SuperPID spindle voltage output... the other 2 wires are going to the E-Stop button wires inside the enclosure (By the way, is that dangerous? Should I just leave the two unused pins empty and make the E-Stop its own socket and connector?)![IMG_20170825_152001[1].jpg](https://openbuilds.com/attachments/img_20170825_152001-1-jpg.26291/)
![IMG_20170809_232203[1].jpg](https://openbuilds.com/attachments/img_20170809_232203-1-jpg.25978/)
Mounted DIN sockets and LAN sockets for stepper motors and limit switches, and the extra LAN socket for the actual network connection to the SmoothieBoard controller. There's the new e-stop, and Collet/Nut set with 0.25 and 0.125 in collets, I'm looking at some lower cost, rougher kits for less precise work.
![IMG_20170809_165215[1].jpg](https://openbuilds.com/attachments/img_20170809_165215-1-jpg.25979/)
![IMG_20170809_232615[1].jpg](https://openbuilds.com/attachments/img_20170809_232615-1-jpg.25980/)
Got a new stepper drill bit for more precise fit of all these panel mount sockets, lots of in-between steps. Ready to connect the spindle controller, it shipped from Australia a few days ago and is on its way.
New enclosure and heavy gauge IEC power cord for the router and superPID
First test without limit switches or motors connected, config file loading and network test
Dell 5V USB charger, regulated power .5A
Plenty of space left for the SuperPID - bet you can't guess what car the key on the left is for or the aircraft the window on the right is from...
Wiring the 24V supply and AC input that also feeds the 5V power unit
Limit switches mounted
New Update MON 31 JUL: Connected to USB, found that WIN7 Pro x64 doesn't want to talk to the board without some sorcery, so I used WIN10 Pro x64 and it worked perfectly to edit the config file, activate a static IP address, and VOILA! It runs without USB off the Dell 5V charger and the LAN connection works beautifully. From installing the upgraded web interface software (Amazing), I learned quickly that it's way faster to take the microSD card out, stick it into an SD wafer into my laptop and manipulate files. You're turning the system off anyway when making config changes, and I've not tried uploading via LAN yet.
I did successfully get the Pronterface to connect via IP address, that's promising.
FRI 28 JUL
****Update: got some 4 pin DIN connectors w panel mount sockets, and LAN RJ45 panel mount couplers for limit switches. Ordered SuperPID... Yep. It's on the way from down under... More to come****
As I've pondered making an OB 500mm gantry CNC, but trying to save money for a good quality steel mini mill like a pre-owned Jet or Grizzly, I saw the OB MiniMill posted last month and just went after it including NEMA 23 motors. I bought a DW611 from Amazon including the plunger, because I will end up purchasing a purpose built spindle and use the palm router for woodworking.
I spent about 3 hours total assembling the bundle, finishing yesterday, and it was refreshing and calming compared, say, to the intake manifold rebuild and A/C replacement on my BMW Z4 I just finished doing.
I had researched the smoothieboard v1.1 for a few months and after seeing the Hackaday article about microstepper accuracy, I decided on the Allegro drivers, so the integration of the newer Allegro A5984 and versatility of smoothie for future projects like laser engraving made my mind up.
I also decided on 24V power supply for the possibility of running a 300W spindle with it later.
I am now contemplating my control panel - I will have an e-stop, I will rewire the DWP611 to accept an external speed control with LED readout; it will be controlled manually or digitally and I like blue LEDs, so there will be many.
Once the electronics are here and connected, I'll put up a video. Very excited to start testing the capabilities and accuracy to build an even better, more precise machine next.
MiniMill Smoothie
Build in 'X/Y Table Style CNC Mill' published by Andrew Helsel, Aug 27, 2017.
MiniMill with DW611 and SmoothieBoard 4x v1.1
-
-
Build Author Andrew Helsel, Find all builds by Andrew Helsel
-
- Loading...
-
Build Details
- Build License:
-
- CC - Attribution - CC BY
Reason for this Build
Why wouldn't I??
Vehicle parts, custom firearm accessories, furniture and decor, custom toolingInspired by
OpenBuilds MiniMill Mark C -
Parts list
Qty Part Name Part Link Comments 1 OpenBuilds MiniMill Bundle http://openbuildspartstore.com/openbuilds-minimill/ Link with 3 NEMA 23 motors (2.8A) 3 NEMA 23 MT-2303SH200AW https://www.smw3d.com/nema-stepper-motors/ Link NEMA 23 (2.0A) 1 SmoothieBoard 4x v1.1 -xC https://shop.uberclock.com/collections/smoothie/products/... Link Completed 4x Controller Board 1 Mean Well 24V 14 LRS-350-24 Switching Power Supply https://www.amazon.com/gp/product/B013ETVO12/ref=oh_aui_d... Link 2 AC power socket with fused illuminated switch IEC https://www.amazon.com/gp/product/B00ME5YAPK/ref=oh_aui_d... Link One for Power Supply, One for SuperPID SPindle Controller 1 Spindle LED array http://openbuildspartstore.com/spindle-router-led-light-r... Link Awesome. 6 Micro limit switches with mounting plates http://openbuildspartstore.com/micro-limit-switch-kit-wit... Link 1 IEC 6' 16AWG Power Cord http://openbuildspartstore.com/6-ft-power-cord/ Link Heavier gauge for the spindle controller, temps will be high as the speed is adjusted more often 1 IEC 6' 14AWG AC Power Cord https://www.amazon.com/gp/product/B0027JRMD0/ref=oh_aui_d... Link Easy to just add on accessories when you're building a cart... 1 Dell AC Travel USB Charger http://www.dell.com/en-us/ Link For the Smoothie Board, I wanted to ensure I used a regulated 5V power supply, the AC charger from my Dell Streak 5 works perfectly 1 Enclosure NBF-32426 Plastic NEMA Box w Clear Door https://www.amazon.com/gp/product/B005UPC9I6/ref=oh_aui_d... Link Bought the internal panel for this first, thinking i could make a nice wooden box, but had a nightmare about it starting a house fire, so I'm opting for a matching, safety tested enclosure... 1 Danger High Voltage Sticker https://www.amazon.com/gp/product/B00M8UPE88/ref=oh_aui_d... Link Yep. "Danger High Voltage Disconnect All Power Sources Before Removing Panel" 1 Heatsink for Speed Controller circuit https://www.amazon.com/gp/product/B00UJ95TOE/ref=oh_aui_d... Link The SuperPID needs a heatsink, this will fit perfectly, and a nearby hole in the enclosure will have an exhaust fan within an inch of this heatsink. 1 Panel for Plastic enclosure 14.25"x10.42"x0.14" https://www.amazon.com/gp/product/B005UPE9B6/ref=oh_aui_d... Link Very awesome, comes in a few sizes, could have gone for aluminum, but this is a lighter setup than alum or wood, and again, safer. 4 Heavy Duty Waterproof 4-Pin DIN connectors https://www.amazon.com/gp/product/B00W93QJC4/ref=oh_aui_d... Link Panel mount socket and in-line connector, seals and caps included, solder on and good to go. 3 for stepper motors, one for the spindle from the SuperPID 4 RJ-45 Waterproof Panel socket (coupler) https://www.amazon.com/gp/product/B01I50HXVA/ref=oh_aui_d... Link Just using NC limit switches on two wires now bc they're not running on 5V, but I crimped 3 wires from min and max into a single RJ-45 connector for each axis if i upgrade. 1 for LAN for SmoothieBoard 2 5M 3-cond 28AWG shielded wire for limit switches https://www.amazon.com/gp/product/B01LNH8IYI/ref=oh_aui_d... Link Easy to fit into tight spaces for limit switches, 5 meters pre-cut is odd but okay. 1 Rubber Feet https://www.amazon.com/gp/product/B008LTY1NO/ref=oh_aui_d... Link Smells vulcanized... very potent odor 1 Standoff set https://www.amazon.com/gp/product/B013ZWM1F6/ref=oh_aui_d... Link I have none, need lots for future projects 1 M2-M5 screws/nuts https://www.amazon.com/gp/product/B06Y3TVKMR/ref=oh_aui_d... Link Need lots of tiny screws to look for in a sea of carpet 1 Crimp tool for PCB wiring DuPont terminal, etc https://www.amazon.com/gp/product/B01N4L8QMW/ref=oh_aui_d... Link I used to have one of these tools, comes in handy making computer connections into reality 1 SuperPID Controller http://superpid.com/SuperPID-Products-and-Accessories.htm Link I went with Blue LED on black background 1 Heavy Duty DPDT toggle switch, center off http://superpid.com/SuperPID-Products-and-Accessories.htm Link For Spindle control to switch from PWM to Manual speed control 1 SPDT toggle switch http://superpid.com/SuperPID-Products-and-Accessories.htm Link For Spindle control closed loop/open loop selection 1 100' Spool of 4 Cond 18 AWG wire http://www.homedepot.com/ Link For internal stepper motor wiring to the DIN Sockets and various AC or DC power jumpers. At Home Depot, near the shrink tubing and crimp connectors, flat, 4 wires Yellow, Green, White, Brown 2 5volt DC Fan - 40x40x20mm IP55 Moisture sealed http://superpid.com/SuperPID-Products-and-Accessories.htm Link Ceramic bearings, moisture sealed, sounds like it jives with the rest of my enclosure. Don't want any errant splashes going ZAP 2 2-pin 14-16AWG Flange Connector Kit Crimp Style https://www.amazon.com/gp/product/B01LDOOVL0/ref=oh_aui_d... Link 2-pin automotive style waterproof connector and panel mount socket for 24v spindle LED array, extra one for the E-stop 1 E-Stop killswitch https://www.amazon.com/gp/product/B00TGO8ZX0/ref=oh_aui_d... Link External emergency stop switch, twist to reset, waterproof enclosure 1 DEEP-0611-84KIT Extreme-Precision Collet Kit http://www.precisebits.com/products/equipment/dewalt_611_... Link That's some high quality metal. Shopping on McMaster for end mills next... -
Attached Files:

