
So, I decided to make an Egg-bot because they looked cool, and because I had lots of left-over bits and pieces. I went with a combination of Niko's and Slobberknocker's builds with a couple modifications of my own. I ordered my EiBotBoard v.2.3 from Evil Mad Scientist EBB Driver Board and more brackets and screws from the Openbuilds Part Store.
I had some leftover 1/8” aluminum plate, so I used my CNC to cut the Nema 17 and Nema 23 plates using Sketchucam to convert the Sketchup drawings to g-code.
Before clean-up:
After clean-up:
I 3d printed the parts from Niko’s Egg-painter robot (OpenBuilds) build and from the Pen Holder for Eggbot by Geotek . Then, I used a combination of parts to assemble the whole thing because that combination worked to center the pen on the sphere using the other components I had.
3D Printed parts used:
Niko's arm backer that mounts to the pen motor. I made it slightly thicker to accommodate a M5 lock nut and I filled in the hollow because it it mounted more securely this way.
The Pen holder was from Geotek and I went to the local hobby store and bought some CA hinges. Unfortunately they did not have the right sized screws so I made due with screw I already had in the miscellaneous spare parts trays.
The head and tail stock had foam and 100 grit sand paper mounted to better grip the spheres. The tail stock was originally designed for a ¼” bolt with a larger bearing (22 mm OD). I had a broken wheel from the cnc build so I popped the bearings out of it. I then made a shim that fit inside the 22 mm pocket converting it to 15 mm pocket. This would not have been necessary had I caught that prior to printing the originals.
The mounting and end brackets (aka feet) were Niko's design. The OB Part Store was out of 2 hole L brackets, so I bought a couple three hole brackets and cut them with the scroll saw.
The mount that secures the Eibot Board to the v-slot was also Niko's design.
The tail stock was mounted to the v-slot with 4 8mm M5 screws an T-nuts. I will have to count up the rest of the screws and lengths if for a BOM.
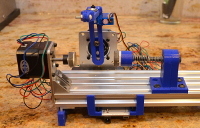
Finished bot:
Video of a quick test:
We were short on eggs so many a Mandarin fell victim to the Mandarin Bot during the testing phase. I only had a few Sharpie ultra fine points so I couldn't go too crazy but here are a few quick tests. I did find two eggs and one has a stipple drawing using StippleGen2 (evil mad scientist).
![[IMG]](proxy.php?image=https%3A%2F%2Fphotos.smugmug.com%2Fphotos%2Fi-vmRNrQV%2F0%2FM%2Fi-vmRNrQV-M.jpg&hash=920e94a5fcf9cf4fb913913c1b8cc9c8)
Mandarin-Bot :)
Build in 'Sphere Bots' published by Giarc, Dec 1, 2016.
Another slight variation of Niko's Eggbot using Openbuilds V-slot and other 3d printed parts.
-
-
Build Author Giarc, Find all builds by Giarc
-
- Loading...
-
Build Details
- Build License:
-
- CC - Attribution - CC BY
Reason for this Build
I built this bot because I had leftover parts from my CNC build , it looked cool, everyone needs one, and building s@#T is fun. Did I mention it is cool.Inspired by
Inspired by the V-slot Sphere bot, and Niko's egg painting robot.
![[IMG]](proxy.php?image=https%3A%2F%2Fphotos.smugmug.com%2Fphotos%2Fi-rcHSh7t%2F0%2FM%2Fi-rcHSh7t-M.jpg&hash=a42dcb6d95448f94991c3b31fd226e07)
![[IMG]](proxy.php?image=https%3A%2F%2Fphotos.smugmug.com%2Fphotos%2Fi-JL9BqZx%2F0%2FM%2Fi-JL9BqZx-M.jpg&hash=07940dc3d96f69213ebc1321763e028e)
![[IMG]](proxy.php?image=https%3A%2F%2Fphotos.smugmug.com%2Fphotos%2Fi-5gP4HBS%2F0%2FM%2Fi-5gP4HBS-M.jpg&hash=66792ac2662ae2bc1e75160bf9c2433f)
![[IMG]](proxy.php?image=https%3A%2F%2Fphotos.smugmug.com%2Fphotos%2Fi-cMXqMM4%2F0%2FM%2Fi-cMXqMM4-M.jpg&hash=da26e08ac9d1993061de374eb83fba58)
![[IMG]](proxy.php?image=https%3A%2F%2Fphotos.smugmug.com%2Fphotos%2Fi-NQrPgMQ%2F0%2FM%2Fi-NQrPgMQ-M.jpg&hash=e8aacc2ce7781a4c5c74554e912f9d59)
![[IMG]](proxy.php?image=https%3A%2F%2Fphotos.smugmug.com%2Fphotos%2Fi-V6NgwCX%2F0%2FL%2Fi-V6NgwCX-L.jpg&hash=5b40992ba792462d59830cc80c91aa73)
![[IMG]](proxy.php?image=https%3A%2F%2Fphotos.smugmug.com%2Fphotos%2Fi-QqJNTNc%2F0%2FM%2Fi-QqJNTNc-M.jpg&hash=c7810952c74cfd8ddf63fee526e7d69b)
![[IMG]](proxy.php?image=https%3A%2F%2Fphotos.smugmug.com%2Fphotos%2Fi-zbVNhck%2F0%2FM%2Fi-zbVNhck-M.jpg&hash=0d259b3f66b5886a27c1b367a02c4113)
![[IMG]](proxy.php?image=https%3A%2F%2Fphotos.smugmug.com%2Fphotos%2Fi-PpbGVLM%2F0%2FM%2Fi-PpbGVLM-M.jpg&hash=9cd9089825dffcdbeafe71f65cb00d42)
![[IMG]](proxy.php?image=https%3A%2F%2Fphotos.smugmug.com%2Fphotos%2Fi-N93fXrM%2F0%2FL%2Fi-N93fXrM-L.jpg&hash=42aff1964fef4e409d5e6e71b12557d2)
![[IMG]](proxy.php?image=https%3A%2F%2Fphotos.smugmug.com%2Fphotos%2Fi-2mfwnCT%2F0%2FL%2Fi-2mfwnCT-L.jpg&hash=0237f75158e781fa56902a409fc3b347)
![[IMG]](proxy.php?image=https%3A%2F%2Fphotos.smugmug.com%2Fphotos%2Fi-58VphpC%2F0%2FL%2Fi-58VphpC-L.jpg&hash=97bf321fce6889a3e9f7e89a56f0c2fe)
![[IMG]](proxy.php?image=https%3A%2F%2Fphotos.smugmug.com%2Fphotos%2Fi-VHBhFwt%2F0%2FM%2Fi-VHBhFwt-M.jpg&hash=eccf329b8593de3af474b4136467b6ac)