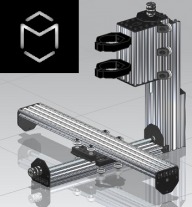
The M Cubed CNC is designed to be a rigid, accurate machine for milling small to medium sized aluminum parts with decent material removal rates. The design builds upon the Nema 23 lead/Acme actuator example build for the X and Y axis and the hidden Acme rod example for the Z axis. The total cost to build comes out around $650 with an 18.5” x 6.3” x 5” work area, but the design can be scaled to meet your needs. No custom parts are needed to make the M Cubed CNC so you can get started without needing an existing mill or outsourcing fabrication. 3D models of the mill can be found in the files section of the build. I do not use sketchup but I have included some common file formats. Let me know if you have any problems importing the files let me know and I can try posting up additional formats.
M Cubed CNC Mill in Action:
Software Used:
CAD: UG NX6
CAM: UG NX6
G-Code: Universal G-Code Sender 1.07
Controller Firmware: GRBL 0.9
Build Instructions:
0. Before building, study the 3D model to familiarize yourself with the design and make any desired modifications.
1. Cut the first 1000mm 20x80 V-slot extrusion into 400 and 600 mm sections (Figure 1)
2. Cut the second 1000mm 20x80 V-slot extrusion in 3x 160 mm sections, and a 380 mm section. The remaining section length is not critical but will be used (approximately 140mm).
3. Cut the 1000 mm 20x40 V-slot extrusion into a 160 mm section and two 380 mm sections, the remaining section (approximately 80 mm) length is not critical but will be used in the column (Figure 2).
4. Drill mounting holes in the machines mounting location, see Figure 3 for details. A 4 by 7 hole pattern will be used for the column mounting, wire routing and Y axis mounting. Two additional rows are also used for Y axis mounting. Spacing of the holes is 20 mm.
5. Add T-nuts as shown in Figure 3 to the table. If your table is not flat, add shims to ensure the Y axis does not bend when bolted down.
6. Tap all extrusion ends using an M5x0.8 tap…yes, all of them (Figure 4).
7. Build the X axis and Y axis using the 600 and 400 mm 20x80 V-slot extrusion sections respectively. Use the Nema 23 lead/Acme actuator example build with the following modification: 1) use 6mm spacers instead of 3mm spacers. 2) The head of the wheel bolts must face the table. 3) Offset the Acme nut block to the edge of the gantry plate. See Figure 5.
8. Add the 4 cube corner connectors to the back of the Y axis. These are used to tie the Z axis and Y axis together and also assist in squaring the Z axis.
9. Use the 380 mm extrusion to build the column. The 20x80 V-slot extrusion stacks on top of the 4 cube corner connectors and bolts through the table. The 20x40 V-slot extrusion bolt through the table to create a “C” channel shape.
10. Add the 90 degree connectors to the column as shown in the 3D model.
11. Add the 80 mm 20x40 V-slot extrusion remnant to the column using 90 degree connectors.
12. Complete the column by using the 140mm 20x80 V-slot extrusion.
13. Build the Z axis gantry using the four 160mm extrusions and eight 90 degree connectors. Use clamps to keep the gantry square during assembly as shown in Figure 6.
14. Add six 90 degree connectors with wheels (all six should have eccentric spacers) to the Z gantry. (Figure 7)
15. Install your selected spindle mounts and spindle (Figure 8)
16. Install the Nema 23 motors as described in the Nema 23 lead/Acme actuator example build
17. Add limit switches if desired
18. Wiring can be run down the center of the column for clutter free cable management of the Z axis.
19. Connect to your selected controller. I choose to build be own controller, details can be found here. (Figure 9)
20. Start cutting using your new CNC! (Figure 10)
Figure 1: Cutting V-slot extrusion
Figure 2: Cut V-slot extrusion
Figure 3: Table mounting pattern
Figure 4: Tapping the V-slot extrusion
Figure 5: X and Y axis build
Figure 6: Z gantry construction
Figure 7: Completed Z gantry
Figure 8: Spindle mounting
Figure 9: M Cubed Bluetooth CNC Controller
Figure 10: M Cubed CNC Completed (for now)
M Cubed CNC Mill
Build in 'X/Y Table Style CNC Mill' published by M^3, Feb 15, 2015.
A no-nonsense CNC mini mill to get the job done.
-
-
-
- Build Progress:
-
- Build in Progress...
Tomas Pontes, adegtiar, Drewdroid and 7 others like this. -
-
Build Author M^3, Find all builds by M^3
-
- Loading...
-
Build Details
- Build License:
-
- CC - Attribution Share Alike - CC BY SA
Reason for this Build
The goal of this build was to create a CNC with more capability (axis travel and accuracy) than a converted mini mill at a lower cost while maintaining the ability to effectively mill aluminum components.Inspired by
Mark Carew's Nema 23 Lead/Acme Actuator Example and X -Y Stage Hidden Acme Rod Example -
Attached Files:
Parts list
-


![[IMG]](proxy.php?image=http%3A%2F%2Fi187.photobucket.com%2Falbums%2Fx215%2F2002noma%2FCNC%2FFeatures_zps8cdc8340.png&hash=31bb534328e608cbd31bacd603bca61d)
![[IMG]](proxy.php?image=http%3A%2F%2Fi187.photobucket.com%2Falbums%2Fx215%2F2002noma%2FCNC%2Fm3_zps59cac1f3.png&hash=c40358e5b25ed45ded9403c9ab52a257)
![[IMG]](proxy.php?image=http%3A%2F%2Fi187.photobucket.com%2Falbums%2Fx215%2F2002noma%2FCNC%2FIMG_20150109_143947_246_zps91858a30.jpg&hash=314f942d9b3dd2801b3381354487ffb7)
![[IMG]](proxy.php?image=http%3A%2F%2Fi187.photobucket.com%2Falbums%2Fx215%2F2002noma%2FCNC%2FIMG_20150109_211307_493_zps36a1f283.jpg&hash=48e5b580df7882545162396b0d681eba)
![[IMG]](proxy.php?image=http%3A%2F%2Fi187.photobucket.com%2Falbums%2Fx215%2F2002noma%2FCNC%2FIMG_20150109_171042_717_zpsd707473e.jpg&hash=c19bf972dd42e9ba48a5b8d0aaff5bbe)
![[IMG]](proxy.php?image=http%3A%2F%2Fi187.photobucket.com%2Falbums%2Fx215%2F2002noma%2FCNC%2FIMG_20150109_164343_895_zps10333b26.jpg&hash=24cbccf0ed6f6a406fc871af447bf1d7)
![[IMG]](proxy.php?image=http%3A%2F%2Fi187.photobucket.com%2Falbums%2Fx215%2F2002noma%2FCNC%2FIMG_20150112_184509_692_zps731e7e53.jpg&hash=789d75667852bd2a6bedca06d05d6f5f)
![[IMG]](proxy.php?image=http%3A%2F%2Fi187.photobucket.com%2Falbums%2Fx215%2F2002noma%2FCNC%2FIMG_20150113_192840_716_zps384f2d86.jpg&hash=1ddbd5c81ad26406406b08f0e1e7abd2)
![[IMG]](proxy.php?image=http%3A%2F%2Fi187.photobucket.com%2Falbums%2Fx215%2F2002noma%2FCNC%2FIMG_20150113_215804_435_zps7f8fa7c7.jpg&hash=4843b82d91b6713ac1fcfe50741733fc)
![[IMG]](proxy.php?image=http%3A%2F%2Fi187.photobucket.com%2Falbums%2Fx215%2F2002noma%2FCNC%2FIMG_20150116_202136_061_zpsfb6bbfcc.jpg&hash=a90b567fb3b5806a1c31eb3349533a08)
![[IMG]](proxy.php?image=http%3A%2F%2Fi187.photobucket.com%2Falbums%2Fx215%2F2002noma%2FCNC%2FIMG_20150210_204113_339_zps5545f846.jpg&hash=6fb145adadc58df83456187a0f69c1dd)
![[IMG]](proxy.php?image=http%3A%2F%2Fi187.photobucket.com%2Falbums%2Fx215%2F2002noma%2FCNC%2FIMG_20150213_215710_951_zps7a26ebf0.jpg&hash=c2c3e3db483075442155d4da0e9baa83)