
Being a home hobbyist I decided it would be really nice to get into the world of CNC. Initially I was thinking of going with a laser cutter but after much deliberation I felt a CNC router would be more useful for me and a good first step into learning more about CNC. I suspect a laser cutter is still in my future but first things first.
Having relatively zero experience with CNC routing I was really impressed with the OpenBuilds machines and community. I felt that building the machine myself would help me understand how it works but having all the development already done was instrumental in my choice of the Lead1010. Also, the videos by OB's to help with assembly and startup were very appealing to walk me through the process step by step.
So here we go...first up inspection of the parts. initial impressions were great!


Some various pics of the assembly:


I wanted to add an enclosure and dust collection system to keep the mess down and to keep the sound down. First up was to create the dust collection and so I made an enclosure for a Festool shop vac:


Next up was a spoil board. I drew one up in Fusion360 then used my table saw and put it to work along with some t-track from mcmaster carr:


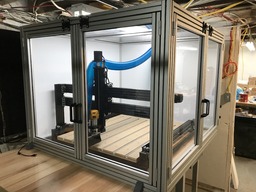
Last item was to create an enclosure for the Lead1010. I added the optional high-z modification so that required a large enclosure. I ended up with roughly 47x50x36H internally. I also had the optional dust boot so I wanted to ensure enough length to accommodate that.
Again, I drew up a design in CAD then tweaked the parts list and sizes using the Minitec website. I ordered all the parts pre-cut from them, essentially making my own 'kit'. Worked out very well and is very solid.


And i've pretty much finished off the build and next up is to get it running. here are some finished photos including the dust collection cyclone separator that i'm going to use.


Lead1010 Build with Enclosure
Build in 'Cartesian Style CNC' published by StrictlyScale, Jul 21, 2020.
First time CNC builder puts together a Lead1010 machine.
-
-
Build Author StrictlyScale, Find all builds by StrictlyScale
-
- Loading...
-
Build Details
- Build License:
-
- CC - Creative Commons Public Domain (CCO 1+)
Reason for this Build
Wanted the ability to CNC router parts for my hobby (model airplanes) at home.Inspired by
Other builds in the OpenBuilds website and community.


