
Will be adding information on my Lead CNC build, I am not planning on shooting too many pictures of the individual components being added since I am following the Openbuilds instruction builds as closely as possible. This is my first CNC build I currently own a glowforge and will be adding pictures shortly. So far the build has been straightforward, although, in the future I might shoot a real time video of building the Black Box controller as watching that fast forwarded video from my iphone was rather frustrating.
Initial Unpacking
https://openbuilds.com/attachments/unpack-jpg.43933/?temp_hash=1269f683493ea066487a6f42934d2333
Building the Frame:
https://openbuilds.com/attachments/...4/?temp_hash=1269f683493ea066487a6f42934d2333
Now we are getting somewhere:
https://openbuilds.com/attachments/...5/?temp_hash=1269f683493ea066487a6f42934d2333
Turns out that there is a more detailed version of the black box instructions at
docs.openbuilds.com/blackbox Unfortunately this is the first time I have heard of there being a docs area! I guess I should have read around more before starting this build. However, I just found out about the iot Relay from the document so it looks like i have yet another toy to order. Once I am done and actually using the CNC I will update this build with Newbie lessons learned and whatever tips and tricks I figure out.
Update 1/17/2019
Been a bit since I updated this build, I had to get the machine off my living room table and moved into the Makers Space in Raleigh, NC.
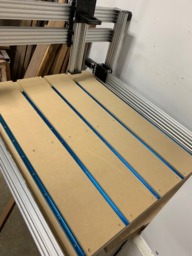
Now that it is over there, I added the High Z axis and made a T Track Base with modular spoiler board. I have seen this other places so the design is nothing new but I am pretty happy with how it turned out. I measured between the T tracks so that each piece of MDF is 6.5 inches and counter sunk the hold down screws so that there is no risk of a bit hitting the screws (or very little risk). The build is a little out of sink with the instruction videos since I built the High Z mod right out of the gate.

Update 2/3/2019
Once again it has been a bit since I submitted an update, I have moved quite a bit along in the build however, I wanted the entire system to sit on a rolling cabinet and this would effect how the Lead CNC was wired up. So before I could continue on to wiring I had to build the cabinet. My initial design was a 48x48x33in (length, width,height) cabinet. I wanted this because with the lead cnc + waste board that would put the entire setup at almost the exact height of my existing workbench. This should allow me to easily do Pass through work on the cnc. To do this I had to account for the wood, casters and CNC. All in all it looks like I am pretty close.
I started off by creating a frame out of standard 2x4 lumber.
I also used metal angle brackets to connect the pieces, while this kept things square, it did not have the rigidity necessary so eventually I moved over to a Kreg pocket jig. Once the frame was built I threw a level on it to make sure that I was starting out with a level build
I had to do a lot of measuring and making sure that all my cuts were square and had a little bit of luck but it was perfectly level.
Once I made sure the carcass was level with a few more checks on the corners etc. I went ahead and sheeted the top with 3/4 in MDF and countersunk screws. I used mdf for the top because I like how flat it is and wanted to ensure I was staying as level (and flat)
as possible. At this point, what I ended up with was a real wobbly monster. However, once the additional braces were added and the sides and bottom were sheeted with plywood the entire cart has become extremely rigid (and heavy) but in this case I believe heavy is good.
Two sides remain open as I will eventually be adding drawers and a cabinet doors to the front and a dust collection system in the back. This way, the entire system is portable. Since I am in the Raleigh Makers Space The Maker's Space it is nice to be able to move the machine around when necessary as the shop is very large.
Here is the cart with machine in the corner of my work space.
All this work also allowed me time to get my order delivered from OpenbuildsPartStore containing my
IOT Switching Relay Power Strip and longer lengths of wiring to assist in accomodating my overall wiring plan.
Lead 1010 First time build
Build in 'Cartesian Style CNC' published by DaveD, Feb 4, 2020.
First time build of the Lead 1010 CNC with the High Z add on.
-
-
Build Author DaveD, Find all builds by DaveD
-
- Loading...
-
Build Details
- Build License:
-
- CC - Attribution - CC BY
Reason for this Build
Woodworking is a hobby and I work as a database programmer so I am always fascinated by new tech.


