
I've been enjoying tinkering with my FDM printer for about a year now and have learned a lot about the technology and its limitations. Or I should say, the limitations of my machine.
Now I want something with greater resolution. Do I have a need for such things? No, not really. Do I love to experiment with new technology? Absolutely! This one will be fun.
So, most of you know about DLP projector based SLA printers and the level of detail they permit. It's a great idea in reality, but I was hoping for something a little more compact and cost effective (decent short throw 1080p projectors are not cheap). After seeing (and backing) the OLO smartphone resin printer on Kickstarter, I started reading into the subject and found that some people had started their own DIY efforts, and some companies were starting to produce printers using LCD's as the mask and light source to cure the resin.
Typically, these are geared for "daylight curable" resins. That just means that the resins are designed to cure using 460-470nm light, which is right around the peak wavelength of the blue color filter on an LCD. Convenient. The cure time it fairly slow though using the LCD backlight. To get around that, you can disassemble the LCD and take out the backlight and it's respective components, open up the back of the case, and project a far more intense LED light through the screen.
My printer will be based around an LCD for a gen3/4 iPad that has a resolution of 2048x1536, giving an XY resolution of about 96 microns (0.096mm/0.0038"). Couple that with 10-50 micron layer heights, and I should be able to get some very fine detail.
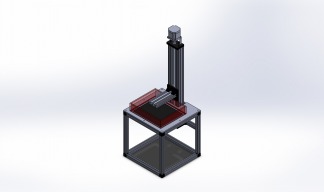
The printer itself will be constructed primarily from OpenBuilds parts, which are on the way at the time of this writing (5/3/2016). The intent is to be able to just bolt together about 90% of this printer without any cuts or mods. The only parts that will be made to fit will be the vat, the top plate (to mount the LCD and the vat), and the build plate.
The base will be made from 250mm lengths of 20x20 extrusion on all sides. The z-axis will be a 500mm C-Beam. I won't be using the full range of travel, as about 100mm of the extrusion will be below the top surface for mounting. With 1/16 microstepping, I will be able to get 2.5 microns per pulse. I never intend to print at that kind of resolution, as a single microstep will never be able to accurately overcome the stiction from the delrin lead nut. I'd have to go to a ballscrew to get that kind of accuracy. I'm going to shoot for 10 microns on the z, but I won't be upset if I can't hit that reliably.
The vat will be a simple design that will just be a box with an open bottom. The FEP film will be tensioned over the bottom of the box and will sit directly on top of the LCD (close proximity to the LCD is critical in this setup).
Resin wise, I'm going to play with two different resins to start. One will be a daylight curable resin from Photocentric 3D that they use with their own LCD based printer. That's a 470nm curable resin. The other with be G+ from MakerJuice. This is a resin that's intended for use with UV light, but it can cure at wavelengths as long as 420nm. I'm going to try two different setups with the LCD. One will be bone stock and use the included white backlight. The other will be modified to have the backlight and the back of the case removed, and a 400-420nm high intensity LED backlight projecting through it. I have to run a few tests on that setup first to see how much the polarizer in the screen attenuates 400-420nm light (I have a spectrometer to do that). If the attenuation is minimal, then that will be the way to go along with the MakerJuice G+ (cheaper, and more resin options available)
I'm almost finished with the CAD model (Solidworks), so I hope to have that up later this week. Parts should be here soon for the frame and the linear rail. Still need to order the acrylic for the vat, as well as the FEP film and a few other odds and ends.
LCD Based SLA Resin Printer
Build in 'Resin Style Bots' published by evilc66, May 3, 2016.
SLA resin printer based on a gen3/4 iPad Retina display. The design intent is to create a printer with the highest resolution possible with a lower cost of entry compared to DLP projector based SLA printers.
-
-
Build Author evilc66, Find all builds by evilc66
-
- Loading...
-
Build Details
- Build License:
-
- CC - Attribution - CC BY
Reason for this Build
Wanted to build the highest resolution printer possible with minimal investment