
Hi all,
I wanted to start a thread to light a fire under my butt to get this project moving: A 4" x 40" CNC lathe! (it my be more than 4" and less than 40")
[Note of interest, my wife LOATHES my "projects," so it may be a little slow to completion... but since I got authorization for this "project" so that I can make the front-porch spindles that would otherwise cost in excess of $1,700 to buy, she's letting me move forward!]
I have purchased a Taig headstock ($63):
Complete Headstock Assembly (with lathe spindle) | Desktop Lathes
a Tailstock ($42):
Tailstock Lathe | Desktop Lathes
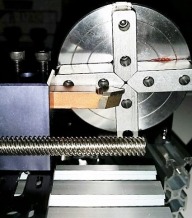
a Chuck ( $72, but it is a 4-jaw, self-centring - so as to turn square stock or round stock easily):
Chuck (4-Jaw Self-Centering) | Desktop Lathes
*** They also offer a 3-jaw self-centering and 4-jaw independent chuck)
and a Toolpost ($5):
Tool Post (for Lathe) | Desktop Lathes
I have decided to use V-slot linear rail and have purchased a couple each of 1500mm sticks in 20x60 and 20x20 along with various fasteners and plates. Everything came in yesterday, so I hope to start a preliminary build this weekend.
This is my 2nd CNC build. My first was a router from Inventables. I didn't find OpenBuilds until afterwards, but V-slot seems MUCH more versatile than the "MakerSlide" offered by Inventables.
I have not found a suitable lathe CAM yet (I ONLY use open-source, free software), Any Lathe work will be G-code designed for my CNC router (HeeksCad generates my G-code) with the CAM functions slowed down for lathe work.... OR I will hand-write the G-code... OR I will just be using the simple Arduino motor control functions (I am the first to admit that I cannot believe at age 44 I learned this kind of stuff)...
ANY comments, advice, experience, etc.. is MORE than welcome!!! Criticism is especially welcome - I have learned more from ONE failure than I have learned from 1,000 successes...
[/ATTACH]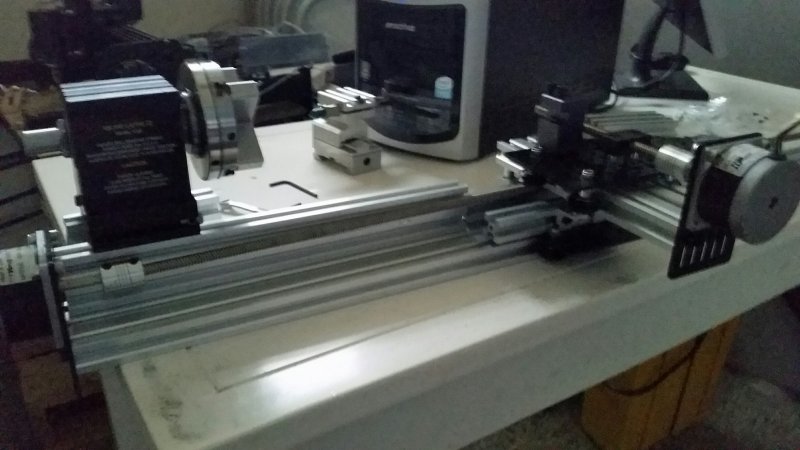
Update.. MY ELECTRONICS PACKAGE IS IN!!
The physical design has morphed just a bit, but not enough progress to show pics. I wanted to make a list of hardware and software I will be using.
The software is simple (all open source and free):
My Computer is a simple Dell that was originally purchased around 2010 and is running the Linux Ubuntu 14.04 operating system (but this should all work in Windows and MAC). I am NOT running LINUXCNC - that is a whole different platform and I didn't want to anyone to confuse the the two...
HeeksCNC:
This is "CAD/CAM" software, but NOT for a lathe. I am using the "x-y" axis to make a "profile" that the G-Code will cut... I will have to make allowances for that when I draw and when I set up the "CAM" functions (I will have to slow down the speed of travel). These should be easy adjustments - I will just have to figure out "speed and feed" for various materials. It can be downloaded here:
HeeksCNC 1.0 - HeeksCAD & HeeksCNC
Universal G-Code Sender:
This is what will send the G-code - most builders will know what this is, but if you are new, you will have to do a little learning on how to "install" it - there is plenty of info on the web for that.
GitHub - winder/Universal-G-Code-Sender: A Java based GRBL compatible cross-platform G-Code sender.
GRBL:
This is not so much "software" as "firmware." It allows the arduino to interpret G-code. This should be familiar to anyone who is "building" with Arduinos. It will have to be "flashed" to the memory on the arduino. There are a million articles on the web telling how to do that. I felt inclined to include this as it is needed
grbl/grbl - C - GitHub
AND that is it...
HARDWARE:
Arduino UNO:
Please buy the original from the Arduino site. All mine come form there - it is the heart and soul of the "maker" world and supporting it means "making" moves forward. Yes, there are cheep Chinese knock-offs, but it is NOT worth the savings, IMHO!
Arduino - Home
PROTONEER CNC shield v3.0:
This fits on top of the arduino and I typically buy them on Ebay. I can usually find a "package deal" that includes an arduino and the Pololu drivers.
#1 CAUTION: When you buy this on EBAY, be SURE it comes with the POLOLU DRIVERS!! Sellers will "trick" you into buyng the shield without the drivers, so be careful to FULLY READ what they are selling! (once just looked at the pic and when it came in without the drivers, I was PISSED! I went back and read the EBAY page, and it never said it came with the drivers, so I could do nothing -except give a negative rating).
#2 Caution: Be sure the one you buy comes with the header pins and components installed - it costs a dollar or two more, but no one wants to mess with soldering this stuff together (unless you are into that, then go at it, pal!)
Pololu DVR8825:
These are the boys that do all the work! I love them because they work, they are reliable and they are CHEAP! I can get 5 of them for $12-$15 on Ebay ...AND ...AND ...AND they are easily replaceable when you do something stupid and burn one up! You will probably need a fan like the one in you PC to keep them cool. they SHOULD come with a heat-sink for each one - just attach with the included sticky-pads and go!~ I build a little plexi-glass box - we'll cover that when I get to it in the build.
Caution: once again, be sure the ones you buy have the header pins already installed!! Unless you just get-off on tedious micro-soldering.
POWER SUPPLY:
Sometimes I hack these out of old computers, but get a 12v, 24v, or 36v like this if you wanna keep it simple:
MEANWELL NES-100-24, 100W Single Output Switching Power Supply POWER SUPPLY
I usually get them from EBAY...
If done correctly, you can snap together the whole hardware package in about 2 minutes...
And that is it. I will discuss my motors as we build, but these are like girlfriends: You may not like mine and my tastes may be different, but mine makes me happy, so get your own!
##################
Trying to show a little progress with some pictures... The pic below shows how perfectly the Taig Headstock matches the open builds corner brackets... It's really great stroke of luck!!!
The below is just another overview of the whole thing for critique!
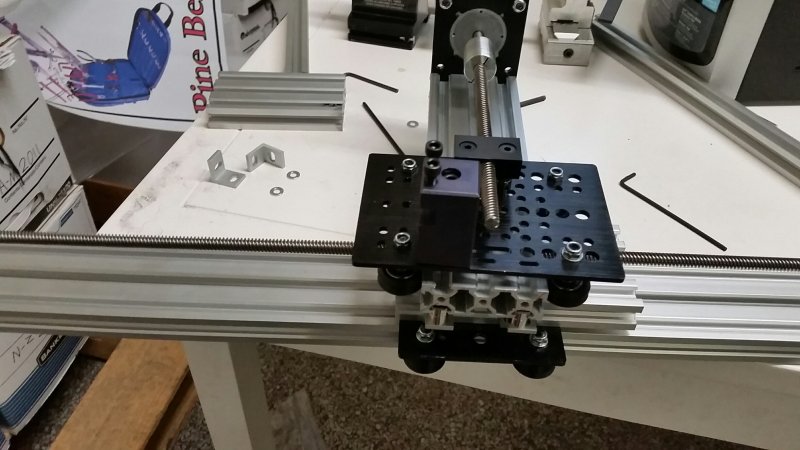
THE ABOVE picture shows this as it is "planned" so far. This is actually sitting a little to the right (facing the chuck) of where I was considering after realizing the original plan was never gonna work... I am wondering about the "rigidity" of it being that far from the carriage as it will create more "torque" on the carriage the farther away it is.... oh, well, that is where it is staying for now and up until I can test run the machine with either Brass or aluminium (or I may get real crazy and try steel).
Trying to figure out what kind of motor to use... I have some laying around, but I want this to be "pretty." We'll see what I can dig up out in the bone yard!
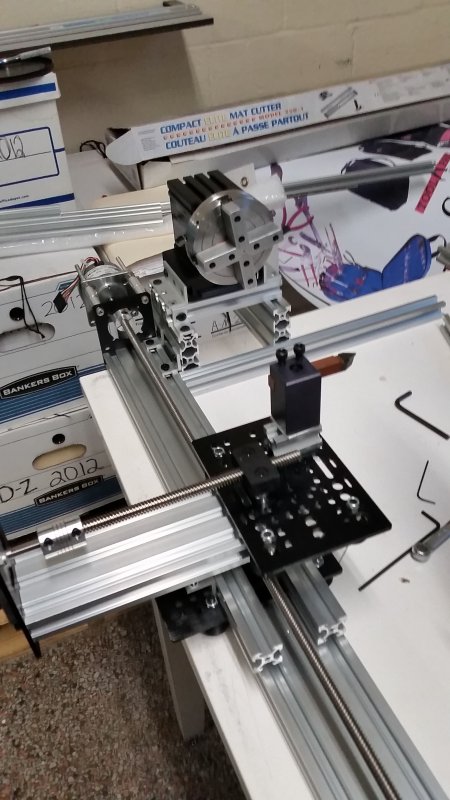
Ok, After a 4 month delay, I've made some progress: I got the spindle motor mounted!
I used a Single-Phase, 56C-frame, 1/2 HP motor @ 1750 RPM (anything between 1725 and 1800 would be the same thing, it's all in how the manufacturer labels it).. This one is from a Chinese manufacturer called Worldwide Electric.. It (or something similar) can be purchased at YOU LOCAL MOTOR HOUSE for around $100-$150... There are many of these type motors on Ebay, you just need a motor you can bolt down, but here is the one I bought from a local dealer (Worldwide Electric GP Motor NT12-18-56CB, TEFC, REM-C, 1 PH, 56C, 1/2 HP, 4.4 FLA, Less Overload)
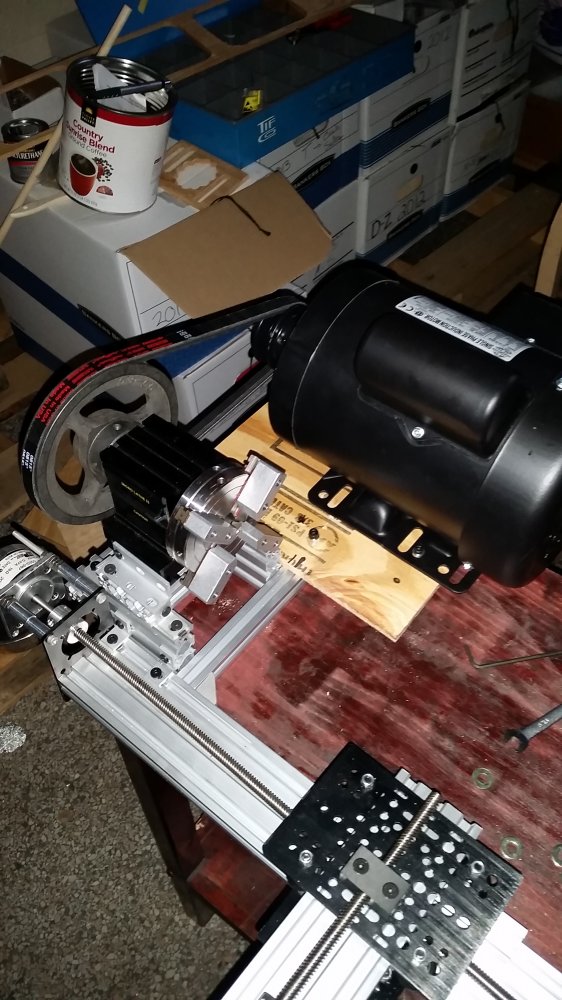
I also added the pulleys and a belt, which can probably also be picked up at the motor shop or a small engine repair shop or even tractor supply. I used a 2" pulley on the motor and a 6" pulley on the spindle head. This gives me a spindle speed of 600 and 54in/lbs of torque, which means it WILL RIP A FINGER OFF your hand!!!
As you can see, this is not rocket surgery... I simply bolted a board to some "single" rails and bolted the motor to it. The belt can be tightened where the board attaches to the rails.. just loosen the bolts and pull the board-and-motor away from the spindle and then lock it back down - simple!
Lathe 4" x 40"
Build in 'CNC LATHE BUILDS' published by Johnnycatt, Jan 22, 2016.
This is a lathe. I do not plan on making parts for NASA, but I want to be able to turn, face and bore things like wood, brass, aluminum and plastics.
-
-
Build Author Johnnycatt, Find all builds by Johnnycatt
-
- Loading...
-
Build Details
- Build License:
-
- CC - Attribution - CC BY
Reason for this Build
I wanted to try to finally break thru the "glass ceiling" of the lathe build. their are plenty of 3D printers and routers that are out there, but there is NO lathe for the "common man." I am hoping this will be it!Inspired by
In the words of Elwood Blues, "We're on a mission from God..." -
