To supplement my CNC router (Ox) I wanted to add a laser diode.
After some time messing around, I decided instead to build a minimalist dedicated laser cutter/engraver.
I've gone for a 5.6W laser diode from Endurance Lasers - from reputation and recommendation.
I spent days looking at all the offerings from China, but I couldn't find my specs at a price I could afford.
I wanted: >5W, PWM control, continuous running, light weight (as I am cantilevering my x-axis, less weight is more good!).
And nothing on Aliexpress in my price point fitted those requirements.
PWM with diode lasers is particularly difficult from China - they all say they are PWM, but unless you're spending $800 or want something only <1W, they are just offering TTL on/off.
The other thing was looking at reviews and specs for diode lasers, Chinese rated 5.5W are actually only delivering the same power as a 2-3W diode in Europe/US. They also push the diode specs, resulting in overheating and shorter life.
My cutting needs aren't great - I'm going to be cutting foam board, cardboard and paper, if I can cut balsa and some thin MDF I will be ecstatic. If I can cut the 2mm acrylic I use to make lamps, clocks, etc., even better. And the ability to raster-engrave will be welcome.
After discussing with various hobbyists and manufacturers I was heading to 10W - in Chinese diodes. I asked for a few quotes, but one manufacturer told me it was overkill and unnecessary expense for what I wanted - I love it when a vendor tells you to spend less money
So, George of Endurance Lasers got my order and it is in transit from Smolensk as I write.
As I'm a dab hand with the electronics I thought it would be cool to build a unit from scratch. This not only gives me a better grounding in laser diodes (something I knew nothing about 2 weeks ago), but would help if I needed to make running repairs or mods down the line.
I had looked at the ACRO as the basis for my machine, but after the Ox, I was keen to look at a different way of doing things than the traditional dual x-axis gantry, beefy y-axis gantry.
I have been looking at some of these cheap pressed-steel/extrusion 3D printers that just have an arm on a Z-axis. I thought I could do a similar thing, only on its side. Minimising the size also appeals as theres not a lot of space left in my playroom.
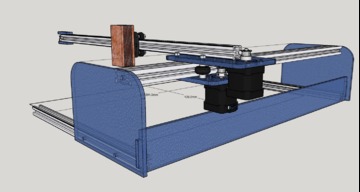
So, a 2-axis system using a cantilevered X-axis.
For this I worked out I can get away with only two NEMA17 steppers, a much smaller Arduino-based 2-axis GRBL Shield running Synthetos G2Core (instead of a 4-axis TinyG, a 5-axis Smoothieboard) - truly minimal.
My total length of V-slot is 654mm (26") of 2040 and 600mm (23.5") of 2020 for an A2-sized cutter with a working area of greater than 420 x 594 mm (16.5" x 23.25" ). With a set of custom laser-cut acrylic plates (less than $20, all up) a couple of metres of toothed belt and some wire, the whole thing is going to be CHEAP!
So far it's just in the planning - I've got all the hardware together that I had on hand - v-slot extrusion, wheels, motors, Arduino Due, GRBL shield with Polulu-type DRV8825 drivers, I've sent the plates off to be cut and ordered the mini-v gantry set to mount the Laser diode to, I've weighed my extrusion, my NEMA17s, and estimated the weight of the plates, did a hack balancing job and designed into the plates the ability to extend out feet to allow for future add-ons - like a camera or additional cooling.
Once the plates are back from the cutters and I have completed the initial assembly, I will put the BOM, the files, up for view.
+Laser
Build in 'Laser Cutter Builds' published by BNMaker, Sep 2, 2018.
A minimalist 2-axis A2 sized laser diode cutter/engraver. Designed to give the most function using the very least number of parts at the lowest price.
-
-
Build Author BNMaker, Find all builds by BNMaker
-
- Loading...
-
Build Details
- Build License:
-
- CC - Attribution NonCommercial - Share Alike - CC BY NC SA
Reason for this Build
To try and build the most minimalist laser cutter possible, in the same vein as the minimalist sub-$200 Chinese stamped-steel 3D printersInspired by
Cheap pressed-steel 3D printer -
Parts list
Qty Part Name Part Link Comments 1 600mm 2020 v-slot Link X-axis 1 654mm 2040 v-slot Link Y-axis 1 mini v-slot gantry set Link X-axis gantry 1 acrylic plate set Link Y-axis gantry, laser and motor mounts, idler pulley, chassis stand, controller mount 2 NEMA17 stepper Link Y-axis, X-axis 1 2000mm Gates GT2-3MM toothed timing belt Link 700mm for Y-Axis, 1250mm for X-Axis 3 Gates GT2-3MM 20 tooth sprockets Link 1 for Y-axis, 1 for X-axis and one as an idler at the end of the cantilevered X-axis. 1 Arduino Due + GRBL shield with 2x DRV8825 drivers Link Motion-control board 4 delrin v-wheel sets Link Y-Axis gantry 1 24V switch-mode power supply Link For GRBL shield/Steppers 2 500mm 2020 aluminium extrusion Link stabilisers - not v-slot. 0 Link -
Attached Files:
-


