
I'm not really the guy to post a "how to" but I can tell you how this project came to be.. A few years back I found a real interest in the 3d printer boom that was happening and found myself owning the worst piece of equipment on the market (I won't say the name)... I watched it work and saw the flaws and figured I could do better. That resulted in many attempts at my own 3d printer build. None of the variations made me happy as there was always something wrong with it. The issues with previous builds really came down to being cheap. I could buy parts like everyone else does but I wanted to make my build out of the parts and materials I had on hand.
Because of my profession I come across a lot of used electronics and mechanical items that I like to re-purpose. I figured one day I'd have enough materials to make the build I wanted. Well, that never happened. At least not yet anyway. My 3d printer was never build. One day in looking for a new controller I stumbled upon smoothieware and smoothieboards. WOW, what a concept. An entire community based on an open source cnc controller board and software! That lead me to my first laser.
I ended up buying and ebay special K40 Chinese laser from ebay. Within an hour I was tearing it apart and building upgrades. There was so many improvements that needed to be made and were relatively easy to do. First thing was to remove the bed and install my own. Next I removed the vent and build my own. Then I needed a new controller because the hacked version of Coreldraw was horrible!
Pretty soon my K40 had expanded to a bed size of 12" x 24" with a 2 inch Z bed and pretty soon I wanted more! I wanted to put my guitar in it. I wanted to put my coffee table in it. I wanted to put anything I wanted into it but the limited space made it impossible.
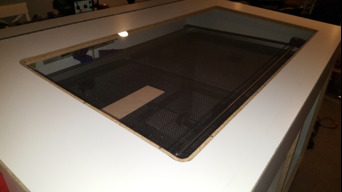
I decided to go for broke and make the largest laser setup I could with all the bells and whistles. I was able to acquire the many feet of 8020 aluminum extrusion. I took my time modeling all the parts and features. I should mention that because the 8020 was already cut (by the previous owner), I was limited to the sizes I used based on the lengths of material I had available to me. That's partially why it has a bed of 37 inch x 51 inches and not something nominal. The z bed has a travel of around 12 inches. So although I can't put my coffee table in it, it sure opens up a lot off doors to other things to cut or engrave.
There are a lot of future upgrades I'd like to add and I'll try to keep this up to date as well.
Feel free to ask me questions!
K40 Laser Build (Major Changes)
Build in 'Laser Cutter Builds' published by Superslinky, Nov 8, 2017.
Major K40 Laser Mod
-
-
Build Author Superslinky, Find all builds by Superslinky
-
- Loading...
-
Build Details
- Build License:
-
- CC - Creative Commons Public Domain (CCO 1+)
Reason for this Build
I've always been interested in computer controlled things like 3d printers and the such. Why not build a laserInspired by
Laserweb, Smoothie, CNC's, Open source, openbuilds -
Attached Files:


