*Disclaimer: All holes drilled in this project were done with a Harbor Freight drill press with runout measured in inches.*
I YouTube. A lot. On YouTube I came across vertical milling centers just hogging through materials quickly turning ideas and dreams into usable, 2 and 3 dimensional objects. Once I saw that I was hooked. What are the capabilities? What materials can it do? How does it work? And also important, how much does it cost? After doing some research I quickly determined I am not fitting a $150,000 production VMC in my garage. But man, how cool would that be? So continuing to dream I scoured the internet until I found a group of wonderful communities with thousands of members encompassing thousands of builds and ideas to suit anyone who wants to cut anything with the help of a computer. Shortly after, I hopped on board and immediately started learning additional skills to aid in building a 3 axis CNC machine.
First, I came up with what I wanted to accomplish. I wanted to be able to cut aluminum as a primary material, and wood as a secondary material. I drafted up a plan in Google Sketchup, and while it is good for generalized ideas, I wanted something a bit more precise. Shortly after my first design, I started learning to use Solidworks, 123D for smaller parts, and finally Autodesk Fusion 360. I made the switch to Fusion and never looked back. Over the next couple months I encountered a lot of material design questions. It was hard to balance bang for buck, capability for cost, etc. In the end I decided on a bolted together steel frame made from 2x3, 0.250" Wall AS500 Steel tube. I opted for this to avoid any warping issues I have read others complain about. As an additional bonus, this makes the frame easier to modify for future upgrades or design changes, and adjustment for square can be maintained after moves if necessary. Moreover, I figured I would much prefer to have things too stiff than not stiff enough. For the X-axis I wanted a strong span, but nothing that would cause me to have to move to a bigger frame motor than the Nema 23. I ended up choosing half inch aluminum plate along with 1030 10 series aluminum extrusion for the X-axis. After selecting the frame and component materials, I made the decision on power transmission and motors. For the transmission of power I went with 1/2-10 2 start acme threaded rods with delrin anti-backlash lead nuts. It was a good selection for my first setup and was easy to procure parts to support this setup with a relatively low initial investment. For the linear movement I kept my eyes peeled on eBay to see if I could get lucky enough to get a matching set of 20mm linear rail and bearings. Luck just happened not to be in my corner. Working within budgetary constraints, I opted for the supported SBR20 bearings for the Y-axis, and some NSK (I think?) 12mm linear guide rails and bearings on the X-axis, and Thompson unsupported 16mm rails for the Z-axis. There was one thing I didn't like about this setup initially. When I first considered the NSK rails for the X-axis, I looked up the dynamic load rating on the rails, and after seeing the numbers decided that it should perform fine for what I was looking for. After holding the bearings in my hand, I was unsure as the size was quite small. Smaller than I thought. So i checked the static and dynamic load ratings again, and decided to try it. If it failed, at least I could still use it to build a 3d printer.
Once I completed the bulk of the machine, I forgot one crucial part to the entire build and that was a bit more permanent of a place to put it. I had been using a piece of scrap MDF to build most of the machine on. After getting it together and seeing the MDF bend to accommodate the weight of the CNC machine, I elected to build a wooden table that was a bit more substantial to support it. It worked out well, and shortly became an electronics enclosure as well. I implemented an intake and exhaust fan in strategic locations and started wiring all of the necessities to their respective locations.
For the power supply I used a 48v 7.3 amp DC power supply. Again, this is an area that took an extra bit of thought as to what power supply to use to accommodate to what driver and which motor. I knew I wanted a Nema 23 framed motor, and started from there. I elected to use some 381 oz. in. Nema 23, 3.5 amp/phase motors. This was a great choice, and provided plenty of torque for my application and lead screw selection. I paired these motors with Keling KL6050 drivers, and have not been let down yet. The ease of setting up these style drivers leaves little to be desired. As for the wiring between components, I utilized 16g twisted shielded pair setups on 48v DC power delivery, and twisted shielded wire groups to any signal carrying wire. The Breakout board is a C-10 type board and it came with a neat little wall wart power supply. Before installation, I powered up the components to ensure communication between the Dell Dimension E310 I found laying around my house. The plug in 5 volt power supply I received with the C10 instantly burned up. I was at a loss. Call the manufacturer, and wait a week or two for a 5 volt power supply? No thanks. I nabbed a Thermaltake PC power supply from my local electronics supplier at a steal, and modified it to provide the missing 5 volts DC. The bonus about this is, I suddenly also had access to a 12 volt DC power supply, which comes in handy for a ton of other accessories CNC machines are known to have (Mainly LED lights, but can also serve to control relays, inductive limit switches and even 12v DC water pumps for charge cooling for future upgrades). The best thing in my opinion about using a quality PC power supply is the power comes out very clean, and can provide some respectable amperage in regards to the 5v and 12v DC rails.
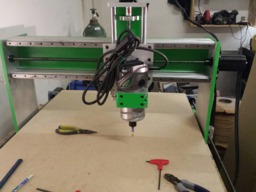
With everything connected, preliminary movement tests complete, it was time to mount the router. The cutting tool I selected was the Hitachi M12VC. Cost was certainly a driving factor behind this, as well as a wide range of high speed, low run out collets that were available. In addition to this, it has a class leading noise level of 79.5 dB and electronic speed control which helps in varying loads for keeping the router speed steady. I purchased the router through Amazon, and the collet set from Precisebits.com. Included with their collet set was a calibration indexing blank with TIR <0.000050", which proved to be helpful to ensure proper collet seating. I am happy to say that this set of collets improved the routers runout, and was a 'no brainer' in my quest for accuracy.
With a fair amount of sweat and maybe a dash or two of blood, I am finally done. The journey in learning to build this was awesome. I learned a ton along the way, and am eager to see more builds by the community! I must say, the CNC continues to perform well, but it seems I am constantly adding new things to it already, and loving every second of it.
Machine Breakdown: 3-axis Gantry style Machine
Motors: 4x 381 oz. in. 3.5a/ph Stepper motors
Drivers: 4x Keling KL6050
Breakout: C10
Computer: Robust gaming computer used for designing parts, Dell Dimension E310 for Machine control
Software: Mach3, Fusion360, Windows XP
Frame construction: Steel, Aluminum, Aluminum Extrusion
Work Envelope: 26"W x 30"L x 6" Z travel
Gantry CNC - Decisions made only to change over and over.
Build in 'Cartesian Style CNC' published by GDanger117, Jan 11, 2018.
This is my first CNC build. As per the norm, I went in with months of research, planning, and resource gathering tied neatly together with a solid plan. As the path went on, the plan continued to change to accommodate issues I hadn't counted on. But, at the end of the road, the project reached completion, and I learned a ton along the way!
-
-
Build Author GDanger117, Find all builds by GDanger117
-
- Loading...
-
Build Details
- Build License:
-
- CC - Attribution Share Alike - CC BY SA
Reason for this Build
I built this because I am a maker. Whenever I see something that captivates my interest, I usually want to buy it. If It ends up being a difficult item to obtain, or isn't probable for a middle class working man to buy, I try to build it. In this case, it ended up being a success. The journey was worth every penny.Inspired by
Neo7CNC.com, many different and modified OX builds -
Parts list
Qty Part Name Part Link Comments 2 2x3 0.250" Wall AS500 Steel tube, 36" Length Link Local Steel Supplier, Griffin Steel 3 2x2 0.180" Wall AS500 Steel tube, 36" Length Link Local Steel Supplier, Griffin Steel 2 10"x12"x0.500" AL6061-T6 Aluminum Plate Link Ebay Aluminum supplier 2 SBR20 Linear Rail, 36" Length Link linearmotionbearings2008 @ eBay 2 Thompson Linear Unsupported Rail, 16mm, 300mm Long Link Lucky score on eBay 2 unbranded(NSK?) 12mm linear guides Link 870mm long, eBay find 1 holo-krome international hardware http://www.fastenal.com Link Found all I needed at local Fastenal 1 Hitachi Router mount http://www.cncrouterparts.com/hitachi-m12vc-router-mount-... Link CNC Router parts Hitachi M12VC Mount 1 Assorted radioshack/scavenged electronics Link 6 8020 1x3 10 Series Aluminum Extrusion http://www.8020.net Link Scored off of eBay, excess material 4 1/2-10, 2 Start Acme threaded rod http://www.Fastenal.com Link Fastenal 4 dumpsterCNC delrin anti-backlash nuts http://www.dumpsterCNC.com Link 1/2-10, 2 Start 6 dumpsterCNC thread lock http://www.dumpsterCNC.com Link 1/2-10, 2 Start thread locker 4 6.25mm to 1/2 motor couplers Link random eBay sellers 4 KL-6050 Stepper Motor Driver http://www.automationtechnologiesinc.com Link Great Driver for the $ 4 KL23H2100-35-4B http://www.automationtechnologiesinc.com Link 381 oz. in. 3.5a/phase dual shaft stepper 1 Hitachi M12VC Router http://www.amazon.com Link Picked this up off of Amazon. 1 C10 Breakout Board http://www.automationtechnologiesinc.com Link Very easy to set up, great I/O for the $ 1 48V DC Power supply http://www.automationtechnologiesinc.com Link Picked up 1 at first, but that changed. 10 2x2x0.250" Aluminum Angle http://www.ebay.com Link Random ebay aluminum dealer -
Attached Files:
-


