
This is my 1st submission to openbuilds.com and my 1st venture into building a 3D Printer.
This build will chronicle my experience with the Phoenix 3D Printer kit from Ez3D.
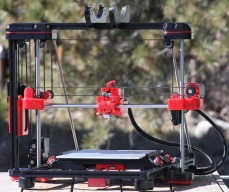
The Phonenix 3D printer is 20" wide by 20" deep and 19" tall with a build area is 250 mm wide, 215 mm deep and 200 mm tall (9.8" wide x 8.5" deep x 7.9" tall) with a heated build platform and a print resolution of 0.1 mm.
The Phoenix 3D printer uses a RAMBo controller board with a timing belt/gear system with what looks to be NEMA 17 stepper motors for the linear motion.
I do not have the kit yet because currently there is a 10 to 12 week back-log of orders. I placed a down payment on April 15th so as of today (June 24th) it has been exactly 10 weeks so I am hoping that my kit will be ready sometime soon.
The structure looks to be made up of metal rods and custom plastic connection pieces with a moving heated build bed on angled bearings. The Phoenix kit can be bought and setup with either a single or dual extruders (I opted for the single extruder for now, a 2nd extruder can be added later) and has a really cool integrated spool holder on top.
The software provided with the Phoenix looks really unique to me and was one of the main reasons I choose this kit. Ez3D uses a modified version of the open source Marlin firmware (since the printer is Arduino based it can be re-flashed with most any other firmware). Ez3D's software is available for Windows (XP, 7 & 8), Mac OSX and Linux.
Built into the provided software is a "Parts Library" that can group .STL files into "assemblies" and "projects" that allows the tracking of what needs to printed. There is also a "Print Recovery Mode" that I do not see listed in many other software packages that can "rewind" a print in the case of any errors like tangles or calibration/print errors.
The software also supports a mobile app that allow the monitoring of print progress and estimated time remaining from a iOS devices. An Android version is in the works. I have Android devices and won't be able to take advantage of this option as of yet. There is also a set of integrated diagnostic tools that can "exercise" each axis, print test patterns, calibrate the Z-axis, nozzle flush, etc.
The Phoenix 3D printer is available as a kit for $374 or fully assembled for a mere $25 more plus shipping (looks like shipping will a little less that $100 for me). An 2nd extruder is available for an additional $100 and Ex3D sells some filament rolls (PLA, ABS & HIPS 1 kilogram/2.2 pounds rolls) for $29.99 plus $5.01 shipping.
Here is the spot on my desk reserved for my Phoenix 3D printer.
![[IMG]](proxy.php?image=http%3A%2F%2Fwww.openbuilds.com%2Fattachments%2F2014-06-23-17-36-05-jpg.3060%2F&hash=30678e96db0c11c53a8a8923445b3508)
The laptop will be relocated once the build begins.
Updates will be posted as often as I can once my kit arrives.
Ez3D - Phoenix 3D Printer Build
Build in 'Cartesian Style Bots' published by Jeremy, Jun 24, 2014.
This is my 1st submission to openbuilds.com and my 1st venture into building a 3D Printer. The Phoenix 3d Printer is a kit from Ez3D, a company based out of Colorado, started and backed by successful Kick-starter and IndieGogo campaigns. The Phoenix 3d Printer kit is currently backlogged 10 to 12 weeks which means quite a wait. I will be chronicling my experience with this kit as I get it done.
-
-
Build Author Jeremy, Find all builds by Jeremy
-
- Loading...
-
Build Details
- Build License:
-
- CC - Attribution NonCommercial - Share Alike - CC BY NC SA
Reason for this Build
I am building this 3d printer to create parts for other build projects, prototypes, etc.Inspired by
I am inspired by many other builds on this and other sites. -
Parts list
Qty Part Name Part Link Comments 1 Ez3D Phoenix 3D Printer Kit, Single Extruder https://www.phoenix3dprinter.com/buy-a-phoenix.html Link I am not associated with this company or site I just want to provide all relevant information.


