This is my adaptation of C-Beam XXLarge Tank by Dollarz81. I ordered the C-Beam XL kit parts and upgraded the Y axis to 1000mm. That gave me all the parts needed to build this.
I am using a Smoothie Board for controller and Leadshine drivers and high torque motors.
I still have a 2.2KW water cooled spindle to attach as soon as I figure out how to make a 80mm bracket attach to Z axis..
Of course, still working on electronics enclosure and mounting plugs.
I have been working on the table to hold the XXLarge and have decided on a torsion box design. Here are some pictures of the build.
Jan 15, 2018 Update
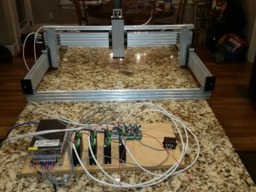
I finally got enough parts setup the way I want ad was able to was able to do my first cut, which was to drill holes in the spoil board, cut a counter bore hole and install blind nuts under the board.
As you can see I installed limit switches on all axes and built a box to hold the electronics. It has a cover I still need to cut vent holes and mount. It you notice the bread board in the electronics box, that is and experiment for the external drivers that is working quite well. I'm not sure about the OpenBuilds external drivers(could not find spec in data sheet, but mine were from Leadshine. The data sheet says they will sink no more than 16 milliamps. However, the SmoothieBoard has a max 4 mA source and sink current on the external driver pins. Under single load conditions the Smoothie seems able (I suspect it is have trouble but I don't have an Oscope to verify) to drive the external driver connected, but for the Y axis I have 2 drivers connected in parallel. This made for intermittent operation so I need to boost the current sink capabilities. I used a 2N2222 NPN transistor with a 4.7K resistor on the base to get upto 200 mA using an open collector config. This has worked and I will be making a PCB and adding this to all axis.
Other than some cable management still needed and a 3D printer for making clips and endcaps I have completed the build, and will be doing upgrades from here.
The cutting area is 365 mm x 740 mm (25.5 in x 29 in). I haven't measured the height yet but it is about 50 mm (2 in) of usable space but I have to adjust the spindle to get based on the tool length.
DM C-Beam XXL Tank
Build in 'Cartesian Style CNC' published by dmasters, Jan 20, 2018.
1000mm x 1000mm C-Beam XXL CNC with external drivers and high torque Nema 23 motors, 2.2KW Spindle with VFD.
-
-
Build Author dmasters, Find all builds by dmasters
-
- Loading...
-
Build Details
- Build License:
-
- CC - Attribution - CC BY
Reason for this Build
To learn and build cool stuff. Building is the most worthwhile part.Inspired by
Dollarz81, Kyo, and all the other builds that gave good explanations to build


