
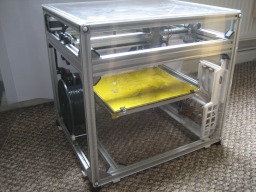
Here is my printer build. It has a print volume of 305x209x219 and everything tucked inside a box of 490x420x450
It uses 2M of 40x20 'v'slot and 12 wheels.
The remainder of extrusion is 20x20 Bosch pattern that I had from a local company.
![[IMG]](proxy.php?image=https%3A%2F%2Fi.imgur.com%2FyTNrom3.jpg&hash=6fbf93beedb059b7e5e5a8575775b835)
This build first started out as a mendel style printer i.e. a Y axis bed and the X axis rising with the Z.
A mendelmax 2 direct copy, in fact. Funny that the Mendelmax 3 now uses 'V' slot.
It was just coincidence that I found Openbuilds V slot via Ooznest UK as an alternative to the MM2's Igus linear motion gear.
![[IMG]](proxy.php?image=https%3A%2F%2Fi.imgur.com%2FYGGyjXN.jpg&hash=dc188c037c608a6071e3aa953584022b)
This design saw a few CAD iterations as I built the frame into an enclosure ...
![[IMG]](proxy.php?image=https%3A%2F%2Fi.imgur.com%2FW1Nv6fG.jpg&hash=0a1938faa0a1b3efd83238154c9aae69)
A visit to the TCT show in Brum' and a look round a few pro printers led the way to a cube design more in the UM style - elevating Z moving XY
![[IMG]](proxy.php?image=https%3A%2F%2Fi.imgur.com%2F6gYHwIQ.jpg&hash=860a7d183d64f49e5ca18e062266c624)
This 'V' slot is such a pleasure to design with as a structural member and guide rail in one with so many ways to motorise motion.
There were a few design variations - fixed motors-moving belts, moving motors-fixed belts, one motor, 2 motors.
The overall design was there but lacked a certain je-ne-sais-quoi (as we say in English)
Then I saw Openbuilds familiar Carl Feniak had converted a printer from H-Bot to Core-XY motion, citing; "The ability to run drive belts inside the 'v' slot . . .something, something"
I decided that CoreXY was the quirkiness that this printer lacked.
I liked the idea of fixed X & Y motors and tucking the belt inside the extrusion and that gave me a direction. . . Offset belt path Core XY
Running the belts inside the V slot required a little chopping out for the pulley with a grinder-
![[IMG]](proxy.php?image=https%3A%2F%2Fi.imgur.com%2Fu7Bw0Gn.jpg&hash=57296461868cf5d28f00d4fdb93ac691)
I tried a method of using fixed bearings with spinning shafts/ pulleys but found it transmitted a lot of noise thru the frame-
![[IMG]](proxy.php?image=https%3A%2F%2Fi.imgur.com%2FtotIC4c.jpg&hash=49dc38a2776ef07482d3d29aeb416c5d)
So I went for 2 605ZZ 5x14x5mm bearings per belt as running idlers-
![[IMG]](proxy.php?image=https%3A%2F%2Fi.imgur.com%2FQF2cdp4.jpg&hash=f2a00401cf9c2e224cd4c7e2dff26881)
I don't have access to workshop machining, only jigsaw/ angle grinder/ pillar drill so used M5 c'sk screws as axles in hand cut Alu plate.
I opted to put the belt return path to the front of the printer so leaving the rear clear for the Z axis parts.
The 'v' slot to the right of the above picture is the front. It was an offcut so used it for the structure.
There's 2 20x20's side by side at the same height to the rear to complete the look.
I had already bought the SCS10 bearings and 10mm ground shaft so I put that to use on the Z axis. Otherwise I would have liked to use 'V' slot there as well.
![[IMG]](proxy.php?image=https%3A%2F%2Fi.imgur.com%2F9TEA6Du.jpg&hash=10eccc78abf17fa52911c94fd874837b)
The Z platform was made from some H section Ali framing extrusion that was down the side of my shed. The lead screw is a TR10x2 with a delryn nut.
I like my cables tidy. The cable chain arrangement was inspired by something that Bits-from-bytes once did-
![[IMG]](proxy.php?image=https%3A%2F%2Fi.imgur.com%2Fpdc3nAD.jpg&hash=a4d6aef49f6b8486d9a3945e1f434cd9)
The extruder is airtrippers direct drive bowden mounted on rubber mounts. The bowden originally ran inside the cable chain which worked but I ultimately ran it outside to reduce friction on the filament.
I made my own wheel plates up to suit my requirements.
![[IMG]](proxy.php?image=https%3A%2F%2Fi.imgur.com%2Ff0w9fiB.jpg&hash=bd2de107bb5af591bf139a4d48d1be5d)
There a 4 Alu blocks which hold the bearing idlers. They are M5 csk screws thru the block with a washer/nut/washer/bearing/washer/bearing/washer/locknut. The block screws onto the 'v' slot of the moving X axis. Like the motors; one side points up, the other down.
![[IMG]](proxy.php?image=https%3A%2F%2Fi.imgur.com%2FaJLewoc.jpg&hash=513eaa452d1060a8b7f12cd9062824cd)
The wheel plates were first just mounted on the extrusion corner clamps, then I changed the rear idler blocks so that the plate screws into that too to stiffen it up.
I don't like wasted space. Every last millimeter was hard fought-
![[IMG]](proxy.php?image=https%3A%2F%2Fi.imgur.com%2FjXOOMPB.jpg&hash=56a19f193b9d3bdce6f22dfa5d8a2bf1)
Even the hot end wire had to be just so . . .
![[IMG]](proxy.php?image=https%3A%2F%2Fi.imgur.com%2FVTE3WsI.jpg&hash=7b52cd999e50d49aadd83cc2dba14a58)
The X carriage is 2 plates sandwiched on spacers
![[IMG]](proxy.php?image=https%3A%2F%2Fi.imgur.com%2FyxS0nyA.jpg&hash=2d667bcb428c4f6fcec44f77cee38a62)
The wheels mount to the rear plate along with belt clamps, wire terminals and X endstops, the front plate holds the Hotend assembly and cable connections.
![[IMG]](proxy.php?image=https%3A%2F%2Fi.imgur.com%2FrGfvrYh.jpg&hash=b13b2fcf47263a75c32f49c55cb9564f)
A couple of tips-
It's worth thinking in advance how you are going to adjust everything square and parallel and then lock it there in a build like this-
![[IMG]](proxy.php?image=https%3A%2F%2Fi.imgur.com%2FFXunNIm.jpg&hash=68585f18fa36c584bcf0b3e557e4e6eb)
For cheapskate nut inserts; if you grind the edges of a M5 nut it will slip down the 'V' slot. Put the ground edges facing in.
![[IMG]](proxy.php?image=https%3A%2F%2Fi.imgur.com%2Fo22Ns1r.jpg&hash=894713c135b206427bf3a33cc3b531c7)
Be warned that it can bite a lump out of the inside of the channel if you overtighten it which may be a problem if you intend to move the nut around to adjust something. Better to use a proper insert.
Thats about it for the moment, I may add more. There's an AutoCAD 3D model and a parts list attached.
It's all run well for a year now.
It does have the odd resonant frequency here and there on the acrylic covers. 1/32 microstepping on the stepper motors have much improved things.(Marlin firmware has come a long way in supporting CoreXY since I started all this)
I have some 'astrosyn' damped stepper mounts to fit one of these days and I may get round to replacing the worlds cheapest idler bearings with something more reputable too
There is a movie which is a compilation of build photos
At 10 minutes long, it's a little boring. My first attempt with Windoze movie maker.
There's a shorter descriptive video
Which is no Oscar winner either.
I hope I can inspire others in the way that others have inspired me. Thanks to all who share their knowledge.
Core-XY Cube
Build in 'H-Bot and Core XY' published by alan richard, Sep 21, 2017.
An enclosed cube shaped 3D printer using CoreXY motion. Fabricated from V slot extrusion, standard extrusion, aluminium plate and acrylic sheet using basic workshop tools. Using standard RAMPS/ Reprap electronics. Technically a 'Repstrap' currently used to build a true 'Reprap'
-
-
Build Author alan richard, Find all builds by alan richard
-
- Loading...
-
Build Details
- Build License:
-
- CC - Attribution NonCommercial - Share Alike - CC BY NC SA
Reason for this Build
I needed a tiny plastic clip for something. Engineers solution - 'build a 3D printer'!Inspired by
Stratasys, Carl Feniaks CoreXY -
Attached Files:
Parts list
Qty Part Name Part Link Comments 0 Link -
Attached Files:
![[IMG]](proxy.php?image=https%3A%2F%2Fi.imgur.com%2FuOhTWD1.jpg&hash=244b3dc475a9c2c35d62690c079c8407)