tl:dr
- You don't need any of this to make plates with the exception of quality end mills
- Added additional X/Y/Z (little but easily uses all of the bed)
- Added MGN12H rails to each axis
- Created custom plates to use rails mounted on existing C-beam
- Added spindle to get lower RPM
- 2 X (12"X12" 1/4") plates of aluminum + rails + spindle + (in my case) proper end mill = all parts needed.
- Added Rockler t-slots for clamping larger pieces
- Nothing is an affiliate link, I paid for everything out of my own pocket, including the OB stuff. Just added links to what I used as when I want to repro something I hate when I cannot find the exact same part.
Did some mods to my C-Beam machine. Bought this kit approx. 2 years ago (2 months shy). Bought it on a whim right after my daughter was born. Needless to say I spent a delusional night assembling it and did a terrible job. Loose joints, out of square, free spinning wheels...it was pretty horrific (to clarify the kit was amazing, I did a horrible job as a new parent underestimating how much time I could go without sleep and make good choices). Fast forward almost 2 years later, I decided I should get back to some of my hobbies and this was my first tackle...
I had decided to make a small, door hung, name plate for a friend. In the process I tightened and squared up my build (which was not a simple task given how poorly I'd constructed things), and cinched down the wheels to a respectable torque so they were actually engaged but not ceasing. With that out of the way I continued on to try some MDF. Worked pretty well and I was pretty pleased with the overall results. So I set out to cut some aluminum and after my first ridiculously terrible attempt I realized I should look at one of those feeds and speeds calcs I'd seen before. Well, with my DeWalt 611 router (which is an absolute beeeeeeast) I realized quickly that my little machine simply couldn't meet the low RPM/super high- feed-rate needed to make use of the Banggood acquired end mills I'd bought for experimenting. Spoiler alert -- buy some good end mills, it's worth the money. However, I'm far too stubborn to do something sensical right away...
I began researching how I might make this machine feasible for cutting aluminum on a regular basis with my cheap end mills. First things first, I need a spindle that can go below 16K RPM. So I bought a cheap Banggood 52mm spindle with PSU and speed controller. I got myself a little optical tach. and added some reflective tape to the spindle fan. Realize quickly that I have no way to mount this thing. Though it included a (actually super sturdy) mount, it didn't line up with my plates. So...here I am without any way to attach this thing. The day has come where all of my non-planning has lead me to spend some money I didn't want to spend. I bought a single flute, carbide bit from carbide3d (absolutely worth every single penny, and since I live in California it came in about a day). This was key to making something work on the machine. If you're working with a high RPM router (such as the DeWalt 611) on aluminum please do yourself a favor and just buy some of these, they're fantastic and saved me countless (additional) hours of frustration. And a shoutout to Winston for doing all those videos so i could figure out a path forward on feeds and speeds.
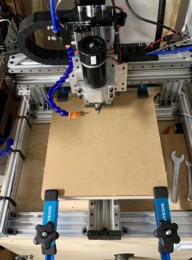
I fired up my hobby version of Fusion 360 (amazing product) and designed a Z-axis plate to hold my new mount. In the meantime during more testing i noticed I could easily flex any axis by hand so I decide to check out good ol' Banggood for some rails. Found some perfectly sized MGN12H rails that shipped from the US locations in a few days. Got myself 2 X 250mm and 4 X 500mm rails to perfectly match my setup. I was able to attach them very easily with no modifications using M3x8mm bolts and 3mm T-nuts. Overall I ended up just shy of hitting all the pre-drilled holes, but only a few left to spare connecting them to the existing C-Beams. They fit perfect! After checking size I decided to use that newly acquired bit to make a Z-Axis plate to use the new rail and the new spindle mount. Made a version and used some 3"x12"X.25" plate I had laying around to make a new Z-plate. Surprisingly it fit on the first try and I used it from here on out. You may note some of the screws are missing in thephotos and this is largely due to me test fitting some dust collection ideas to the unit, and also the lack of proper sized M3 screws in in my stash. I'm going to say the former is the real reason...
Next up make a new X-axis. Using the the same measurements I went back to Fusion 360 and created a new X-plate to match the 500mm rails and hold the Z-axis c-beam in place using the channels with T-nuts. This went extremely well (to my surprise). Once mounted I began work on the Y-axis. This was actually pretty straight forward and I made some small adjustments that cost me some z-height but also gained me (and then some) a full 12" x/y axis.
I created a new Y-axis that used the another set of 500mm rails and also some spacers along with the other other 12"x12" plate I had as a new bed. I then drilled some holes 1" off each corner to mount a waste-board. Once mounted I surfaced the waste-board (which I could easily hit ever inch of with room to spare based on my new travel). In addition I also mounted a couple of Rockler T-slot I had laying around from another thing I was working on to the bottom of the aluminum bed. With this in place I now have a reasonably goo starting point fo holding the 12x12 material in place. Double-sided tape works really well, but I really hate how it ruins the edges of a piece of acrylic. Between the clamps and screws things have been working pretty well.
All said and done each axis is in place with the rails and the new plates. The machine is incredibly sturdy considering I haven't changed any of the fundamentals other than added support to the axis' individually. While I cannot speak to the true advantage this has, I can say that I cannot flex any axis without lifting the entire machine.
Net net the machine is operating at the best it ever had. The cuts are sturdy and I'm producing chips as opposed to just melting stuff. This has been great both for aluminum and acrylic. I've had really great success cutting aluminum even with my super cheap end mills. Though I'll certainly recommend getting some nice coated endmills from carbide or someone of the same caliber.
In adding the homemade plates and adding the new rails not only did I get additional X/Y/Z travel, but also was able to add to the end stops directly the C-beam end plates for maximum travel on homing. And I'd me amiss if I didn't say how much I freaking LOVE the Blackbox + Openbuilds CONTROL. Really just an amazing product. I previously had the X-pro CNC V3 which was OK, but the Blackbox is really just such an enormous upgrade that the price is more than justified. The Xtension connectors and the excellent matchup to the C-beam dimension really move this into a class of its own. Not to mention that customer support was outstanding when I made a complete "id10T" error. It's really hands down the controller everyone should be using with these devices. It is aspirin for the electronics headache of these builds.
Hope this is helpful to someone in the future as I've learned a lot of valuable lessons. Happy to share my plate designs (and even happier if you can improve on them). Feel free to ping me with any questions. One fun side note is that the moving to rails offered up the entire X-axis C-beam top as a bed for a true cable chain which I ran all my electronics plus my air and coolant line though. It looks really nice in addition to be very functional . I also use an IoT power switch off the Blackbox toolhead to control vacuum and spindle.
i've also began using a Steamdeck to control as much as I can as my keyboard is never close tot he CNC. I'd be super interested in others know how to create Key commands in this product to control stuff like Z-probe and setting X/Y + check-size (which are my most used functions that aren't available though default key commands.
-
-
Build Author tmadrms, Find all builds by tmadrms
-
- Loading...
-
Build Details
- Build License:
-
- CERN (CERN-OHL1.2+) Open Hardware Licence
Reason for this Build
Really enjoy tinkering and love openbuilds products. -
Attached Files:
-


