Hi There,
In one of my other build logs I mentioned that I needed to improve my dust collection, so I spent a bit of time looking at all the different kinds of designs our there and selected one with the brush style edging.
I ordered the 2 inch flexible brush from Amazon.ca. 36 inches was about 20 dollars Canadian. I already had some 10 mm lexan.
In the files section you'll find the Sketchup model of the Z axis with the dust shoe parts attached. You'll also find another file that has the SketchUCam profiles as well as all the GCode I used to cut the parts out. If you do use the files please ensure you review them thoroughly before cutting anything and make any adjustments as necessary.
This is what the base part that attaches to the router looks like - similar to other designs out there. In the original design I had three aluminum alignment post inserted into this plate, you can see them in the picture. These have been removed in the final design.

I don't have a picture of the bottom part on its own. Needless to say it is oval with grooves milled into it that the brush fits in. Here is a picture of the completed bottom part assembly. You can see the grooves and other features. As with other designs I use magnets from Lee Valley to hold the too parts together. I chose the 1/4" rare earth magnets.

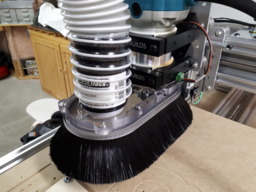
Here is the first assembly of this dust shoe fitted to the machine and cutting out a part.


One of the main issues with a brush type design that I read about on the forum and experienced, is the resistance the bristles have to downward force. Without some type of deflection of the bristles there is an effect on the Z axis.


So I cut out a part that fits inside the brush and forced the bristles out on an angle. This picture (repeated) is the first version of the part. After successively moving the part closer to the Lexan (decreasing the spacing between the wooden part and the plastic), the bristles naturally bent further and further out - until the part broke on me. It was only some cheap thin plywood (underlayment).
So we cut a new part out of 9mm Baltic birch plywood and installed it - success!! The profile of the inner Baltic birch part is the same as the Lexan part that holds the brush - except it was then edged on the router with a 45 degree bevel. Once installed the bristles bent out perfectly. Now with downward force on the brush, the bristles bend out with almost no upward resistance.


Here is the view inside and on top of the brush. As you can see the holes that used to be used for the alignment pins now have screws holding the wood part in place. I placed magnets in the mating holes on the plastic part that attaches to the router - so I have a total of 7 magnet fixing points between the upper and lower two plates.


A view of the part that attaches to the router.

It works great!
Thanks
rob
C-Beam Dust Shoe
Build in 'Everything Else' published by RobertCanthal, Feb 9, 2020.
A short description of the dust shoe I made for my machine.
-
-
Build Author RobertCanthal, Find all builds by RobertCanthal
-
- Loading...
-
Build Details
- Build License:
-
- CC - Attribution - CC BY
Reason for this Build
Improve overall dust collection. -
Attached Files:


