
The idea for this build was to compete with the QU-BD Revolution XL for speed and quality without the high cost and deafening sound of it's linear bearings. I may end up calling this Whisper3d.
Critique of Revolution:
The Revolution claims it's travel speed (1000 mm/sec) and print speed (400+ mm/sec) are due to the fact that all pieces are turned to mill specs on CNC mill/lathe. While that is true, Open Builds extrusions and brackets are also within mill specs. My reasoning is that the same rigidity and trueness should be achievable using Open Builds extrusions and fitting with mill spec jigs for assembly - at a fraction of the cost.
The Revolution's stability at high speed is also the result of something I've seen nowhere else. Instead of using 1 nema 17 motor for the X axis, they use 2 nema 15s, one on each side. Although I think that may be over powered (nema 14 may work), their idea was good; to relieve torque stress by balancing the weight on both sides of the X axis so the two Y axis motors are moving equal weight. While that makes sense, they then add back in stress and vibration by mounting those two X motors high in the air on pedestals above short linear bearing housings. This design envisions placing the two X axis motors lower with their weight firmly distributed between to the top and bottom sets of mini v-wheels running on a v-slot extrusion.
Aside from the above innovation, the Revolutions main feature is in managing the Z axis. Since the Revolution does not have any way to adjust bed level to the X & Y axis, the frame design has to be perfectly matched to X & Y for Z trueness. Most of the Revolution's engineering, manufacturing and expense is in achieving that. There are only two goals on a box type Z axis design - a bed trued to the X & Y axises and a way to lift the bed that enforces side to side parallelism. Revolution achieves the latter with acme screws and nuts. However, leveling a bed to X & Y is actually trivial if an adjustable bed is employed, it does not need to be integral to the frame design. While acme screws are accurate and can be timed for parallelism from side to side, we already achieve the same with two motor design Y axises using GT belts, and with great with accuracy and at incredibly high speeds compared to a Z axis. I therefore plan on using a belt concept to raise the bed, using only one motor to eliminate need to time two motors to each other.
The Revolution's print speed max is far below it's travel speed. That's because print speed (in that range) is governed by how accurately filament can be plasticized in the heat zone at high speed. (Revolution's inability to print at it's max travel speed is an indication of overkill on travel design). On a direct drive, like the Revolution, that requires a long heat zone and/or higher temperatures with adequate heat dissipation above the heat zone. Revolution's extruder achieves that, but at the cost of excess weight for the X and Y constructs to have to move. I plan to use a Bowden setup to separate filament drive requirements from heat management. For the drive section, I favor using the design by our own Open Builds fellow developer Carl Feniak (http://www.openbuilds.com/threads/c-bot.726/).There are shortcomings in the images and skp, for example; brackets, bearings and flex couplings on the Z axis drive. The stage at this point is conceptual.
The L shaped corners are fabricated from v-slot extrusions using the technique at http://www.3dwrx.com/imgs/L-shape.png.
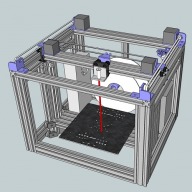
With no overhanging elements from the frame (while enclosing everything but the power cord and USB cord), adding panels to sides to enclose the print area should be easy. I plan on making those panels slip down fit for easy removal for long term maintenance.
Here is the design's Sketchup SKP http://3dwrx.com/openbuilds/BldrBox/BldrBox-1.skp for those who want to flip, flop, twist, spindle and mutilate.
I hope someone can talk me out of mistakes I've made before I begin cutting and welding on this....
![[IMG]](proxy.php?image=http%3A%2F%2F3dwrx.com%2Fopenbuilds%2FBldrBox%2F500-angle-view.png&hash=b835c268724daa3dc39ba5fff657a740)
![[IMG]](proxy.php?image=http%3A%2F%2F3dwrx.com%2Fopenbuilds%2FBldrBox%2F500-angle-view-back.png&hash=a08f1358f12f39f308cf162b8f29eb00)
![[IMG]](proxy.php?image=http%3A%2F%2F3dwrx.com%2Fopenbuilds%2FBldrBox%2F500-top-view.png&hash=9225fd532b4bf7abcf6945002857f78d)
![[IMG]](proxy.php?image=http%3A%2F%2F3dwrx.com%2Fopenbuilds%2FBldrBox%2F500-bottom-view.png&hash=9d1d32c9d9a4592f0457c6da6ec1087b)
BldrBox
Build in 'Cartesian Style Bots' published by Keith Davis, Oct 9, 2014.
OpenBuilds box type printer using min-v-wheels for X & Y axis. Designed for plexiglas panel enclosure of build area.
-
-
Build Author Keith Davis, Find all builds by Keith Davis
-
- Loading...
-
Build Details
- Build License:
-
- CC - Attribution NonCommercial - Share Alike - CC BY NC SA
Reason for this Build
Considering that the build plate and object are the main weight, I wanted to get away from moving them in X & Y motion to increase speed and quality.