Hi All...
First : sorry for my English it is not my native language.
Ok, let's start:
I found this page and want to share my build with You All . I 'm sometime chaotic so I hope it also helps me to add some structure to things that i want to do.
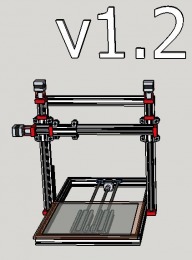
For now my ALUMNO it is just a drawing but I will try to make it live.
So now a little background for what this machine will be used and why
I'm hobby RC builder and like to work sometime with tools. But because I'm just hobbyist i miss precision with working with tools. But I'm good with IT.
Because of what i like to do i was thinking to build lautr3k v2.2 but for my problem no friends of my have 3d printer and could print parts for me. Order somebody to do it for me it is to expensive. So i stuck thinking how to, and decided to do opposite to lautr3k so "As less printed 3d parts", and as much raw and ready parts as possible.
Also because i miss space in my place where i do my hobby this machine should be more than just 3d printer. I will try to make it as modular as possible so with few modifications i will be able to do:
1)3d print (don't have to be fast)
2)Cut foam with hot wire (2 separate Z-axis) can make X-axis long for 1m RC -plane wings
3)Cut foil/paper/thin plywood with home made laser (optional)
4)Cut/engrave/milling in acrylic/plastic/wood/aluminium(optional)
5)Milling PCB for electronics (optional)
But first it need to 3d print. So i can make parts to make all necessary updates
Planning:
1) Draw what i want (tricky... I didn't build by using aluminum profiles till now and sketchUp is also unknown for me ...).
1a)Make a part list and find suppliers.
2) Order electronics and build together (easy part for me).
2a) Reorder electronics because for sure something will burn
3) Order mechanical parts and start building
3a) Ask my wife to not divorce with me because i spent to much time and money on "!@# that stupid thing !@#"
4) update this site
5)Have fun !!!
Updates:
1) v1.1 - First i was thinking that this construction is light but fast moving X and Z axis would imho cause imperfections when 3d printing so changing to 2 steeper Z-axis. 2xZ-axis will add also possibility to use it as foam cuter with hot wire
2) v1.2 - A little material optimization and Y-axis longer after changing mounting of steeper motor
3) Ordered arduino + shild for 3d printer + 6x 2A drivers,
4)Update electronics: Have Mini ITX Motherboard with 230 Atom processor + 2GB Ram _ 2,5 " HDD as steering computer (or i can use it without Arduino because it has LPT on board)
Have 2x ATX 400W power supply from old PC - for start should be ok
Have some basic steper motors from old printers for tests
Marcin
ALUMNO v1
Build in 'Other Style 3D Printers' published by MNowak, Sep 18, 2014.
It is a first draw of my future Printer/CNC cutter.PCB mill Still need to work more on it
-
-
-
- Build Progress:
-
- Build in Progress...
-
Special Notes
I'm total noob to building machines so any help, advice are welcome...Thx in advance...
skarab likes this. -
-
Build Author MNowak, Find all builds by MNowak
-
- Loading...
-
Build Details
- Build License:
-
- CC - Attribution NonCommercial - CC BY NC
Reason for this Build
I was thinking to build lautr3k v2.2 but because where i live i don't know nobody that could print for me parts (or priced those extreme high) I decided to make my own without any 3d printed parts. Only exception will be parts marked red. Those i will cast with epoxy and thin aluminium tubes and screws inside.Inspired by
lautr3k v2.2 -
Attached Files:
-

