
This is my OX CNC router. I actually used a smaller CNC that I had made (this is Grandpa!) to cut out the plates (Side and Z axis) out of 1/4" acrylic
. Then I used the OX to cut out another set of plates out of acrylic that were more accurate (OX with the acrylic plates!
) . Then I used the OX with the better plates to cut out new plates out of T6061 Aluminum
! I also made the side plates a little taller to give me more room when using a longer bit
.
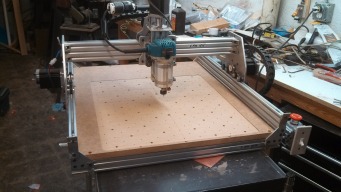
The cutting surface is 1" thick MDF. I used the OX to drill holes in an alternating 4" spacing pattern. I then hammered 1/4-20 furniture nuts from under it. This allows me to use my home made clamps


!
I didn't like the way the original OX held the belts in place. It ended up putting a hole in the belts and weakened them. I decided to go with the crimps that make a loop out of the end. I figured that would keep the belts as strong as possible. I then had to come up with a way to mount and tighten them. This is the stationary mount on the rear of the machineand this is what I came up with to tension the belts

. If the belts ever stretch out, I can just tighten it up, or if I've reached the maximum, I can add a few washers/spacers to the back side! The pegs you see are for the limit switches.
So here are some pictures of the finished project! She is strong enough to cut aluminum and accurate enough to do isolation routing of printed circuit boards!!!


I also used a 1" diameter routing cutter to cut out a small amount of the tables surface to ensure that the cut out area is exactly parallel to the x and y axes. My cutting envelope is 20.3439" x 18.3618" (I could probably squeeze out a little more by moving my limit pegs...
My next upgrade will be to replace the delrin wheels with polycarb or even steel.
Here are some links to the controllers I am using:
Xylotex Online Store
Xylotex Online Store
Home (I used the ethernet one and found it on e-bay)
I hope that you find this build interesting. It was a long time from start to finish (and maybe still not completely finished!!) During the process, I used the OX to do all sorts of different things and I only upgraded it as it was needed. I am so very pleased with the final product! Grandpa was the first CNC router I had made and OX was the second, (third, fourth, fifth...
I hope this inspires you to make your own!!
Aluminum OX build with some modifications
Build in 'Cartesian Style CNC' published by Dave Zahn, Mar 15, 2020.
This is my OX CNC router. It has been a labor of love for over a year now! I hope you find it interesting and inspiring! I also hope that it gives some of you more experienced CNC builders a different perspective and some ideas!
-
-
Build Author Dave Zahn, Find all builds by Dave Zahn
-
- Loading...
-
Build Details
- Build License:
-
- CC - Attribution - CC BY
Inspired by
David Steele (for the build for Grandpa), the OX builders, Openbuilds.com
