I "completed" the build a few months ago but I figured I'd throw something up in the builds section to sort of document some of the things that I worked my way through. Maybe it'll help some of the prospective builders out there
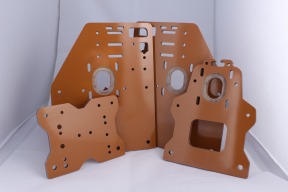
First steps of course was to make an order to openbuilds, and then start on making some plates for the vslot to stick to. I milled my set on my old cnc which went together pretty well. On a side note I've started making some kits of the same plates w/ a few 'improvements' which is available here: http://clockwerkmech.weebly.com/ox-cnc--garolite-plates.html. The idea was to make some plates for a budget build, but not have to skimp on the strength of the machine. From my experience with the ox, the vslot extrusion itself will flex well before the plates on the machine does, regardless of what the plates are made from. This garolite is pretty impressive stuff and much lighter than aluminum which is good news for the v wheels that have to support everything.
One of the things that I struggled at first w/ was making all of the v wheels to have equal contact w/ the vslot. Recently I learned (and should have checked) is that some v wheels aren't all the exact same dimensions, and should measure the wheels prior to slapping the machine together (keep like dimensioned wheels in the same areas).
After getting that figured out, the rest was pretty easy, especially with the youtube videos that Mark made.
(an attempt at a quick vacuum table, which didn't work out to well. Figured I'd give it a shot. Plus side? Now all of the saw dust has a place to go when they fill the threaded t nuts... hehehe)
Some of the more interesting areas of my build was trying to improvise in order to achieve a more cost effective machine. One of the things that I tried out was using blue flex conduit from Lowes as 'drag chain' to house my wires. It actually works really well. I mounted it in a somewhat ugly way to mock it up, but never got around to changing to a nicer mounting system because it worked well enough for what I needed it to do.
(i removed the electrical tape in the end, unnecessary.)
Another thing that I had to tackle was mounting my dewalt 611. In the pictures you can see I went with a pretty simple mount and then modified it to hold a shop vac hose for the messy machining operations. I also made an air diverter which I found in the shapeoko scene. This keeps the dust from being blown every direction by the dewalts exhaust air.
(A quick and dirty dust shoe that is super easy to make, and the foam(from michaels or AC Moore, a craft store) is super cheap. So its not a big deal to replace when/if it gets torn up.)
I supposed I should talk about my electronics at some point as well. I'm using a HobbyCNC pro 4 axis kit which I soldered together (and I believe is not being sold anymore). This driver board has a parallel port built in which talks to Mach 3. Something interesting about this board is that It only allows the use of unipolar stepper motors (6 and 8 wire steppers). I got the steppers from (http://www.kelinginc.net/) and I'm very happy with them so far. I wired all of my motors to terminal blocks on the machine themselves to facilitate easy tear down/replacement if required. It doesn't look as pretty as some of the other builds but I value function over form in this application.
I also needed power for everything
Here are a few 'things' I've milled: Everyting from MDF to Aluminum.
![[IMG]](proxy.php?image=http%3A%2F%2Fi1005.photobucket.com%2Falbums%2Faf178%2FMaverick--%2Fcnc%2520ox%2F20140914_154229_zpsfcd57bfe.jpg&hash=d8a9572aa8a67eb69bac73236379c50d)
1000mm X 1500mm OX CNC -- Fiber/Garolite
Build in 'Cartesian Style CNC' published by SlyClockWerkz, Nov 2, 2014.
Building the full size OX.
-
-
-
- Build Progress:
-
- Build Complete!
-
-
Build Author SlyClockWerkz, Find all builds by SlyClockWerkz
-
- Loading...
-
Build Details
- Build License:
-
- CC - Attribution - CC BY


![[IMG]](proxy.php?image=http%3A%2F%2Fclockwerkmech.weebly.com%2Fuploads%2F4%2F0%2F4%2F2%2F40427093%2F1327622_orig.jpg&hash=c544c9fe757a1302f2c013959f053e93)
![[IMG]](proxy.php?image=http%3A%2F%2Fi1005.photobucket.com%2Falbums%2Faf178%2FMaverick--%2Fcnc%2520ox%2F20140809_164049_zps00ef0101.jpg&hash=e7d776842f6ffa0e5f9399deeb74f85e)
![[IMG]](proxy.php?image=http%3A%2F%2Fi1005.photobucket.com%2Falbums%2Faf178%2FMaverick--%2Fcnc%2520ox%2F20140809_163323_zps44fdf417.jpg&hash=bfc8084b20390fe68f7f8c18b241ab25)
![[IMG]](proxy.php?image=http%3A%2F%2Fi1005.photobucket.com%2Falbums%2Faf178%2FMaverick--%2Fcnc%2520ox%2F20140705_203821_zps9d2fdbc0.jpg&hash=0a06149d715749f544e9286532e0b4c0)
![[IMG]](proxy.php?image=http%3A%2F%2Fi1005.photobucket.com%2Falbums%2Faf178%2FMaverick--%2Fcnc%2520ox%2F20140714_201924_zps2e2dcb8f.jpg&hash=4075976515d4a67c019897171d6ac365)
![[IMG]](proxy.php?image=http%3A%2F%2Fi1005.photobucket.com%2Falbums%2Faf178%2FMaverick--%2Fcnc%2520ox%2F20140820_201817_zps6aae3250.jpg&hash=7e1b6328199f6c911111d88e0521233f)
![[IMG]](proxy.php?image=http%3A%2F%2Fi1005.photobucket.com%2Falbums%2Faf178%2FMaverick--%2Fcnc%2520ox%2F20140820_201908_zpse7485896.jpg&hash=b2a8d6308018433b711e664fb30e92b1)
![[IMG]](proxy.php?image=http%3A%2F%2Fi1005.photobucket.com%2Falbums%2Faf178%2FMaverick--%2Fcnc%2520ox%2F20140810_153152_zpse8b83bbf.jpg&hash=c9b90930e9b47d7f0941ccd9dbd8b0f7)
![[IMG]](proxy.php?image=http%3A%2F%2Fi1005.photobucket.com%2Falbums%2Faf178%2FMaverick--%2Fcnc%2520ox%2F20140830_112524_zpseab81793.jpg&hash=d52dc744e71dee662cd988a838462ddd)
![[IMG]](proxy.php?image=http%3A%2F%2Fi1005.photobucket.com%2Falbums%2Faf178%2FMaverick--%2Fcnc%2520ox%2F20140705_153102_zps4c39aeb4.jpg&hash=d276ebea2a333580bd7caa265c11880f)
![[IMG]](proxy.php?image=http%3A%2F%2Fi1005.photobucket.com%2Falbums%2Faf178%2FMaverick--%2Fcnc%2520ox%2F20140628_160008_zpsbf2ba335.jpg&hash=48d5f6b14c1334a7b6cd979bb67a4afe)
![[IMG]](proxy.php?image=http%3A%2F%2Fi1005.photobucket.com%2Falbums%2Faf178%2FMaverick--%2Fcnc%2520ox%2F20140830_112516_zpsa579d751.jpg&hash=e286a32406e9f00c9b754bc68ccd0e6c)
![[IMG]](proxy.php?image=http%3A%2F%2Fi1005.photobucket.com%2Falbums%2Faf178%2FMaverick--%2Fcnc%2520ox%2F20140928_164149_zps8aba2745.jpg&hash=91fd2abd1e49a74695d7aa61d5467ba8)