Welcome to Our Community

Some features disabled for guests. Register Today.

OXmill

Discussion in 'CNC Mills/Routers' started by John Mueller, May 14, 2016.
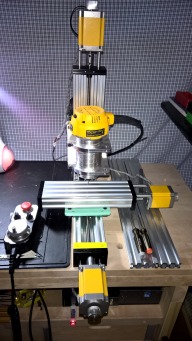
Tags:
  1. John Mueller

    Builder

    Joined:
    Aug 5, 2015
    Messages:
    21
    Likes Received:
    39
    John Mueller published a new build:

    Read more about this build...
     
    Tom Allen likes this.
  2. John Mueller

    Builder

    Joined:
    Aug 5, 2015
    Messages:
    21
    Likes Received:
    39
    Here are some potato camera pictures of the mock-up for the X/Y plate. Since this is a plastic part, it is larger than the aluminum piece will be.

    Here is the concept to it. 4 inner mini v wheels per side, and 4 outer large v wheels per side at an offset to the inner. Each side holds one anti backlash nut block for the 8mm. Similar to the C-Beam Gantry Plate, but only one is needed to join your X/Y C-Beams or other C-Beams where you need the cross movement.

    c_beam x_y plate LG.png

    WP_20160526_18_25_31_Pro.jpg WP_20160526_18_26_01_Pro 1.jpg
     
    GrayUK likes this.
  3. John Mueller

    Builder

    Joined:
    Aug 5, 2015
    Messages:
    21
    Likes Received:
    39
    Here is some more progress, steppers are running, 1/32" end mill went through my finger. So making good progress!!

    WP_20160529_20_24_23_Pro.jpg
     
    Tracy Ranson, stargeezer and Kyo like this.
  4. stargeezer

    stargeezer Journeyman
    Builder

    Joined:
    Feb 20, 2015
    Messages:
    328
    Likes Received:
    117
    Awesome build John! But, you do know the old saw about "blood, sweat and tears" is truly just a saying??? :rolleyes::rolleyes::):)

    I'm really looking forwards to seeing this build progress as you have time too work on it. What do you see are it's greatest advantages over a C Beam or Ox??

    I have a bench top mill and a couple Ox machines. I've considered adding CNC control to the mill, in order to have the best of both worlds, but since I'm very comfortable operating a manual mill I've limited my upgrades to DRO's on each axis and a few mechanical upgrades.
     
  5. John Mueller

    Builder

    Joined:
    Aug 5, 2015
    Messages:
    21
    Likes Received:
    39
    Thanks, been running it today but have not yet calibrated it. Just playing with the MPG to see how far off I am before I do run calibration - 1cm is running about 1.5mm. o_O No end stops yet, so I did not want to get a crash.

    For what I wanted the C-Beam took up too much room on the workbench, but I did otherwise like the design. OX same thing for the most part, never put that one fully together as I wanted to make a hybrid using C-Beam and really beef up the gantry, as my business needs changed I really decided it was more important to find something small enough to do the jobs I get the most of. So I looked at the cheap mills on eBay, Amazon - but wow were those bad (and for the price).

    So for my use case, I now no longer have to run to the big CNC in the garage shop (uncover it, fire it up, make sure my jig is set, etc). All on the same bench I can now put in a clients broken transponder into the mill (once calibrated mind you - I have 13 for this week so I better hurry). So mill on the right side of the bench, grinding and sanding with dust collection is towards the middle not far from the mill and nothing touches anything else, while on the left I can solder and hold the pieces with the vise. When I had the C-Beam machine in the same spot I was always bumping my arms, the flex shaft for grinding was always getting hung up on something, the solder station was a cluster, so I did not like the flow.

    I will have to edit this comment in a bit, family time is keeping me limited. :thumbsup:
     
    Tom Allen likes this.
  6. Sonny Lowe

    Sonny Lowe Journeyman
    Staff Member Builder Resident Builder

    Joined:
    Nov 11, 2015
    Messages:
    143
    Likes Received:
    157
    I love the idea behind this small mill, I look forward to following your progress :D
     
  7. Joe Santarsiero

    Joe Santarsiero OB addict
    Staff Member Moderator Builder

    Joined:
    Oct 30, 2014
    Messages:
    902
    Likes Received:
    196
    Is that a LPT MPG? How are you interfacing to that with the gecko in place?
     
  8. John Mueller

    Builder

    Joined:
    Aug 5, 2015
    Messages:
    21
    Likes Received:
    39
    Got the new plate in place, so much better than the plastic piece. Additionally it is smaller giving me more travel. Now it is time to get the limit switches in place! New pictures are below.

    @Joe Santarsiero - It is an older MPG, that is hand wired into an older PoKeys55 USB keyboard style breakout. Still supported in Mach 3 with a bit of luck and :banghead: :nailbite: :banghead:. I think the MPG was sold by PoKeys (Handy Pulser), but ends up being similar to a generic sold on eBay as best I can tell.

    @Chris Laidlaw did the plate for me as my metal working skills are zero, give me wood and I am ok. We had a bit of fun getting the plate out of Fusion, mostly my fault for starting it as a 3D printed part to build up the concept. I redrew it, and then Chris fixed my mistakes (and redrew it again). Huge thanks to him for the help!

    Now for the latest build pictures, the machine is running but no video yet.

    WP_20160602_18_13_58_Rich 1.jpg WP_20160602_16_57_23_Rich.jpg WP_20160602_16_57_36_Rich 1.jpg WP_20160602_18_14_09_Rich.jpg WP_20160602_18_14_18_Rich.jpg
    The plate design should have other applications for C-Beam style machines of all types.

    Edit 2: Getting 265mm of travel on the Y and 135mm on the X.

    Edit 3: I went with a bit of overhang on the Z axis to get more usable Y travel, as this will allow me to use custom jigs, or even cut vinyl stickers with it. I had thought about having the Z axis just on a C-Beam, but after looking at the other types of work I could use that are still small, I added in the 60mm V-Slot to create that overhang. Was a bit more work to get it to 90*, but so far it appears really rigid and by hand I can't tell if it is my body moving or the table. :D Will test it further, but really happy with how it compares to my larger format CNC.
     
    #8 John Mueller, Jun 2, 2016
    Last edited: Jun 2, 2016
    GrayUK and Kyo like this.
  9. John Mueller

    Builder

    Joined:
    Aug 5, 2015
    Messages:
    21
    Likes Received:
    39
    Machine is now up and running and doing jobs for me, really happy with how it is performing.

    One area I need to improve is dust collection, and holding it down on my table. I don't want to bolt or screw into my bench, so I will probably just secure it at the back or add some v-slot feet at each end.

    WP_20160614_13_36_58_Pro.jpg

    Here is the latest picture with a custom printed jig in place - you have to love 3D printers!
     
  10. Sonny Lowe

    Sonny Lowe Journeyman
    Staff Member Builder Resident Builder

    Joined:
    Nov 11, 2015
    Messages:
    143
    Likes Received:
    157
    John,

    Great progress on the build, that plate is B-E-A-U-tiful!!! I'm curious, what's the torque spec on your Nema 23's...they look like the high torque!?!?
     
  11. John Mueller

    Builder

    Joined:
    Aug 5, 2015
    Messages:
    21
    Likes Received:
    39
    Yes they are a higher torque - 280 oz in I think.

    I uploaded a video here of it in action - Instagram video by John Mueller • Sep 20, 2016 at 11:21pm UTC

    More to come, been really busy with orders so I apologize for not getting back to finish all the build details and mark it completed.
     
  12. wastelandfab

    Builder

    Joined:
    Sep 8, 2016
    Messages:
    42
    Likes Received:
    14
    That is awesome! Good job on thinking out of the (B)Ox!!
     
  13. Baronvon

    Baronvon New
    Builder

    Joined:
    Sep 22, 2016
    Messages:
    2
    Likes Received:
    0
    I really like your build. Looking forward to full parts list and dimensions.
    I love the DeWalt yellow stepper motors.

    Thanks for taking the time to document this build.
     
  14. wastelandfab

    Builder

    Joined:
    Sep 8, 2016
    Messages:
    42
    Likes Received:
    14
    How have you found the rigidity of this set up to be? I'm considering a small build like this to have next to my computer, in an enclosure. Interested on hearing about your vinyl cutting setup
     
  15. Tracy Ranson

    Tracy Ranson Well-Known
    Builder

    Joined:
    Nov 4, 2014
    Messages:
    88
    Likes Received:
    32
    This is a really nice build and I would like to build something similar to it. Will you be sharing your dxf files for the plates?
     

Share This Page

  1. This site uses cookies to help personalise content, tailor your experience and to keep you logged in if you register.
    By continuing to use this site, you are consenting to our use of cookies.
    Dismiss Notice