

Hello CNCers,
I am new to the world of CNC, and I humbly presenting to you my Hobby CNC design. Yes, this is Another Chinese Linear Rail Concept. the base of the design is from the ROVERCNC.COM lt model, adjusted to my budget.
First mistake, In the excitement of getting my own CNC I putted the cart before the horse and directed myself straight to alliexpress, ordering some linear rails, controllers, and motors. I end up with some weird ball screws and linear rails dimensions. anyway, i ended up putting things together and i would say that the design is 95% finished. Some parts are missing, I plan to 3d Print them in ABS.
Fusion 360 file
to date, i have in hand:
from aliexpress
x-y-z axis linear rails ( 20mm), made in china
1605 ball screws assembly, made in china
A weird 4 axis RNR bitsensor controller, made in china
4x DM542, made in china
4x High torque Nema 23 motors, made in china
1x 36V 360W power supply, made in china
From makerparts.ca
all C beams, required uncut. Oben build
all 20x40 required uncut.
Limit Swiches
screws and bolts
Spindel Holder
Other source
aviation plugs,
shielded cables, 4x wire and 2x wires, 18ga and 22ga.
ordered:
Gantry Plates 3/8" 6061-T6
Z front and back Plates 3/8" 6061-T6
Feets 1/4" 6061-T6
Rail risers 3/8" 6061-T6
to be ordered
Hitachi, M12VC, I was looking for low speed ( aluminum/acrylic) and has to be Quiet ( 79.5db)
milling bits, cable chain, dust shoe
Any advice is welcome.
update 07-05-2018
Still waitning for the 3/8 plates to be machined the lead time was 3-4 weeks. by the time stuff are pilling and I worked on the electronic enlocsure wich will all be inside the PC case.
Printing some drag chain component

hardware is slowly arriving.

working on the computer case with enclosed electronics

Update 18-05-2018
Today i received the machinated plates made from 3/8 6061 T651 precision plates, some paint will pimp this rig. Unfortunatly, some grass as stuck below the paint! I guess it will make a « greener » cnc.

Tapping all extrusion is a long process! Thanks to makersparts.ca that did some of the work for free!
Corona is more important than wd40 when tapping!!

Update 21-05-2018
While this build is starting to look at something, i got a bad feeling this weekend, when I tried to move the carriers over the rails, the movement was not smooth at all. i was really bad, and carriers are getting stuck every here and there. each carrier have been tested individually and each rail. I can say that most carrier are working well on the small rails but are not working smooth at all on medium and long rails. ( X, Y). Thus, said, i would warn anyone from aliexpress china made rails. i sent video to suppliers to see if he can do something.
by the mean time, some picture and the video of the carriers bad movements.


Update 26-05-2018
Z axis is done! Not the sexiest Z axis of all time but hopefully it will just work.
The base frame is done.
Now need to assemble everything together. with all the screws ordered, i shall be fine.


Update 27-05-2018
Most of the mechanical assembly is done, going forward with the electronics


Update 03-06-2018
Sad day in Quebec city, first, I was planning to do an all in one computer case and CNC control. it tooks me a lot of time to hook up everything and place everything but i managed to get it done.

when i tried to fire up the the Chinese 36v power supply, it was dead. After dismantling, opening and investigation, i found out that the copper wire coil was broken. I then choose to re solder the coil to where it was soldered before.

After re-assembling the power supply, it was working, but between 27v-28v. I dont know if this is normal, but 27v seems really far away from the rated 36v. I anyway decided to hook it up, trying to fire the stepper.
But then what!!! My 15 years old WINDOWS XP computer that was working relatively fine 15 days ago, is now blue screening at windows logon. nothing to do this will blue screen every time. After a few tries, the computer dosent even turn on. WHAT THE &(*?&(! this whole thing is starting to stretch my patience.
The show must go on, I said to myself, so i tried the whole thing with a laptop. fortunatly, i had in hand those adapter that short the Computer PSU 24 pin so it power up even if the motherboard is not responding.
After setting the ports /inputs correctly on the laptop, we fortunately got some movements.
This whole issue will cost me alot, I need to re plan everything in an external control box, i needed to order 1 new 36v PS and and new 24v PS. I will need to buy stuff to make an enclosure. it is at least a 2 month step back and few hundred canadian dollars.
I should have bought Benchtop PRO 2424!
Update 17-06-2018
Not much done recently, following my recent issue with the all in one PC/CNC controller box, I have designed a new case only for the CNC control. it is actually ordered and waiting for arrival.
By the time I have wired the limit/homing switch, and add some rail covers. the stl file for rail cover is on the resource page.


Update 13-07-2018
Hey Hey, long time no update... For those following the thread, you have seen that the machine did some work. however it was not without any issue. What was done since last update:
Got the new control case to be punched and bent


I also got knocked in the head overlooking at the router diameter vs the openbuilds router mount.


So I had to print a new router mount. Not sure it will last long because my first attempt at printing ABS was a majestic failure. it wrapped so much that it was unusable. So I printed one in PLA. it is thick enough to endorse the load, but i fear the heat from the router on the long run.
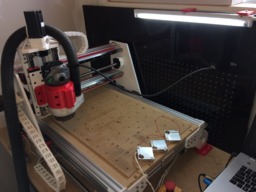
Since the beginning i didn't had any specific place to install the CNC. Working on the ground sucks! so I called Mom and she generously gave me a desk so I can install the CNC on it. The Drawers are very helpfull to store all the stuff.


Then we were ready to play a little with the machine. We ended up breaking, as you know from the discussion board, 5 limit switches and one carbide O flute endmill. At the end we managed to get a nice cut and start prepping the spoil board.


A you can see at one location during the spoil board preparation, the machine did not moved up and a trace was made in the board. After checking the G-code, it was supposed to move up. Don't know what happened! I am also missing some inserts since the hardware store did not had enough. will have to amazon some...
Machining the spoil board, i ended up finding that this stuff is making wait to much dirt to be used as it is. so i am actually designing and printing a dust shoe. my temporary setup will use a vaccum brush. but i also ordered those 1m-70mm brush from ebay for a future and permanent use.


Stay tuned for a final update and review of the performance.
Update 12-08-2018
Well Folks, I guest its time to call this build complete! Since the last time, i manage to get a new location for the cnc. The Family room is not really appropriate for this machine. Also since I live in a twin house, I wanted a space far from the neighbor. I managed to install the CNC in the tiny mechanical room well closed and with a few walls in between the machine and the neighbor.
Since last update we finished the temporary dust shoe. ( still waiting for the 1m-70mm brush from china to complete the permanent dust shoe.


We also managed( not without many failure) to machine some cutting board, tag plates in 3003-H14 and some probing plate in 6061-T651.


I am still learning the machining process ( from tool path creation to finishing the parts). What i have learned is that high quality cutting tools with known feed and speed and design for a particular work are the best. I have mainly used Onsrud and Amana. Must say I prefer the Onsrud however.
Thanks for everyone that took the time to look at this build.
HP
YACLR CNC
Build in 'Cartesian Style CNC' published by HuguesP, Aug 12, 2018.
Yet Another Chinese Linear Rail CNC, my first one, doing this mainly for the fun of building it more than using it.
-
-
Build Author HuguesP, Find all builds by HuguesP
-
- Loading...
-
Build Details
- Build License:
-
- CC - Attribution - CC BY
Reason for this Build
for the fun of building it! Mill small aluminum and acrylic parts,Inspired by
rovercnc.com LT model


