Many of us have projects where we would like to make a canopy, or a motor cover, etc. Often times a Vacuum Former is needed to make those parts. Not having one, I made one.
The heater side is simply just a floor heater that I placed into a new housing. I kept its backing/heat reflector since it made a nice holder for the heating element, and helps keep the wood from getting too hot.
There are many types of set ups, from having a grid of holes to a single central hole. Using a house hold vacuum to high pressure tank systems. I chose to go with a central set of holes and a tank system on mine.
Only having a small group of holes in the middle of the table has some advantages. I can make both large and small parts with the same table, and not have to try and cover unused areas of a table like if I was using a large grid of holes, or using a much larger piece of plastic and wasting a large amount of material.
Inside is the tank. I made my tank from a 2' section of 3" ABS plumbing pipe. Instead of using the corner bends you can get from the hardware stole, I cut the pipe at 45° angles and re-glued it back together to get those nice right angles on the tank. ABS glue was used to also put the ends on the tank and also put a layer of glue around the outside of each seam to make sure there where no holes. I was able to test this to 29hg with no problems or leaks after 2 hours of holding that pressure. I decided to use a pump and tank system to keep the final set up small, self contained and quiet. I don't need to hook up a LOUD house vacuum to do my projects. Something anyone around me appreciates, along with the cats.
Powering everything inside is a small 6.3v/12.6v center tap transformer. Depending on how you use diodes you can get either 6.3v or 12.6v. I set up my power board to do both. 6.3v going to the pump, and 12.6v for the vacuum solenoid.
The pump is from an old car. You can find these in a lot of Japanese cars from the 80's-90's, in this case, from my old wrecked 1984 Dodge Conquest (Mitsubishi Starion). The nice thing about using auto components is that the parts where made to a high standard. Parts from the 80's-90's cars where also built to be serviceable, unlike newer car parts that are almost throw away. This pump will pull all the way down to 18hg.
Holding back all that pressure is this 3/8" vacuum solenoid I found in a VW Passat. Once the plastic has heated up enough and the tank is ready all I must do is place my frame holding the hot plastic on top of the table and push down.
I have two switches on opposite corners of the table top that will trigger a relay to activate the solenoid. Solenoid activates, pulling the air out from inside the area of the frame and plastic, pulling the plastic down around the plug.
Once that is done all you need to do is trim away the unneeded plastic and secure it to your project.
Final suitcase size came to 18" x 16" x 12". I added on some nice rubber feet to keep things from getting scratched up. They also help to dampen the vibrations of the vacuum pump. If you know where to look for the parts you can build one of these for less than $100.
- See more at: http://flitetest.com/articles/suitcase-vacuum-former#sthash.XFKE6jOE.dpuf
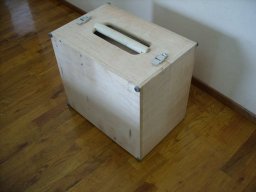
Suitcase Vacuumformer
Build in 'Small Vacuum Former' published by OutcastZeroOne, Dec 5, 2013.
Quick overview of my build up for a vacuum former that is self contained, portable and fairly easy to build.
-
-
Build Author OutcastZeroOne, Find all builds by OutcastZeroOne
-
- Loading...
-
Build Details
Reason for this Build
Wanted to make some canopies and such for RC aircraft
![[IMG]](http://assets.flitetest.com/article_images/full/ss851267-jpg_1368997597.jpg)
![[IMG]](http://assets.flitetest.com/article_images/full/ss851268-jpg_1368997544.jpg)
![[IMG]](http://assets.flitetest.com/article_images/full/ss851269-jpg_1368997754.jpg)
![[IMG]](http://assets.flitetest.com/article_images/full/ss851271-jpg_1368997964.jpg)
![[IMG]](http://assets.flitetest.com/article_images/full/ss851273-jpg_1368998121.jpg)
![[IMG]](http://assets.flitetest.com/article_images/full/ss851275-jpg_1368998377.jpg)
![[IMG]](http://assets.flitetest.com/article_images/full/ss851277-jpg_1368998497.jpg)
![[IMG]](http://assets.flitetest.com/article_images/full/ss851251-jpg_1368998622.jpg)