Well I chose to make a 1000mmx1000mm Sphinx because it looked like it was doable for a complete noob due to Kyo's manual.
So far I built the table, and the base. I had to cut the 1000mm y-direction v-rail down to 880mm so it would be a total of 1000mm when put with the 2 end x-rails. I cut the rails with my new miter saw with the stock blade. I am not cutting the x-axis c-beam so i just moved the outside vrail base in toward the center 3mm instead of cutting it. This part took me... 3 weeks. Its zero degrees out. I have no heat in my shop.
I went out in the blistering cold and sorted the parts to make the (2) y-axis cbeam rails. And had to post a question on the o.b. facebook page. Which one of these are "8mm shims". Ive come to conclusion the left is Shim - 12 x 8 x 1mm,,,,,, right is Precision Shim - 10x5x1mm? I hope that's right.

1/24/18 - I went out to the 30 degree barn and as Kyo had described, put a nut on the m5 bolts and ground them down to 27mm. Using a big angle grinder was kind of dangerous..it seemed.. then threaded a nut on each one. Public service announcement: Bolts get hot when ground down.

3/7/18- Why didn't I think of this before, bring the parts inside and assemble them so I don't have to deal with the blistering cold. I should have done this 2 months ago! Back to assembling on a TV tray! I may end up with extra nylon lock nuts because they come with all the wheel kits... I also have to figure out how to use these anti backlash nuts. Can't find anywhere how to actually use them and adjust them. Facebook people say put em on and make em tight with the set screw, we will see tonight.

3/8/18 Update : According to the minimill video at 15:53 you just leave the anti backlash set screw loose. There has to be some sort of adjustment, I just can't figure it out.
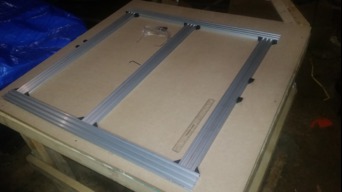
I finished one Y-Axis assembly! A few notes: the wheels and eccentric nuts either make the side play move really hard, or like butter. I left it like butter (very little resistance). I hope that's correct. Another thing to note is all the set screws on everything is a different size Allen wrench than the bolts.
3-11-18- Finally finished both Y-Axis assemblies, they had to be pulled on a bit to get them to fit onto the base. The next step is assembling the Z-axis... But I forgot to buy the Cbeam for it..

Noob 1000Sphinx
Build in 'X/Y Table Style CNC Mill' published by Joe Downard, Mar 11, 2018.
A complete noob stumbling thru his first cnc build in winter.. and trying to find the time with 2 toddlers..
-
-
Build Author Joe Downard, Find all builds by Joe Downard
-
- Loading...
-
Build Details
- Build License:
-
- CC - Attribution - CC BY
Reason for this Build
I've went to college for cnc programming, and have always wanted to do it, but I dont get to in my current career.Inspired by
Kyo and Beardyblair

