Hi All!
I am sure you have seen thousands of prusa builds, but I thought id show you all any how
This project started when I bought a cheap eBay CTC prusa. Surprisingly, it went wrong very quickly.
But please don't judge, I was new to this technology then.
I decided within a week that it was rubbish... and it started.
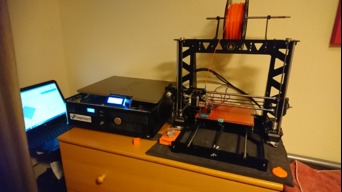
So, in brief, this is a run out of what I have done
- New Prusa Steel frame
- New carriage ways
- New motors, wiring etc
- Machined a J Mount for the new extruder
- New E3D hot end
- Bowden - Gone away from the rubbish direct drive
- Gutted a old dell case
- Mounted din connectors and power socket the back of the case
- Built all the insides up to mount everything neatly
- Machined a block/pipe styled heat sink and modified my extruder (nearly cried turning all the fins of a £100 extruder)
- Set up liquid cooling on the system
Since then (photos are out of date) I have switched to a 32 Bit RADDS board, along with a multitude of other changes. I am planning to switch to optic limiters and fitting a touch probe to it, when changing to the aluminium heat mat bed.
I am in the process of manufacturing bungs for my filament spool to sit on centrally.
Please be kind, this is my first build. I basically threw away everything from the original bought... thing.
I ran my first print on this (haven't uploaded a photo yet) and it was superb in terms of measure and quality. Any feedback/criticism is welcome.
I have added a copy of my radds firmware (working well) to hopefully help some people. The firmware is well support but finding answers to problems is difficult. I will be happy to share my experience setting this up with anyone
Thanks for looking.
---------------------------------------------------------------
Progress Update 01/03/18
Titan/Lite6 Assembly to replace the old V6
Performance has been considerably improved.
---------------------------------------------------------------
Progress Update 03/01/19
A lot changed. New cabinet (3 phase electrical box) that I have adapted. Got rid of the water cooling as unnecessary.
Switched to mosfets and running a second power supply to help feed power.
Installed a bed probe, updated bearing blocks and will shortly be switching to screws on the y and x axis.
My Prusa Build
Build in 'Cartesian Style Bots' published by Connor Mckeown, Jan 3, 2019.
The process from my bought printer, to a custom home built machine
-
-
Build Author Connor Mckeown, Find all builds by Connor Mckeown
-
- Loading...
-
Build Details
- Build License:
-
- GNU (GPL3+) General Public Licence
Reason for this Build
General Interest -
Attached Files:
-


