
Hi there. Mine is a fairly standard C-Beam build except I needed to swap some Axis's around to make it fit where I needed it to.
Also I wanted to make a base so that the unit can be moved and all of the electronics neatly packed away.

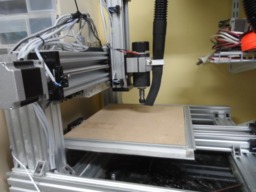
Here is my unit being build. Being an electronic tech I made sure that all the wires were neatly laid with room to move freely. Also I decided not to use internal motor drivers but to mount mine on the back using TB6600 motor drivers. They are set to 1/4 microstepping and 2.5A

Another view.

Start of the mounting box. Here you have the master on switch and the emergency off button. Due to the orientation of my machine this is the side.

On the front are two power points that are controlled by the master switch. If needed I can add relays to power them under software control.

Internals. 2 power supplies - 24v and 48v (for spindle).

Now showing the wiring. Relay module and speed control are for the spindle so I can have clockwise/anticlockwise rotation. Extension lead end is for 5V power for the Arduino Uno.

I mounted the C-Beam on a 3mm thick sheet of acrylic and sealed the edges. This way I can run lubrication and misters on the work without it seeping in to the power parts.

Yes - the power parts are very easy to get to. At the bax of the box are 2 slots. One for the cables and air inlet. And the other next to the power supplies for the air out. I made a cardboard manifold to help direct the air circulation.

Here is the control box with an Arduino UNO and a Protoneer controller board. I decided not to use internal stepper drivers so the header boards go to connectors and then up to the TB6600

My Creation LIVES.... I use CarbideCreate to set out the cut, and to create the GCode. I also have access to Fusion360 however I have not made it to contour work yet.
I use Universal G-Code Platform for driving the Arduino via GRBL.

Finally - dust collection. I found this flexible rubber extender for normal vacuum cleaners and heat shaped it to curve towards the spindle. The hose assembly just rests there and can pop up or flex depending on what is being cut. Being rubber the CNC has no problem re it rubbing against the work.
Under the table is a modded backpack vacuum cleaner that has the power and the endurance to run all day.
So.. This is mt beast and I am very happy with it. I do special effects as a hobby and it fantastic for making repative items etc. I also have a Tevo Blackwidow 3D printer which I have modded so I can mount a 15W laser module on to it for cutting/engraving work.
Here is the first test..
Enjoy
C-Beam unit with 400W Spindle
Build in 'Cartesian Style CNC' published by Marcwolf, Sep 8, 2018.
Standard (If there is one) C-Beam with plnth
-
-
Build Author Marcwolf, Find all builds by Marcwolf
-
- Loading...
-
Build Details
- Build License:
-
- CC - Attribution - CC BY
Reason for this Build
Found a need for accurate and relative subtractive manufacturing.Inspired by
I looked at many units and chose the C-Beam. Firstly it's size, strength, and that I can also do light aluminium on it.
