
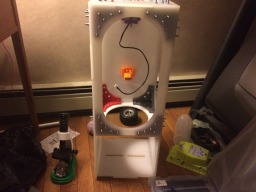
This 3D printer works by having a projector underneath it which is mounted by a mount and by moving a bed up and down from a resin basin. Here is the assembly as of now.
Here is a link to the downloads.
For non printed parts you need the following.
Laser cut parts include the following.
- 150 * M5 bolts smaller than 25mm long
- 4 * M3 bolts
- 8mm smooth rod
- 8mm threaded rod.
- M8 wedge nut
- 4 * M8 bolts
- 4 * M8 hex nuts
3D printed parts include the following.
- Front Plate
- Axis Plate
- 2 * Projector Plate Mount
- Projector Plate
- Resin Basin Plate
Assembly instructions... Underway...
- 8 * Corners
- Z axis motor mount
- Bed Mount
- Limit Switch Mount
Schreibotics Fabricator MkII
Build in 'Resin Style Bots' published by nschreiber0813, Apr 14, 2017.
It all started after my prusa i3 build inspired me to experiment with resin 3D printers because I want to learn if they are worth it and if I can design my own printer.
-
-
Build Author nschreiber0813, Find all builds by nschreiber0813
-
- Loading...
-
Build Details
- Build License:
-
- CC - Attribution NonCommercial - Share Alike - CC BY NC SA
Inspired by
Some random designs I made in tinkercad.