Welcome to Our Community

Some features disabled for guests. Register Today.

Vertex CNC - 1000mm x 750mm C Beam

Discussion in 'CNC Mills/Routers' started by EvanBruner, Jul 26, 2016.
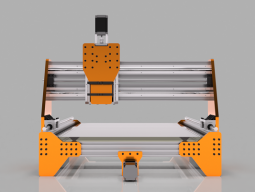
  1. EvanBruner

    EvanBruner Well-Known
    Builder

    Joined:
    Mar 26, 2016
    Messages:
    68
    Likes Received:
    66
  2. EvanBruner

    EvanBruner Well-Known
    Builder

    Joined:
    Mar 26, 2016
    Messages:
    68
    Likes Received:
    66
    Finished up most of the design today. Still need to decide what I'mm doing for the Z-axis, whether to go with the steel reinforcement or not.

    I decided to create 'feet' for the y axis ends to serve a few purposes. One, it will allow me to attach the base frame supports with minimal hardware. Two, I can attach leveling feet to the end plates to eliminate the need for a torsion box. Three, looks pretty cool ;)

    Here's a few more renders of the fully assembled design:
     

    Attached Files:

  3. EvanBruner

    EvanBruner Well-Known
    Builder

    Joined:
    Mar 26, 2016
    Messages:
    68
    Likes Received:
    66
    Design is finished! Before I start the build, I'd like to know what you guys think of the steel rails sitting in the v slot. Do you guys think it will work? I'd hate to be missing something totally obvious. Thanks for any advice you guys have. Cheers!

    [​IMG]
     
  4. Kyo

    Kyo Veteran
    Staff Member Builder Resident Builder

    Joined:
    Feb 27, 2014
    Messages:
    673
    Likes Received:
    699
    It has been brought up from time to time, and lightly tested. I look forward to following your build and seeing how it plays out. I believe you would be the first to undertake a whole build using the inserted steel rail method. :thumbsup:
     
  5. silopolis

    silopolis New
    Builder

    Joined:
    Jul 6, 2015
    Messages:
    20
    Likes Received:
    3
    Nice design and renderings !
    My main question about the inserted steel rails (interesting idea BTW) is how do you plan to fasten them to the beams ?
     
  6. EvanBruner

    EvanBruner Well-Known
    Builder

    Joined:
    Mar 26, 2016
    Messages:
    68
    Likes Received:
    66
    The end mounts for each beam have a square hole cut out that the beam will slot in to and then be secured with a set screw. You can kinda see them in the image with the legs if you zoom in. I'm hoping the mounting pressure of the wheels will be enough to keep the rails from twisting in the channel but I'll figure that out with testing before the build. Perhaps I'll need to use some kind of adhesive like Jb weld but I think just having the rails secured at the end will suffice.
     
  7. EvanBruner

    EvanBruner Well-Known
    Builder

    Joined:
    Mar 26, 2016
    Messages:
    68
    Likes Received:
    66
    I got everything set up to cut today and my hitachi M12vc broke on me. The speed controller knob broke right off the potentiometer. The knob spindle was about 1/16" thick plastic! I thought Hitachi's were supposed to be nice machines. Oh well. I contacted a repair center and the new speed controller is about two weeks out. Big bummer. I tried to use an external router speed controller but because the speed controller is PWM and only likes 110v, it didn't work. I would just cut out the speed controller and wire the router up but I didn't want to risk losing the warranty.

    [​IMG]

    Soooo... instead I thought I'd do some simulation in Fusion 360. I wanted to know what kind of deflection my machine would have and what kind of cuts it would be capable of. Disclaimer: I don't know if this is the correct way of modeling machine deflection. I'd be interested in seeing if you guys notice I missed anything or how I can get more accurate results. To start, I wanted to figure out how much force is applied to the tool when cutting. Google didn't turn out much outside of the spindle power required which isn't helpful. I decided to check out HSMWizard and see what it would give me. Using HSMWizard I input my desired cut parameters:

    DOC: .100"
    WOC: .100"
    Chipload: .005

    [​IMG]

    These are really progressive numbers compared to my current machine, which takes about a .015 DOC before starting to walk with this tool. HSM Wizard results were really good with a maximum of 15lbs of cutting force needed to remove the material at the given parameters. So now I can move over to the Fusion 360 Simulation environment and use that load to compute the deflection. So I prepped my model by isolatingthe X gantry and moving the z axis to its lowest point and the x axis to its center. This would represent the worst case scenario for the machine. I then used a fixed contact for all the points and fixed the y gantry plates as I wasn't interested in their deflection. I now applied two loads to the model, a gravity load and a 15 lbs force acting on the spindle in the y direction. I had initially modeled the cutting force at the end of the cutting tool but this lead to excessive deflection in the tool and gave wonky results. I also could not model my SBR16 rails correctly as I have them modeled as a single body, so I assigned them an aluminum material to keep the results honest.

    The results are very promising. The program computed less than .002" deflection at the bottom of the z axis and less than .0004" deflection of the X gantry rails. So I doubled the load for fun and to account for any error or more agressive cuts. Still, promising results with a maximum deflection of .0032". The displacement mesh:

    [​IMG]

    Very happy with those results if they are accurate. I can improve the deflection further by increasing the cearing spacing of the z axis, though I will lose some z travel. Maybe I will redesign the plates so that the bearing spacing is adjustable. I could then increase the bearing spacing for hogging aluminum plate and decrease it for cutting thick stock.

    Do you guys have any suggestions for improving my simulation accuracy or the strength of my machine? Any tips are greatly appreciated.
     
    Mark Carew likes this.
  8. EvanBruner

    EvanBruner Well-Known
    Builder

    Joined:
    Mar 26, 2016
    Messages:
    68
    Likes Received:
    66
    A present arrived today!

    [​IMG]

    Still waiting for my router to get its new controller in. Should have just ordered a SuperPID but mehh
     
    Synths, GrayUK and Kyo like this.
  9. GrayUK

    GrayUK Openbuilds Team Elder
    Staff Member Moderator Builder

    Joined:
    May 5, 2014
    Messages:
    1,668
    Likes Received:
    627
    Evan, nice set there. How much did that set you back?
    Gray
     
  10. EvanBruner

    EvanBruner Well-Known
    Builder

    Joined:
    Mar 26, 2016
    Messages:
    68
    Likes Received:
    66
    Synths and GrayUK like this.
  11. Mark Carew

    Mark Carew OpenBuilds Team
    Staff Member Moderator Builder Resident Builder

    Joined:
    Jun 28, 2013
    Messages:
    2,741
    Likes Received:
    2,407
    Great strong looking Build @EvanBruner I am sure this machine will get the job done
     
  12. Andy Bernstein

    Builder

    Joined:
    Oct 12, 2016
    Messages:
    1
    Likes Received:
    0
    Any updates? I've thought about doing something similar, just waiting for time
     
  13. EvanBruner

    EvanBruner Well-Known
    Builder

    Joined:
    Mar 26, 2016
    Messages:
    68
    Likes Received:
    66
    My wife and I went on an unexpected vacation so money is a bit tight, though I'll be mocking up some mdf parts to test fitment soon!
     
  14. Joshua Coke

    Builder

    Joined:
    May 10, 2015
    Messages:
    12
    Likes Received:
    1
    I changed my Z axis so that the beam moves, that way I can use all the space between the table and bottom of gantry.
     
  15. Gary Caruso

    Gary Caruso OpenBuilds Volunteer
    Staff Member Moderator Builder

    Joined:
    May 19, 2016
    Messages:
    1,183
    Likes Received:
    530
    when you say some of the bearings are "not the best" how are they bad? did you try adjusting the pre-load, some of those type have a small adjustment screw.
     
  16. Michael.M

    Michael.M Veteran
    Staff Member Builder Resident Builder

    Joined:
    Jan 21, 2017
    Messages:
    432
    Likes Received:
    263
    Awesome build! I'm building a Sphix currently but I really like what you're doing here. I'll be following this closely.
     

Share This Page

  1. This site uses cookies to help personalise content, tailor your experience and to keep you logged in if you register.
    By continuing to use this site, you are consenting to our use of cookies.
    Dismiss Notice