Welcome to Our Community

Some features disabled for guests. Register Today.

The Frog CNC Router

Discussion in 'CNC Mills/Routers' started by Neil Rosenberg, Jan 3, 2014.

  1. Hytech2k

    Hytech2k Veteran
    Builder

    Joined:
    May 6, 2014
    Messages:
    429
    Likes Received:
    331
    I apologize Neil! I forget sometimes i'm in someone else build. ;) I'm glad to see the steel plates are helping. The continued problems with even tying the 2060 together was a consideration when I was trying to decide whether to go with Openrail or not. I would have like to use more Openbuilds products but they really need extrusions in the 40XX or even 60XX range. That would help with a lot of the flex issues people run into. What feeds and DOC are you able to run in it's current configuration? Also i'm not sure if it's the same size but for what its worth the DeWalt 611 i'm running keeps up pretty well with even my 3 1/4 router, I can run a 1/4" compression bit .25 deep at 80ipm without it bogging, might be a thought if you decide to upgrade. Thanks !!

    Gerald
     
  2. Hytech2k

    Hytech2k Veteran
    Builder

    Joined:
    May 6, 2014
    Messages:
    429
    Likes Received:
    331
    4. Changing bits is a chore. I'd like to find a quicker way to swap in/out cutting bits, something that doesn't break the bank.

    I just noticed your running Mach 3? Did you set up the auto zero function yet? Saves a lot of time when changing bits, you only have to set the material Z height once, every time you do a tool change it auto sets the new bits height.. If you have any questions about it let me know, it's the only way I can do some of these signs with up to 9 tool changes and retain my sanity. :)
     
  3. Larry_AK

    Larry_AK New
    Builder

    Joined:
    Oct 6, 2014
    Messages:
    26
    Likes Received:
    32
    Interesting, how do you go-about setting up auto zero? That would save a lot of time!
     
  4. Serge E.

    Serge E. Journeyman
    Builder

    Joined:
    May 6, 2014
    Messages:
    730
    Likes Received:
    251
    Well, actually, you should at minimum be paying the HST (sales taxes) unless for resale for which you would collect HST from your buyer, right ? The 'free trade' agreement is not with all countries and, more precisely, country of origin of the goods being imported will make the difference. I did some customs brokering in my younger days. It isn't that bad, just a lot of paperwork and rules. The brokers deal with all goods; a big book can be seen at customs when they make you pay for the items you or your wife buy. If you import just specific items, it is a cookie cutter process after the first few. In my case, that was true and thus we were doing our own brokering after a while. In the case of cross border shopper, the custom officer will pick the applicable rate applicable to the bulk of the purchases and you usually end up paying just the sales taxes anyways. It's easier for everyone, not worth the trouble of picking the proper code for each individual item (which you could insist on ... and probably be flagged for your next crossing, never a good thing). The sales taxe you would pay in the Canadian store anyways, BUT on the higher shelf price. You still save a few bucks, if not more. Free Trade somehow does not help.

    Thus far - knock on wood not to jinks myself, if I get small orders from China shipped direct to my house, I have not payed any thing (neither duties nor taxes of any kind). Those small orders go through the various Post Offices. I've got 80+ orders over a year or so thus far. However, if a carrier is used to deliver an order, it is an other story as the carrier uses a broker and will most often tack on their fee, duties and sales taxes. But they do handle the paperwork, you ... just pay. The pain is to the wallet, very little to no sweat involved.

    The fact we are not being charged for duties or taxes is probably due to the cost of doing all the paperwork and collecting the $ would be more than the amount collected. Kind of like receiving a 50 cents invoice in an envelop with a 1$ stamp, not to forget someone printed, stuffed and licked the envelop before sticking the stamp on !

    At least they tell you there may be 'landing' fees before it reaches you. Regardless, if you order from outside your country, you should be expecting to pay something extra even if 'shipping' is included. You can check with your Customs office BEFORE a order is placed to see how big a surcharge (duties) could be if they decide to apply it.

    If you are commercial, brokering and duties are an evil fact of life. The paperwork is still done by someone, even with the Free Trade agreement. Just some items have no duties and the paperwork seems like a waste of time, energy and dollars. I believe these days you have to use a broker if doing commercial transactions, no longer possible to do your own brokering (?)

    If you are an end-user, it will depend on the customs officer, just hope (s)he had a good night sleep. Depending on the item, it might be a good idea to have some paperwork done before showing up at customs. An obvious example : buying a car. I lived experience when getting my V-slot lengths... loads of sweating there ! Could of lost the material AND the car on top of getting fined !!! The customs officer didn't believe the invoice price as it seemed to low for him ...

    Basically, it's like being quoted a shipment FOB (free on board) - the price being quoted is for the goods as they leave a loading dock of the shipper : it's "free" (the shipper's tab) to get the order on board (in the truck or whatever) and from their on it is the buyer's responsibility for all other costs (transport, insurance, ... duties, ... taxes). Not to forget some countries have 'duties' or fees just to transport certain goods in certain quantities within their own borders (pay for the right to transport the said goods).

    Believe it or not, it was actually fun ... back then. I probably would not do it today.
     
  5. Serge E.

    Serge E. Journeyman
    Builder

    Joined:
    May 6, 2014
    Messages:
    730
    Likes Received:
    251
    Oops sorry, I just added fuel to fire. :duh:
     
  6. Neil Rosenberg

    Neil Rosenberg Journeyman
    Builder

    Joined:
    Dec 29, 2013
    Messages:
    180
    Likes Received:
    177
    No problem Serge, and thanks for noticing.

    Gerald -- As you suggest, I'm interested in Mach3 automations, one being auto-zero for tool height. I'd also like to add limit switches to my axes, which Mach3 seems to support but their documentation is pretty opaque. Please tell me more, and feel free to post photos as needed!

    You asked about speed and DOC with the updated machine. First of all, in its original condition (belts, no stiffening) I was reluctant to do any real cutting due to extreme bit deflection. Now with the updates I can easily take 1/4" cuts with a V-bit tool in MDF at 100 ipm, plunge rate about 30 ipm. I'm still experimenting, but if I go much faster/deeper than that it bogs down my weenie 1/4 hp Harbor Freight trim router motor.

    BTW I am definitely going to update to the DeWalt 611 at some point, and I even saw that I can buy the motor only for about $80 or less from various places. The only thing slowing me down on that is the need to recreate my motor mount, laser x-hair and dust boot.

    Neil
     
  7. Hytech2k

    Hytech2k Veteran
    Builder

    Joined:
    May 6, 2014
    Messages:
    429
    Likes Received:
    331
    That's one of the things I really like about Mach 3, it will handle limit switch duties, auto square the gantry, and auto zero the tool when you do tool changes. I'll get some photo and screen shots together and postem for you guys. Limit switches are actually pretty easy to install and setup in Mach. Didn't realize the HF router was just a 1/4hp, that sucks, may as well use a dremel.;) A 611 would feel like a powerhouse next to that. I found just the motor only on Amazon for..... $79.00

    http://www.amazon.com/gp/product/B0054LXWKA/ref=oh_aui_detailpage_o03_s00?ie=UTF8&psc=1
     
    #187 Hytech2k, Jan 29, 2015
    Last edited: Jan 29, 2015
  8. Hytech2k

    Hytech2k Veteran
    Builder

    Joined:
    May 6, 2014
    Messages:
    429
    Likes Received:
    331
    I'll put together some screenshots and photos Larry... It's actually pretty easy...

    Gerald
     
    Larry_AK likes this.
  9. Hytech2k

    Hytech2k Veteran
    Builder

    Joined:
    May 6, 2014
    Messages:
    429
    Likes Received:
    331
    I forgot to mention, I don't run the stock screenset, never have, it had a very Windows 3.0 feel about it. I use the 2010 screenset from here: The CNC Woodworker This screenset has a much better flow to it, alot more like windows with tabs for different functions and a very large preview pane. Plus there are a ton of gadgets built in. Even comes in different resolutions for those of us running wide screen monitors. Best $20 bucks I spent !

    Anyway here are a couple videos on set-up and auto tool zero for 2010.


    I looked through a bunch of videos on youtube in reference to auto tool zero for standard Mach 3, I only found where you have to reset the tool height every tool change. I'm not sure if this is correct because like I say, I never use Mach 3 stock. When I set up a job I zero the first tool to the work piece, the machine moves over to a fixed plate I have mounted and lowers the bit and takes a reference height then moves back ready to cut. When I do a M6/tool change, it brings the bit to the tool change position, I change the bit, press a button telling it the bit change was completed, it moves over to the fixed plate, lowers the bit and sets the new bit to the proper height for the work piece. It moves back to the 0,0 on the work piece then starts cutting. The webpage above has a video showing how it works. Just not sure if standard Mach 3 can do it....
     
    #189 Hytech2k, Jan 29, 2015
    Last edited: Jan 29, 2015
  10. Nick W

    Nick W Well-Known
    Builder

    Joined:
    Oct 22, 2014
    Messages:
    99
    Likes Received:
    61
    That is a good idea to use a fixed plate for the auto tool zero. I was thinking about ways to use a switch or build a fancy button. I was WAAAY over thinking it.
     
  11. Hytech2k

    Hytech2k Veteran
    Builder

    Joined:
    May 6, 2014
    Messages:
    429
    Likes Received:
    331
    Lol, it's actually pretty simple. If I didn't have it my production would be slowed way down... I still would like a ATC but 3k to convert a Porter Cable 7518 to a ATC is out of my budget, plus at it's core it's still a router...
     
  12. sgspenceley

    sgspenceley Veteran
    Builder

    Joined:
    May 27, 2014
    Messages:
    249
    Likes Received:
    292
    I apologize Neil! I was impressed with the pricing of ball lead screws that Robert purchased from China. Now I'm deciding which route to go. Rack and pinion or lead screw. My machine will never be large So it's hard to decide.
     
  13. sgspenceley

    sgspenceley Veteran
    Builder

    Joined:
    May 27, 2014
    Messages:
    249
    Likes Received:
    292
    Thank you for the excellent videos and suggestion to change the screenset.
     
  14. Hytech2k

    Hytech2k Veteran
    Builder

    Joined:
    May 6, 2014
    Messages:
    429
    Likes Received:
    331
    No problem... ;)
     
  15. Neil Rosenberg

    Neil Rosenberg Journeyman
    Builder

    Joined:
    Dec 29, 2013
    Messages:
    180
    Likes Received:
    177
    Hey Gerald -- that's brilliant!

    I had already bought the 2010 screenset but hadn't yet used much of its automation. I will definitely go for auto-zero once my new spindle motor is in.

    Thanks!
     
    Hytech2k likes this.
  16. Hytech2k

    Hytech2k Veteran
    Builder

    Joined:
    May 6, 2014
    Messages:
    429
    Likes Received:
    331
    Yeah I like that screenset alot ! I'm here in Florida and get alot of power outages, I use a corner finder from The Makers Guide, that way I can reset my 0,0 using the probe wizard and restart cutting. Also the break-in wizard works nice for putting the machine through it's paces. If you need any screenshots showing settings for limit switches or to setup auto zero let me know...

    Gerald
     
    #196 Hytech2k, Jan 30, 2015
    Last edited: Jan 30, 2015
  17. Nick W

    Nick W Well-Known
    Builder

    Joined:
    Oct 22, 2014
    Messages:
    99
    Likes Received:
    61
    The Makers Guide. Another great idea! I just dug through the Planet-CNC manual and it looks like the automated functions to find 0,0 with this method, already exists. Time to add the Guide to my wish list.

    Gerald, I think you should film your process. Such as mounting the material, tool offsets, material offsets, tool change, etc.

    -nick
     
    #197 Nick W, Jan 30, 2015
    Last edited: Jan 30, 2015
  18. Hytech2k

    Hytech2k Veteran
    Builder

    Joined:
    May 6, 2014
    Messages:
    429
    Likes Received:
    331
    I might make a few videos to help everyone out, just swamped right now with work, as soon as I can get above water i'll put some together.
     
    GrayUK and Nick W like this.
  19. Larry_AK

    Larry_AK New
    Builder

    Joined:
    Oct 6, 2014
    Messages:
    26
    Likes Received:
    32
    Ordered up 2010 screenset!
     
    Hytech2k likes this.
  20. Hytech2k

    Hytech2k Veteran
    Builder

    Joined:
    May 6, 2014
    Messages:
    429
    Likes Received:
    331
    I'm sure you'll like the improvement over the standard Mach 3 screens. If you have any questions feel free to message me directly, I don't want to clutter up Neil's build.

    Gerald
     
    Larry_AK likes this.
  21. Hytech2k

    Hytech2k Veteran
    Builder

    Joined:
    May 6, 2014
    Messages:
    429
    Likes Received:
    331
    Liking the new drawing with the dust covers !! Sharp !
     
  22. Neil Rosenberg

    Neil Rosenberg Journeyman
    Builder

    Joined:
    Dec 29, 2013
    Messages:
    180
    Likes Received:
    177
    Thanks Gerald. This project is causing other projects, such as making a nichrome wire plastic bender.

    I also added (inspired by YOUR machine) a spindle relay. Not too hard once I figured out the right pins and settings in Mach 3, but I found that I had occasional E-stop triggers from switching noise. I was able to eliminate these by using the software debounce in Mach 3. Time will tell if this is a real fix, otherwise I may have to do some shielding etc.

    Neil
     
  23. Hytech2k

    Hytech2k Veteran
    Builder

    Joined:
    May 6, 2014
    Messages:
    429
    Likes Received:
    331
    Those SSR relays are great for that. Not sure what wire your using, but HD and Lowes carries 4 strand shielded "security system" wire for a pretty good price. That what I wired my Joes Evo machine with a couple years ago, works great for me, I probably used 150 feet of it, goes to all my motors. Keep up the good work !!
     
    mybuild14 and Nick W like this.
  24. Neil Rosenberg

    Neil Rosenberg Journeyman
    Builder

    Joined:
    Dec 29, 2013
    Messages:
    180
    Likes Received:
    177
    After several runs with the new spindle control, I LOVE IT! Also with the software debounce no more unwanted e-stops.
    Now on to the other aspects of this project -- Dewalt spindle, new dust boot and etc.

    I think I enjoy working on the machine as much as making parts with it :ROFL:
     
  25. Hytech2k

    Hytech2k Veteran
    Builder

    Joined:
    May 6, 2014
    Messages:
    429
    Likes Received:
    331
    Add a second relay to control your vacuum and you'll be set ;)

    I have that same problem, I like cutting new parts and improving on them so much that I find myself looking over dxf files trying to find something to improve, just so I can cut it again and make a improvement on my machine at the same time. :)
     
    #205 Hytech2k, Feb 4, 2015
    Last edited: Feb 5, 2015
  26. Neil Rosenberg

    Neil Rosenberg Journeyman
    Builder

    Joined:
    Dec 29, 2013
    Messages:
    180
    Likes Received:
    177
    Interesting idea on the 2nd relay. In fact the way I made the relay box for the spindle motor, I have additional AC outlets and a 2nd pair of relay contacts that I could use without major rework. The only issue is that I'd like to be able to turn on the vacuum motor manually during setup to get my Z-axis zero, since the vacuum pulls the part down to the bed a bit. I'll probably wire-in a manual switch on the relay box for that.

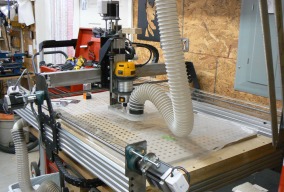
    BTW I did my first cuts with the DeWalt 611 spindle yesterday, WOW what a difference compared with the flea-powered Harbor Freight motor. I also love the white LED lights on the underside of the motor which illuminate the cutting area. This, in combination with my new transparent dust shoe makes it really easy to see what's happening at all times. I didn't realize how much I was missing with my opaque dust shoe. It's mesmerizing to watch the action!

    Photos, and maybe a video or two to follow...
     
    mybuild14, Hytech2k and Nick W like this.
  27. Hytech2k

    Hytech2k Veteran
    Builder

    Joined:
    May 6, 2014
    Messages:
    429
    Likes Received:
    331
    That little Dewalt is a good router, has a lot more power then you would think. Just a FYI might want to order a set of brushes from like ereplacementparts, only like 5 bucks a piece, the Dewalt seems to go through them pretty quick. I used mine for just over a month and had to replace them. I have the clear dust shoe as well, it's nice with that bright LED light you can see the progress on your cuts...
     
  28. Neil Rosenberg

    Neil Rosenberg Journeyman
    Builder

    Joined:
    Dec 29, 2013
    Messages:
    180
    Likes Received:
    177
    Good advice, ordered the brushes just now. Shipping is almost as much as the brushes:confused:

    Almost done with this round of changes -- just need to do a couple more updates to the dust boot and add a cover to the LED crosshair switch, then on to actual work.

    I forget what I wanted to make before all this started...
     
  29. Neil Rosenberg

    Neil Rosenberg Journeyman
    Builder

    Joined:
    Dec 29, 2013
    Messages:
    180
    Likes Received:
    177
    Build is done for now, here's a snap:

    [​IMG]

    Here's a few photos of ArtCAM Express, and the resultant test part. I'm playing around with raised lettering above a relief:
    [​IMG]
    [​IMG]
    [​IMG]
     
    #209 Neil Rosenberg, Feb 13, 2015
    Last edited: Feb 13, 2015
    Mark Carew, Hytech2k and GrayUK like this.
  30. GrayUK

    GrayUK Openbuilds Team Elder
    Staff Member Moderator Builder

    Joined:
    May 5, 2014
    Messages:
    1,668
    Likes Received:
    627
    Really nice looking machine Neil. :thumbsup::thumbsup:
    We shall be expecting some more pictures and maybe a few videos in the not too distant future, if you would be so kind my Friend. :D

    Well Done
    Gray
     

Share This Page

  1. This site uses cookies to help personalise content, tailor your experience and to keep you logged in if you register.
    By continuing to use this site, you are consenting to our use of cookies.
    Dismiss Notice