Welcome to Our Community

Some features disabled for guests. Register Today.

Shawn's Workbee 1510

Discussion in 'CNC Mills/Routers' started by sharmstr, Jul 2, 2018.
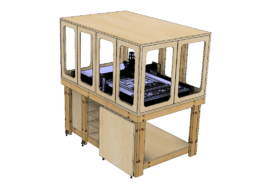
  1. Jacob Lotter

    Jacob Lotter Well-Known
    Builder

    Joined:
    Oct 26, 2018
    Messages:
    34
    Likes Received:
    57
    Got everything Up and running tonight!! works fantastically! will take some pictures in the morning when its actually cleaned up. Will give numbers on max velocity I can achieve without whipping for those who had asked.
     
    sharmstr likes this.
  2. Jacob Lotter

    Jacob Lotter Well-Known
    Builder

    Joined:
    Oct 26, 2018
    Messages:
    34
    Likes Received:
    57
    You're build sure looks to be coming together nicely!! Great job, looking forward to seeing yours finished.
     
    sharmstr likes this.
  3. OpenPasta

    OpenPasta New
    Builder

    Joined:
    Aug 17, 2016
    Messages:
    1
    Likes Received:
    0
    Nice enclosure design. Did you design this yourself or is this a standard solution?
     
  4. sharmstr

    sharmstr OpenBuilds Team
    Staff Member Moderator Builder Resident Builder

    Joined:
    Mar 23, 2018
    Messages:
    2,029
    Likes Received:
    1,428
    Thank you. I designed it.
     
  5. sharmstr

    sharmstr OpenBuilds Team
    Staff Member Moderator Builder Resident Builder

    Joined:
    Mar 23, 2018
    Messages:
    2,029
    Likes Received:
    1,428
    I decided to go with the DQ542MA drivers from OB and 269oz (2.8a) motors from steppers online (couldnt wait any longer for OB to get the high torque motors back into stock). I'm powering everything off a Mean Well SE-600-48 power supply. The machine has no issue running rapids at 10,000mm/min with the 1/2" lead screw now. Whoop!
     
  6. sharmstr

    sharmstr OpenBuilds Team
    Staff Member Moderator Builder Resident Builder

    Joined:
    Mar 23, 2018
    Messages:
    2,029
    Likes Received:
    1,428
    I worked on my revised control panel this weekend. I was able to get it to the point of working, but I need some assistance on finalizing the wiring.

    50488715_374579136429144_6097789470103255566_n.jpg

    I've been reading a lot about wiring on these forums and I believe I have a decent understanding of what's left to do. It seems that most of the information I've read has come from @Metalguru so perhaps he can lay eyes on this and tell me if I'm headed in the right direction.

    1 - I need to add 5amp fuses to the + driver wires.
    2 - I need to add a ground connection on the ac side to the control panel. Then run ground wires from the control panel to all moving axis of the machine chassis. I'm planning on using ring terminals connected to the vslots via a drop in nut.
    3 - All of my motor and limit switch cables use shielded wire. The drain wires are not connected on the motor/switch side. On my xpro version of the control cabinet, I attached the drain wires to DC ground, but now I'm thinking I should attach to the AC ground instead. Not sure.
    4 - I have a opto isolator board for the limit switches arriving soon.
    5 - I have to wire up the SuperPID. The SuperPID and my vac are on a separate 20amp circuit (motors are on a 15amp circuit). I havent figured out where I'm going to ground the vac hose yet.

    If anyone sees any issues with this, or something I missed, I'd appreciate the input.
     
  7. Jacob Lotter

    Jacob Lotter Well-Known
    Builder

    Joined:
    Oct 26, 2018
    Messages:
    34
    Likes Received:
    57
    It's fine to ground all of these (AC/DC) at the same ground block. Sometimes you will see a DC "floating" ground but most of the time this is even grounded to the chassis defeating its purpose As I've seen on industrial machinery. Just be sure that all your plugs/cables are grounded on the chassis side!! Just be sure that AC and DC wires to not run parallel to each other as it will cause interference.
     
    sharmstr likes this.
  8. Metalguru

    Metalguru Veteran
    Builder

    Joined:
    Dec 29, 2015
    Messages:
    752
    Likes Received:
    545
    I would say a resounding NO to this. Never connect AC and DC ground together! This will just couple all the noise in your AC circuit into the Arduino and stepper drivers, as well as the other way around.

    I was an Instrumentation designer for 30+ years and I always strived to keep DC circuitry grounds separate from AC. In some cases it works better, but in the vast majority they should be kept separate. Modern computers connect digital ground to chassis, but only at one point and only for EMI compliance. If you really must connect them, run a .1-1uF cap between DC and AC ground, so you have an AC path for noise but not DC.

    https://openbuilds.com/members/sharmstr.107720/, your list looks good, but all shields should be connected to AC ground, and wires must have a shield connection on only one end, never connect a shield wire at both ends. Current must not be allowed to flow through the shield.

    MG
     
  9. sharmstr

    sharmstr OpenBuilds Team
    Staff Member Moderator Builder Resident Builder

    Joined:
    Mar 23, 2018
    Messages:
    2,029
    Likes Received:
    1,428
    Got it. Thank you for verifying. I really appreciate it.
     
  10. Jacob Lotter

    Jacob Lotter Well-Known
    Builder

    Joined:
    Oct 26, 2018
    Messages:
    34
    Likes Received:
    57
    Never had a single issue with AC/DC common noise in 680/24VDC grounds or 480/220/120VAC being grounded to the same chassis. Environments with dozens of 75+HP drives, encoders, devicenet, Datahighway, ethernet, and none have noise issues with proper shielding and cable routes. I then connected the enclosure to Earth ground for safety purposes. Coming from an industrial setting as a Installations Engineer with a corrugator manufacturer. Just my 2 cents, This topic has always been controversial with many perspectives and my CNC has 0 issues with nuisance trips. :)
     
    sharmstr likes this.
  11. Metalguru

    Metalguru Veteran
    Builder

    Joined:
    Dec 29, 2015
    Messages:
    752
    Likes Received:
    545
    Too easy to get ground loops by connecting DC ground and chassis ground. Chassis ground is, as you mentioned, only for safety and should never have any current flowing through it unless there is a fault.

    Most stepper drivers are optically isolated from the power supply, and keep the motion controller and USB isolated from the noisy steppers and protective earth. Connecting the power supply - terminal to chassis ground can bypass this optical isolation and can destroy equipment, cause noise problems, and unexplained faults. In addition, in the unlikely event of an AC power fault or short to ground, you can have full AC line voltage present on the protective ground, which, as you can imagine, would not be good for your stepper system, computer, etc. Notice how your Laptop has no protective ground lead?

    Just because it hasn't happened yet does not mean it won't. Better to just not do it.

    MG
     
    joe williams likes this.
  12. sharmstr

    sharmstr OpenBuilds Team
    Staff Member Moderator Builder Resident Builder

    Joined:
    Mar 23, 2018
    Messages:
    2,029
    Likes Received:
    1,428
    I installed this opto isolator board for the limit switches that I found on Tindie. Its well built, has excellent documentation and works great (though I've only about 2 hours run time on it.) You can power it only by the 5v from the arduino, but I have it connected to 5v from arduino and a 5v power supply which is the best way to do it.


    [​IMG]

    You can buy it here: CNC Optical Limit Switch Isolator - GRBL by The Eccentric Workshop Store on Tindie
     
  13. sharmstr

    sharmstr OpenBuilds Team
    Staff Member Moderator Builder Resident Builder

    Joined:
    Mar 23, 2018
    Messages:
    2,029
    Likes Received:
    1,428
    Reconfigured my spoilboard today. Dropped it another 20mm. While I was messing around I decided to measure the Y c-beam flex in the middle compared to the ends. As I suspected, the linear rails help to stiffen up the c-beam, but there as still .015" - .017" of flex when pressing down in the middle. Since I dont have the inner Y plates anymore, I was able to use my leftover 20x40 from my spoilboard reconfig to support the center of the beams. Now there's only .002" of flex. Sweet!

    20190223_124936.jpg
     
  14. sharmstr

    sharmstr OpenBuilds Team
    Staff Member Moderator Builder Resident Builder

    Joined:
    Mar 23, 2018
    Messages:
    2,029
    Likes Received:
    1,428
    Been awhile since I posted any updates. I've been running OB BlackBox since the first batch shipped. I'm really loving it even though its less powerful than my 34v DQ542MA setup. I finally hooked up my IoT relay. I've been sitting on it for months. I ran a few jobs today and its amazing how something as simple as having the gcode turn on my router and my dust collector can really make a difference. Less to think about for sure. I also ditched my laptop and hooked up a Windows 10 mini pc. Need to rewire everything, but at least everything is under the table and out of the elements. I have two circuits coming into the table. I have a 15A that runs the mini pc, monitor and the BlackBox. I have a 20A that the router and vacuum connect to via the IoT relay.

    IMG_20190630_111605.jpg

    I dont have any room on the table surface for a monitor and keyboard, so I knew I'd have to build a stand of some sort. My first thought was a simple slide out shelf, but that would set the keyboard to about thigh height which would be annoying. I came up with a slide out vertical panel that has slides that move my keyboard/monitor stand up and down. It works pretty good.

    IMG_20190630_111521.jpg


    IMG_20190630_111220.jpg

    I'm using a 13.1" 1200x1600 touchscreen in tablet mode. Nice big sim area (which I rarely look at, but hey). The keyboard is a waterproof mini keyboard and touchpad.

    I really need to get around to adding the linear rails to the X and Z.
     

    Attached Files:

  15. Alex Chambers

    Alex Chambers Master
    Moderator Builder

    Joined:
    Nov 1, 2018
    Messages:
    2,674
    Likes Received:
    1,318
    Hi Shawn, very nice build, but what I'm really, really envious about is that workshop!
    Alex. :thumbsup::thumbsup:
     
    sharmstr likes this.
  16. sharmstr

    sharmstr OpenBuilds Team
    Staff Member Moderator Builder Resident Builder

    Joined:
    Mar 23, 2018
    Messages:
    2,029
    Likes Received:
    1,428
    35,000 sq ft is more than anyone needs. LOL
     
    Alex Chambers likes this.
  17. Alex Chambers

    Alex Chambers Master
    Moderator Builder

    Joined:
    Nov 1, 2018
    Messages:
    2,674
    Likes Received:
    1,318
    I could try to fill that space (too many hobbies)
    Alex :ROFL::ROFL::ROFL:
     
    sharmstr likes this.
  18. GeoffH

    GeoffH Journeyman
    Builder

    Joined:
    Mar 11, 2017
    Messages:
    178
    Likes Received:
    106
    Great job Shawn, and good to hear that you have automated the spindle on/off, doesn't sound not much of a benefit, but as you say it does make a big difference in practice - it's a no brainer for what it costs :thumbsup: Geoff
     
    sharmstr likes this.
  19. sharmstr

    sharmstr OpenBuilds Team
    Staff Member Moderator Builder Resident Builder

    Joined:
    Mar 23, 2018
    Messages:
    2,029
    Likes Received:
    1,428
    Got my spare Shuttlexpress working as a jog pendant with OB Control
     

    Attached Files:

  20. Robert White

    Builder

    Joined:
    Oct 17, 2020
    Messages:
    36
    Likes Received:
    3
    Hello Jacob. Hey. So I clicked on the link for the linear rail setup you got. Well nobody had it. Not is it listed anymore on eBay. Could you tell me what model is this set up is. Etc. thank yuh.
     
  21. sharmstr

    sharmstr OpenBuilds Team
    Staff Member Moderator Builder Resident Builder

    Joined:
    Mar 23, 2018
    Messages:
    2,029
    Likes Received:
    1,428
    Looks like they are a bit hard to find atm. But the amazon (not ebay) link has the specs. They are a common size.
     
  22. David the swarfer

    David the swarfer OpenBuilds Team
    Staff Member Moderator Builder Resident Builder

    Joined:
    Aug 6, 2013
    Messages:
    3,222
    Likes Received:
    1,813
    for dust collection you must look at the stuff Matthias Wandel does in terms of making his own dust extractors per machine using whatever motors he finds lying around.
    they are much quieter than a shopvac.
     
    sharmstr likes this.
  23. Robert White

    Builder

    Joined:
    Oct 17, 2020
    Messages:
    36
    Likes Received:
    3
    You have the link to the one on amazin
     
  24. sharmstr

    sharmstr OpenBuilds Team
    Staff Member Moderator Builder Resident Builder

    Joined:
    Mar 23, 2018
    Messages:
    2,029
    Likes Received:
    1,428
  25. Robert White

    Builder

    Joined:
    Oct 17, 2020
    Messages:
    36
    Likes Received:
    3
  26. Giarc

    Giarc OpenBuilds Team
    Staff Member Moderator Builder Resident Builder

    Joined:
    Jan 24, 2015
    Messages:
    2,892
    Likes Received:
    1,610
    The entire spec sheet is there in the description. Also, in the written description under the details: "4pcs square type carriage bearing block internal width 34mm"
    upload_2020-10-28_21-2-24.png
    If you look at the picture you can see they are HGH15CA.
     
    #56 Giarc, Oct 29, 2020
    Last edited: Oct 29, 2020
    sharmstr likes this.
  27. Giarc

    Giarc OpenBuilds Team
    Staff Member Moderator Builder Resident Builder

    Joined:
    Jan 24, 2015
    Messages:
    2,892
    Likes Received:
    1,610
    If you need a 3d model that can be imported unto Fusion 360, McMaster Carr has a close representative model. The hole pattern and all other measurements are correct, but the length is 63mm. McMaster-Carr This model worked for me.
     
  28. Rob Taylor

    Rob Taylor Master
    Builder

    Joined:
    Dec 15, 2013
    Messages:
    1,470
    Likes Received:
    746
    I've always watched every single one of Matthias' blower videos! They're so good (and I'm amazed at the balancing he gets with wood).

    Linear rail is all standard sizes per the Hiwin/THK/Thomson specs, you can just type in the model number (MGN12, HGR15, etc) and six thousand versions of the same table will come up in Google Images, mostly from Aliexpress. Only difference in the carriages is standard block vs wide flange. The rails can be different in terms of vertical vs horizontal mounting, but I believe all of the cheap Chinese stuff is omnidirectional.

    Edit: Loving the machine and its updates, Shawn- this is the first time I'm actually reading through it properly! Big fan of that folding/telescopic control console too, I need to come up with something similar. Unlike certain people with giant warehouses, I have absolutely nowhere to put the control for M4, so I'm pondering it a lot.
     
  29. sharmstr

    sharmstr OpenBuilds Team
    Staff Member Moderator Builder Resident Builder

    Joined:
    Mar 23, 2018
    Messages:
    2,029
    Likes Received:
    1,428
    Thanks, man! Well, since my last update to this build, I've sold the big warehouse and moved to a much smaller one. The sliding console has worked great, but I think I'm going to have to change it up. I'm teaching my dad about all this and the jog buttons confuse him since the touch screen is 90 degrees off :)
     
    Peter Van Der Walt likes this.
  30. Rob Taylor

    Rob Taylor Master
    Builder

    Joined:
    Dec 15, 2013
    Messages:
    1,470
    Likes Received:
    746
    Probably sensible. Hard to justify the costs of an oversized place, even when you own it outright, I'd imagine. I'd like to have somewhere in the 10,000sqft region at some point, though.

    I'm seriously considering building a legit console, possibly even getting a box and pan brake for it, and putting it on a swivel arm, the whole deal. Fabbing something isn't much of an issue, it's a question of whether it can mount well enough to actually function and also stay out of the tiny pathway between the M4 bench and the hydraulic press to my back corner bench and shelving unit.

    Speaking of jog, is the ShuttleXPress still working for it? How is that? I've never had one, they seem to have a free-spinning dial and possibly a sprung two-way analog wheel? I see code for it pop up in HAL when I use the PncConf wizard for Mesa hardware, and I'm wondering if it would translate to a gamepad analog stick proportional jog for @Batcrave, but I have no clue what they even really are.
     

Share This Page

  1. This site uses cookies to help personalise content, tailor your experience and to keep you logged in if you register.
    By continuing to use this site, you are consenting to our use of cookies.
    Dismiss Notice