Welcome to Our Community

Some features disabled for guests. Register Today.

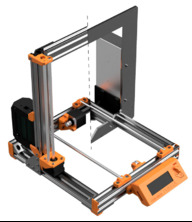
Prusa i3 Bear Upgrade V2

Discussion in '3D printers' started by pek, Feb 8, 2018.

  1. pek

    pek Journeyman
    Builder

    Joined:
    Apr 17, 2017
    Messages:
    196
    Likes Received:
    130
    Does anyone tried to use MK3 x-ends (version R2) on MK2(s) /MK2.5? I know the end stop holes on x-end-motor are missing but I have put them back (STL file attached) (I used Fusion 360 for now, but tomorrow will redo it using openscad).

    I have done some measurements on x-end-motor, x-end-idler and x-carriage and nothing seems to be a problem to my eyes. Did I miss something?

    I have just finished to print MK2.5 parts and have to update bearings and rods, the perfect moment to print new x-ends!
     

    Attached Files:

    kabar03 likes this.
  2. pek

    pek Journeyman
    Builder

    Joined:
    Apr 17, 2017
    Messages:
    196
    Likes Received:
    130
    Just to tell you that MK3 style X ends works perfectly on my MK2.5. I could not resist to add some improvements on the x-ends (on Fusion 360). I will publish this soon :)
     
    kabar03 likes this.
  3. xequtor

    xequtor New
    Builder

    Joined:
    Jan 23, 2018
    Messages:
    44
    Likes Received:
    1
    @pek, I got the power panic PCB's today, let me know if you need it.
    Screenshot 2018-03-19 09.42.13.png
     
  4. pek

    pek Journeyman
    Builder

    Joined:
    Apr 17, 2017
    Messages:
    196
    Likes Received:
    130
    that could be awsome yes, thank you. Does it works with 12v PSU?
     
  5. xequtor

    xequtor New
    Builder

    Joined:
    Jan 23, 2018
    Messages:
    44
    Likes Received:
    1
    I'm not sure, it may be but it is for MK3 24V PSU
    There is 24V in on the PCB and D1 may be voltage regulator but I have to take my MK3 PSU apart to check what diode it is, so it may work with 12V but you will need the Einsy to make it work or
    different code and board.

    prusa3d/MK3_Power_Panic
     
  6. pek

    pek Journeyman
    Builder

    Joined:
    Apr 17, 2017
    Messages:
    196
    Likes Received:
    130
    Yes you are right, this will be too complicated, I will wait for the MK3s :D

    Maybe someone else is interested ;)
     
  7. xequtor

    xequtor New
    Builder

    Joined:
    Jan 23, 2018
    Messages:
    44
    Likes Received:
    1
    yeah, MK3s is better option, I decided to build with V-Slot a MK3 clone.

    there will be too many who wants the PCB, dont think I'll send them out.
     
  8. pek

    pek Journeyman
    Builder

    Joined:
    Apr 17, 2017
    Messages:
    196
    Likes Received:
    130
    I understand, thanks for proposing :) . Keep us in touch with this, still interested to see how it goes!
     
  9. kabar03

    kabar03 New
    Builder

    Joined:
    Jul 12, 2016
    Messages:
    22
    Likes Received:
    1
    For those scratch building instead of moving parts over, this are the X carriages I will be using to clear my Z motor couplers. Because I have motors and screws already from another project I didn't want the added expense of integrated motors/screw. Includes a new hotend carriage to move the endstop to clear the couples. Pek, if you ever get caught up, perhaps you could add some mods for the scratch builders into a package? X-End Carriages with clearance for Z couplers for Zaribo/Haribo by ocieward
     
  10. pek

    pek Journeyman
    Builder

    Joined:
    Apr 17, 2017
    Messages:
    196
    Likes Received:
    130
    I could add this to the optional parts, why not. I would like to put priority on some other designs for now (for this printer and foe other things). But if the requests for this increase then I will give a try
     
    kabar03 likes this.
  11. kabar03

    kabar03 New
    Builder

    Joined:
    Jul 12, 2016
    Messages:
    22
    Likes Received:
    1
    yep, understood, lower priority, thanks

     
  12. pek

    pek Journeyman
    Builder

    Joined:
    Apr 17, 2017
    Messages:
    196
    Likes Received:
    130
    I finished to mount the MK2.5 during the week-end and on the side of the Bear Upgrade everything was fine. However, I am having a weird issue where the extruder is skipping steps on the first purge line. I have asked on Prusa forum :
    Extruder is skipping steps on purge line

    If some of you have ideas let me know!
     
  13. xequtor

    xequtor New
    Builder

    Joined:
    Jan 23, 2018
    Messages:
    44
    Likes Received:
    1
    on the end of the purge will be more material pushed, could be low temp, filament problem or maybe extruder gears not tight enough
     
    #193 xequtor, Mar 20, 2018
    Last edited: Mar 20, 2018
  14. pek

    pek Journeyman
    Builder

    Joined:
    Apr 17, 2017
    Messages:
    196
    Likes Received:
    130
    I tried to tight them less and more but got the same results

    I have disassembled the extruder and I found that the top PTFE tube was a slightly squished by a piece of plastic. I have cleaned the PTFE tube hole and double check the hole between PTFE and Bondtech pulley. Unfortunately this does not change anything.

    I removed the genuine E3D silicon cover, same result.

    Something else I could observed is that my bed seems to be badly leveled (front the front, on the left side the level is bigger than on the right side) and I could not correct it with the bed level correction menu... Firmware is still RC1 so maybe there are issue with the functionality.

    I am currently printing a Benchy to see if it is only a problem with the first layer / first purge line.

    Then I will take the road of the filament/low temp issue
     
  15. xequtor

    xequtor New
    Builder

    Joined:
    Jan 23, 2018
    Messages:
    44
    Likes Received:
    1
    do you have pictures what included in the MK2.5 upgrade? there is just description on Prusa site but no detailed pics, like if there are the distance rings between the Y alu carriage and hotbed.

    I want to place bigger order by Prusa (Filament, Einsy, etc ) and considering the MK2.5 upgrade for my Alu Ultimaker, still thinking what I want to do.
     
  16. pek

    pek Journeyman
    Builder

    Joined:
    Apr 17, 2017
    Messages:
    196
    Likes Received:
    130
    For the distance ring, are speaking about the standoffs? Yes they are already mounted on the bed.

    Here is what you get with MK2.5 upgrade :
    SNMXqmrvRfreRRuJ.huge.jpg
     
  17. pek

    pek Journeyman
    Builder

    Joined:
    Apr 17, 2017
    Messages:
    196
    Likes Received:
    130
  18. xequtor

    xequtor New
    Builder

    Joined:
    Jan 23, 2018
    Messages:
    44
    Likes Received:
    1
    thanks, I just ordered V-Slots cut to size from Watterott, here is my plan, order X, Y , E steppers from Prusa, Z from Zaribo or all but E from Zaribo, MK2.5 upgrade + Einzy and use the 12V bed with 24V just will add maybe 15A step down, plus some other needed parts,

    Then if MK3S will be released, use MK2.5 upgrade parts for my Alu Ultimaker upgrade and use MK3S parts for Bear MK3.

    Just made BOM for the Power Panic, total cost for 10 pieces incl. components, PCB and Power socket: 1.50 EUR :)
     
    #198 xequtor, Mar 21, 2018
    Last edited: Mar 21, 2018
  19. pek

    pek Journeyman
    Builder

    Joined:
    Apr 17, 2017
    Messages:
    196
    Likes Received:
    130
    Looks to be a sweet plan

    Maybe you could ask if they can swap the 12v bed with the 24v. One of advantage of the 24v is that the bed is fixed on 9 points, and so more flat. But this means you will need the Y alu carriage from MK3... And 24v comes without the standoffs on it, you have to add 6x6 round M3 standoffs.
     
  20. xequtor

    xequtor New
    Builder

    Joined:
    Jan 23, 2018
    Messages:
    44
    Likes Received:
    1
    I already asked, they said no.
    I may just ordered the single parts that are in the MK2.5 upgrade (they are available for people who bought the MK3) and get 24V bed, this will cost me 50 EUR more as the MK2.5 upgrade
    and yeah, I was already looking for the 6x6 round M3 standoffs, if I go that route I will have to order the alu heatbed carriage from china as I did not found source in EU, zaribo has the one for MK2S
     
  21. pek

    pek Journeyman
    Builder

    Joined:
    Apr 17, 2017
    Messages:
    196
    Likes Received:
    130
    Finally! Extruder issue solved! That was mainly the nozzle, I swapped for a new one! \o/

    I can work again on new parts / optional parts!
     
  22. pek

    pek Journeyman
    Builder

    Joined:
    Apr 17, 2017
    Messages:
    196
    Likes Received:
    130
    5D3_1550.jpg
     
    kabar03 likes this.
  23. pek

    pek Journeyman
    Builder

    Joined:
    Apr 17, 2017
    Messages:
    196
    Likes Received:
    130
    kabar03 likes this.
  24. xequtor

    xequtor New
    Builder

    Joined:
    Jan 23, 2018
    Messages:
    44
    Likes Received:
    1
    and that in times when everyone should quit and delete FB account :) btw, just joined the group but I don't like/use FB in general
     
  25. xequtor

    xequtor New
    Builder

    Joined:
    Jan 23, 2018
    Messages:
    44
    Likes Received:
    1
    do you think the 12V MK52 heatbed is stable enough with 5 mounting points? 24V MK52 has 9 as you know (I still can't decide which option to go for, MK2.5 upgrade with 12V or single parts with 24V MK52)
     
  26. pek

    pek Journeyman
    Builder

    Joined:
    Apr 17, 2017
    Messages:
    196
    Likes Received:
    130
    Do not forget that it was good until the MK3 went out :D
     
  27. Michael.M

    Michael.M Veteran
    Staff Member Builder Resident Builder

    Joined:
    Jan 21, 2017
    Messages:
    432
    Likes Received:
    264
    Nice work! Very clean. I have a 3D printer that I built but haven't used it much lately. It's the Aluminum Ultimaker 2 clone from Thingiverse. This makes me want to get back in to it. Thanks for sharing your masterpiece.
     
  28. pek

    pek Journeyman
    Builder

    Joined:
    Apr 17, 2017
    Messages:
    196
    Likes Received:
    130
    Thank you very much Michael, I appreciate. 3D printing is very useful to create lots and lots of tools and jigs (for CNC machine or not). Do not hesitate if you have few questions ;)
     
  29. pek

    pek Journeyman
    Builder

    Joined:
    Apr 17, 2017
    Messages:
    196
    Likes Received:
    130
    I have done some update :
    - New printed parts to cover top of the Z axis. This part has some space in case a t-nuts is a bit longer on top and it saves print time and material. Can be used with self tapping screws or standard low profile screws
    - All BOM and manuals have been updated according to this new part
    - I now recommend an orientation for zip ties on Full Upgrade (they might touch the heated bed sleeves with MK2.5 and MK3)
    - Added zip ties reference to all BOM
    - Added recommended spare parts to all BOM
    - Added McMaster-Carr links for non-Openbuilds components

    5D3_1587.jpg

    5D3_1585.jpg

    5D3_1582.jpg
     
  30. xequtor

    xequtor New
    Builder

    Joined:
    Jan 23, 2018
    Messages:
    44
    Likes Received:
    1
    I hope I'll get my V-Slot extrusion in next few days the the big part print action can start.

    the Z axis top cover, can this be integrated in the top Z rod mount? if not I would design (and I will :) ) it w/o need for screws, just insert in the extrusion, I think screw is overkill
     

Share This Page

  1. This site uses cookies to help personalise content, tailor your experience and to keep you logged in if you register.
    By continuing to use this site, you are consenting to our use of cookies.
    Dismiss Notice