Welcome to Our Community

Some features disabled for guests. Register Today.

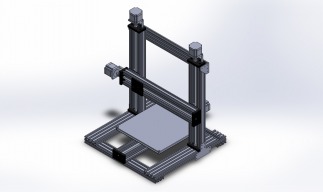
My C-Beam 3D Printer

Discussion in '3D printers' started by evilc66, Jul 27, 2016.

  1. Tinkerz

    Tinkerz New
    Builder

    Joined:
    Jul 3, 2017
    Messages:
    6
    Likes Received:
    5
    Wow!! This thread is full of useful information. Thank you all!! Jacques D brought me here via a comment posted on my build I put up the other day. So glad to see I was on the right track with most the issues after reading the entire thread. This is my first build and much of my motivation is similar to that of evilc66, so I feel like I'm in good company here. I'm super excited about this now!! Wish I could see the pictures that evilc66 posted though, not sure what gives there but apparently it's some 3rd party issue on photobucket.

    Thanks again everyone for all the work you've done. It's awesome to know that this type build should have good, accurate and repeatable print results.
    - Keith
     
  2. evilc66

    evilc66 Journeyman
    Builder

    Joined:
    Jan 9, 2015
    Messages:
    392
    Likes Received:
    153
    Sorry for the very delayed response. The last 8 months or so has been dedicated to selling a house, buying a house, then renovating said house so that we can live in it (house was built in '67 and didn't look like it had been touched since then - clean, but dated). House is nice and cozy now, and the printer was the first "toy" to be set up.

    So, it seems as though Photobucket has lost it's mind and no longer allows for 3rd party hosting without having to pay through the nose for the privilege. I'm going to have to find an alternative and edit the posts soon so that the pictures show up again. Very frustrating.

    On to more frustrating things though...

    When we moved out of the old house, we were staying with my in-laws and I had the printer set up in the basement. It was working ok, but every now and then I would get missed steps and the print would be botched. I thought at first that it was that the Alegro drivers on the Smoothieboard weren't delivering enough current for the acceleration and max speed settings that I was using at the time, so I ordered some external drivers similar to the ones that OB offers (they aren't TB6600 drivers or similar, so no issues there). I didn't get them wired in until I got everything set up in the new house.

    Once the new drivers were in place and the current was set to 2.5A with 1/32 microstepping, I ran into more missed steps. Thinking it was interference issues, I basically replaced all the wiring to the stepper drivers and motors with shielded cables. Nope, didn't help. Updated the firmware and the host software (Simplify3D), as well as try different host/slicing software (Repetier/Slic3r). Nope, didn't help. So then I start thinking that the controller was at fault somehow. I pulled the enable pin from the drivers (they are active low, so pulling the pin just leaves them enabled all the time). This seemed to help, as I managed to get through an entire print without any missed steps. Wasn't so lucky on the next few. The model that I've been having the most issues with was a model pulled from Thingiverse. I generated the g-code and used some of the online viewers to see if there were any obvious signs that the code was the issue (it had been skipping steps at close to the same layer height each time), but I couldn't spot anything.

    While doing all this, I reduced the acceleration and jerk/junction deviation settings, which did seem to help. I haven't touched the max speed though (60mm/s), and I refuse to do it. This machine is more than capable of that (I've actually hit speeds over 80mm/s, which I'm pretty happy about).

    The motors and the drivers aren't getting hot, so I'm pretty sure that's not an issue.

    End stops are set up normally closed, so there shouldn't be any issues with noise there causing an axis to hiccup.

    All axes are mechanically sound. There is no binding, bearings run smooth, wheels have decent preload, and the anti-backlash nuts are tight but smooth. The acme screws are a little bent, which is causing a little resonance at certain speeds, but it doesn't seem to be the cause of the missed steps.

    I printed a 3D Benchy yesterday at 100% scale. Came out fine. Went to print it at 200% scale, and it skipped on the y-axis about a dozen layers above the deck. It seems so inconsistent.

    I'm running out of ideas here. I've ordered a Duet Wifi board to see if maybe the Smoothieboard is at fault. I would have ordered another Smoothieboard, but the wife is complaining about the noise (the sound it generated is piped everywhere through the house through the heating ducts), and the Duet has Trinamic drivers that can support the full current of the OB Nema23's. I'm going to build an enclosure for it anyway, but the quieter I can make it the better for all involved.

    I'd love to hear if anyone has any other suggestions as to why this is happening.
     
  3. Jacques D

    Jacques D New
    Builder

    Joined:
    Oct 9, 2016
    Messages:
    49
    Likes Received:
    13
    This problem of skipped steps occurred on parts that you used to print without any problem ?
    On both axis ?

    When switching to small A4988 Stepsticks drivers, I encountered the same problem : missing steps on the Y axis at almost exactly the same layer each time on a specific model that I designed. In all previous parts I printed with A4988, I had no problem, but for that specific model, I had skipped steps on Y every time.

    In my case, I believe that the slicer ordered a quick forward to rearward movement of Y, that the driver just could not handle. So I believe it was a jerk/acceleration and/or a current issue. I don't see any other explanation...
    I did not try to reduce jerk/acceleration, I switched to my "old" (powerful but very loud) external drivers and no skipping steps anymore.
     
  4. evilc66

    evilc66 Journeyman
    Builder

    Joined:
    Jan 9, 2015
    Messages:
    392
    Likes Received:
    153
    As far as I can tell, it is failing on hardware that was known to be functional. Changing to the external drivers was an attempt to correct the problem, under that assumption that it was a lack of current.

    I agree that it could be a quick forward reverse movement. I've heard the machine "clunk" on occasion, but originally assumed that it was a glitch on the enable pin. After the enable pin was removed, I've heard it again, so a rapid movement change may have been responsible. When I've been there to hear it, it's never resulted in skipped steps. That's not to say that it couldn't be an issue though. I have tried Simplify3D and Slic3r with similar end results though. I would have expected the drivers set to 2.5A would have been able to deal with this though.
     
  5. evilc66

    evilc66 Journeyman
    Builder

    Joined:
    Jan 9, 2015
    Messages:
    392
    Likes Received:
    153
    So, it looks like it was the Smoothieboard. I got the Duet Wifi as a replacement last week and have been printing with it all weekend without issue. The Trinamic drivers are quieter, so now all I hear is mechanical noise. It's fast too. Faster than the Smoothieboard with the same settings. I'm not a big fan of how you configure it though. I found editing the text file on the SD card pretty easy compared to using the Reprap configurator.

    Oh well, it works, and that's all that counts.
     
  6. Brendan M Pucel

    Builder

    Joined:
    Nov 28, 2018
    Messages:
    1
    Likes Received:
    0
    Looks great. I might make a similar machine for printing and milling
     
  7. froggyman

    froggyman New
    Builder

    Joined:
    May 10, 2016
    Messages:
    1
    Likes Received:
    0
    In my book, there's no kill like overkill. Overall, this build looked like a fantastic base idea for the machine I wanted to build. Simple, yet rigid, mechanics with easily sourced components, and for a fair price. I think this same mechanical design could also easily lend itself to a basic 3-axis router for plastics, wood, and aluminum. This is then, of course, some serious overkill in the 3D printer market that typically uses wet noodles and rubber to build the frame. With typical stepper motor speeds and accelerations, you should see no vibration on the surface finish of your parts.

    But, I wanted to take it a step further.

    Instead of the smaller (yet standard) gantry plates that fit snuggly on the inside of the c-beam rails, I opted for the beefier X-large gantry plates that allow for up to 6 wheels per plate (and with the wheels are a greater distance apart allowing them to better resist moments combined with their larger bearings), on all axes. I also went ahead and got a precision lead screw from McMaster machined to size for use on the X and Y axes to have greater precision, rigidity, higher efficiency, and smoother operation (the Z axes use the standard 8mm lead screws still). Then for the bed, I'm using a 600W AC heater attached to a 12" square of MIC Aluminum.

    Finally, for motors and controls, I went with a set of premium Japanese industrial-grade servo motors and basic CNC/motion controller that the company I work for makes and that I helped develop (total cost new is likely around $10k, but free for me since I work there). Now to be clear, I'm not advocating that everyone needs to get industrial controls for their build. Industrial controls, like mine, provide a good bump in performance, but also will typically come with a 10-20x increase in price while also being more complicated than many of the open-source alternatives.

    My first test run without an extruder was yielding exceptional results: 20190725_173735.mp4

    Of course, an out of the ordinary 3D printer needs an out of the ordinary extruder, so I'm using an E3D SuperVolcano combined with a special clamping mechanism to increase its rigidity. In the end, I'm able to max out around 240 mm/sec with 3G's (30,000 mm/s/s) of acceleration (though I'll typically stay at 150mm/sec or less with 1G of acceleration to reduce mechanical wear and noise pollution). Here's a video running at 240mm/sec with the 3Gs: TurboImpeller_240mm-s_3Gs.mp4
     

Share This Page

  1. This site uses cookies to help personalise content, tailor your experience and to keep you logged in if you register.
    By continuing to use this site, you are consenting to our use of cookies.
    Dismiss Notice