Welcome to Our Community

Some features disabled for guests. Register Today.

LEAD 1515, HGH15, SFU1604 Ball Screw

Discussion in 'CNC Mills/Routers' started by Netechsys, Sep 7, 2020.
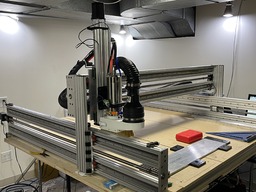
  1. ljvb

    ljvb Well-Known
    Builder

    Joined:
    Feb 14, 2019
    Messages:
    276
    Likes Received:
    87
    The ER-11 collet maxes out at 5/16ths, so you will be limited to smaller diameter router bits. More than likely won't effect you, but for me, I have a number of 1/2" bits.. which of course my ER-16 won't fit either (maxes out at 3/8ths). At least bits are cheap.
     
  2. Netechsys

    Netechsys Journeyman
    Builder

    Joined:
    Mar 25, 2020
    Messages:
    149
    Likes Received:
    107
    Stepper drivers, power supplies, terminal strips, wire, and wire ends all showed up today. I’m playing with an idea to mount the power supplies and steppers. Tell me why this won’t be a good idea.

    305C31CD-25D3-4337-B288-FEA6CC9E93AA.jpeg

    Use a 2080 and a 2040 for a base, connected together, with 2 2080 verticals that the steppers will attach to. The terminal blocks on top of those. One power supply attached to each side. The arduino on a plexiglass top. And put a fan on one side blowing air through the center. The aluminum extrusions will act as a heat sink.. I’m trying to think what’s wrong with this and not finding anything. The aluminum will all be 250mm so there will be a slight gap between the stepper drivers.

    thoughts on this?
     
  3. Netechsys

    Netechsys Journeyman
    Builder

    Joined:
    Mar 25, 2020
    Messages:
    149
    Likes Received:
    107
    Yes. Which is why I went to a 2.2kw spindle. It has an er20, which goes to 13mm. So my 1/2” will work. Sure makes running the spoiler board bit nice! 1/2” shank, 2” clearing per pass.

    @cnc0014 No, I don’t. It all works fine, and when running there is no problem. Only issue I have is when I shut machine down. The Z tends to slowly drop, so I normally park it on a block if I’m shutting everything off.
     
  4. ljvb

    ljvb Well-Known
    Builder

    Joined:
    Feb 14, 2019
    Messages:
    276
    Likes Received:
    87
    Not a fan to be honest.. I cannot quite put my finger on it.. but something is off.. I feel that it would be a nightmare in the event someone fails and you need to trouble shoot.. also, that is a lot of heat that needs to be dissipated.. I would mount the drivers next to each other with enough of a space between to allow for decent airflow. The 2080 and 2040 will also soak up some of the heat, which while nice, but based on that configuration, would soak up a crap ton of heat.. and I don't think there is enough air flow for a fan to dissipate it. Those extrusions do not have enough surface area. Think fins on most heat sinks, there is a reason they are not all flat pieces of metal.
     
  5. Netechsys

    Netechsys Journeyman
    Builder

    Joined:
    Mar 25, 2020
    Messages:
    149
    Likes Received:
    107
    I’m trying to keep it Openbuilds parts as much as possible, but I’ll play a bit more. That was first idea. As for heat, these steppers don’t even come with heat sinks so I was thinking that even the amount added by the extrusions is a step up from what they have. But agree that it would soak up a lot of heat. Maybe I’ll just say screw it and go get an enclosure to mount everything into. McMaster is only a short drive from my house.
     
  6. JustinTime

    JustinTime Veteran
    Builder

    Joined:
    Dec 18, 2013
    Messages:
    759
    Likes Received:
    253
    The simple answer is yes. My whole machine is custom built out of plywood and making the interface plate is trivial, therefore. :)
     
  7. Netechsys

    Netechsys Journeyman
    Builder

    Joined:
    Mar 25, 2020
    Messages:
    149
    Likes Received:
    107
    Base board for the new controller is shaping up. I have an enclosure coming to mount this is. I’ll mount the GX16 connectors when the box comes.

    15DD3C1D-12C8-483C-BD21-C99D448EC710.jpeg

    The glove in the middle is just to hold the PWM to 0-10v board. Still need to mount the limit switch board, when I build it, later tonight. Hopefully I’ll have it all done for testing tonight.

    the rest of the electronics will be done in the enclosure. Contractor, switches, etc.
     
    Rhett E and Corey Corbin like this.
  8. Corey Corbin

    Corey Corbin Well-Known
    Builder

    Joined:
    Feb 27, 2016
    Messages:
    135
    Likes Received:
    62
    Nice a tidy. I like it. This is also a good way to use left over extrusion.
     
  9. Netechsys

    Netechsys Journeyman
    Builder

    Joined:
    Mar 25, 2020
    Messages:
    149
    Likes Received:
    107
    New control box taking shape. Most of the base electronics are mounted. And I’m working on the GX16 connections.


    Liking the results so far. Now need to finish it.
     

    Attached Files:

  10. Netechsys

    Netechsys Journeyman
    Builder

    Joined:
    Mar 25, 2020
    Messages:
    149
    Likes Received:
    107
    Machinist Santa showed up tonight at my house. The first of the new end plates arrived, to replace and combine the 2 c-beams and house the bearings for the ball screw arrived. These are the first set, with more to follow.

    He even redesigned the plates for the x-axis to eliminate the angle connectors from the mix and use the bracket to mount to the uprights. Now I need to get the aluminum for him to make these new improved mounts.

    I guess I’ve been a good boy this year

    Screen Shot 2020-12-17 at 2.58.34 AM.png

    Machine is still running, so I guess these will have to wait. But, the bearings went from a 26x10 to a 28x10. I will try to get the CAD file for these, and the motor mount sides as well. For the X axis, the 2 narrow spaced holes will move out to the outer location, and then he will add 2 screw holes through the entire plate to attach to the side of the uprights using drop in T-Nuts and 50mm screws, so the X will have a 220MM plate holding it to the uprights on each side. That will take care of the Y and X axis. Lastly, I will need to do the Z plates, after I figure out how I want them to be.. Still using the 8mm ACME screw for the Z since I need to make a custom nut block for the ball screw.
     
    #70 Netechsys, Dec 16, 2020
    Last edited: Dec 17, 2020
    Giarc likes this.
  11. Netechsys

    Netechsys Journeyman
    Builder

    Joined:
    Mar 25, 2020
    Messages:
    149
    Likes Received:
    107
    Change in the electronics.. I have been playing with the arduino, and not really happy with the results. I am now changing everything to grblHAL running on a Teensy 4.1, using the T41U5XBB board by Phil Barrett. I will post more when I get the boards, and get it running. My intentions are to go to a 4 active axis, with the A being a spindle off the front. There will be 5 AXIS's run, with the 5th (B) being a clone of the Y axis.
     
  12. Rob Taylor

    Rob Taylor Master
    Builder

    Joined:
    Dec 15, 2013
    Messages:
    1,470
    Likes Received:
    746
    Well that's exciting. Teensy 4.1 is the most logical option for grblHAL, for sure. You'll need to write up the process in detail, because there's not a whole lot of documentation out there and this would be a "real" build with it- the rest of the stock examples are fairly standard 3-axis routers except the one lathe conversion (which is cool, I'm all for converted machines!). But this'll be the first multi-axis build with it that I've seen, certainly on OpenBuilds, and this is basically the de facto future of grbl, so needs to be fairly in-depth.

    I almost went this way for M4, but LinuxCNC has some momentum in my shop now and can do a couple things that even grblHAL can't (yet?). I still wanna do a fun little Teensy 4.1 based build at some point though.
     
  13. Netechsys

    Netechsys Journeyman
    Builder

    Joined:
    Mar 25, 2020
    Messages:
    149
    Likes Received:
    107
    i will document it up. I built the grblHAL for the system already, and set the basic configuration for it already. BoB should be her tomorrow or Monday. I am jumping in and building it to use the Ethernet connection as well, so now the controller can be in another room, away from everything.

    I looked at the linuxCNC, and that may get used for the next machine. I am starting a C-Beam mill next.

    another thing I’m doing now, since I have the free time, is build up a table, based off of the open builds design, with an enclosure attached to the top for this machine. Since I can’t get the length needed for the extrusions from Openbuilds, and seeing 80/20 is a short drive away, I will be using the 80/20 extrusions. I can have them cut to length, and setup for the connections I am looking to use. But, that’s another project.
     
  14. Peter Van Der Walt

    Peter Van Der Walt OpenBuilds Team
    Staff Member Moderator Builder Resident Builder

    Joined:
    Mar 1, 2017
    Messages:
    14,038
    Likes Received:
    4,122
    Longer custom lengths (as long as the carriers are willing to ship) and precision cut to length service, etc always available via http://support.openbuilds.com/support/home (;
     
    Mark Carew and Rob Taylor like this.
  15. Netechsys

    Netechsys Journeyman
    Builder

    Joined:
    Mar 25, 2020
    Messages:
    149
    Likes Received:
    107
    New BoB arrived. Built out the basics and mounted to the backer board. Testing tomorrow.

    image.jpg
     
    Giarc likes this.
  16. Andrew S

    Andrew S New
    Builder

    Joined:
    Jan 4, 2021
    Messages:
    2
    Likes Received:
    0
    What is your Z axis clearance when you’re done? It looks massive!
     
  17. ljvb

    ljvb Well-Known
    Builder

    Joined:
    Feb 14, 2019
    Messages:
    276
    Likes Received:
    87
    which bob are you using
     
  18. Netechsys

    Netechsys Journeyman
    Builder

    Joined:
    Mar 25, 2020
    Messages:
    149
    Likes Received:
    107
    sharmstr likes this.
  19. Netechsys

    Netechsys Journeyman
    Builder

    Joined:
    Mar 25, 2020
    Messages:
    149
    Likes Received:
    107
    The Z axis is now 200mm. I am working out the travel of the Z Axis some, so it may increase a bit more, but the 200MM is a good starting point.
     
    sharmstr likes this.
  20. Luciano Oliveira

    Builder

    Joined:
    Nov 13, 2020
    Messages:
    3
    Likes Received:
    0
    For better resistance, the ideal is to use 3/8 ", 1/2" or 5/8 "aluminum plate?
     
  21. Netechsys

    Netechsys Journeyman
    Builder

    Joined:
    Mar 25, 2020
    Messages:
    149
    Likes Received:
    107
    For the X/Y plates, I am using 3/8". For the end plates on the Y/X, I have started the change over to 1/2" for the Y and 1" (Milled to 20mm) for the X. The X will have the attachments and end caps milled into one. Attached is the rendering for the motor mount side of the X axis. This will replace the angle connectors for the X/Y uprights into the end plates.

    Screen Shot 2020-12-30 at 5.42.30 PM.png
     
  22. ljvb

    ljvb Well-Known
    Builder

    Joined:
    Feb 14, 2019
    Messages:
    276
    Likes Received:
    87
    I'm currently using the 6-pack I posted about a while ago. I originally had TMC5160 drivers, but there is an issue with those, I tried the 2130s, they worked, but I was having some issues. It;s an ESP32 based modular controller. I have 4 external drivers now and new steppers since my original 23's were the small ones.. I'm about to start retrofitting my electronics and drive train, next step after that is the bearings. I'm not going to increase the size of it yet due to space constraints in my garage.

    bdring/6-Pack_CNC_Controller

    With modules (there are about 10 different ones, I have the PWM, 4 input, and 4 pass through stepper modules)
    [​IMG]
    [​IMG]
     
  23. Netechsys

    Netechsys Journeyman
    Builder

    Joined:
    Mar 25, 2020
    Messages:
    149
    Likes Received:
    107
    New plates cut on the machine. The ones my friend made were off a bit so I remade them. Here are the plates for the Y axis. Will install after I finish the X axis plates.

    8DF009C8-C591-48B6-A1AE-AFDBB3DCAECC.jpeg

    image.jpg


    You can see the motor mount in the edge of the picture. This will sit nicely in the cut out and the short plates attach to the bottom and to the motor mount.

    here is the motor mount side completed. And assembled. I am using the screw and mount for machine #2 so I don’t have to take everything apart yet.

    image.jpg image.jpg
    happy happy. Joy joy. Almost done with the new plates!

    update on the grblHAL. Had some problems with it and will need to troubleshoot it. Was working fine, then it stopped responding, so I changed back to the arduino setup.
     
    #83 Netechsys, Jan 14, 2021
    Last edited: Jan 14, 2021
  24. Netechsys

    Netechsys Journeyman
    Builder

    Joined:
    Mar 25, 2020
    Messages:
    149
    Likes Received:
    107
    New plates installed on the Y axis. Now I see how far off the original was.. I need to realign the linear rails on both sides to make it all square again. But, in the end, I will know everything is aligned, square, and strong.

    Sorry, it’s a bit messy by the machine right now.

    A6C688B5-21F3-4432-8FD5-3AC2C2966E6D.jpeg EBCD121D-9FB7-424F-8983-CDA1408C9DE4.jpeg 0CC7FE6D-08F2-4DAC-B850-6093B0FEB863.jpeg A57056F8-CC94-4A13-A52E-9C8AFD9C6623.jpeg
     
  25. JustinTime

    JustinTime Veteran
    Builder

    Joined:
    Dec 18, 2013
    Messages:
    759
    Likes Received:
    253
    I see you have thrust bearing on one side. Do you also have them on the motor side? If yes, did you make the mount yourself or is it a bought one?
     
  26. Rob Taylor

    Rob Taylor Master
    Builder

    Joined:
    Dec 15, 2013
    Messages:
    1,470
    Likes Received:
    746
    The mount on the motor side is an FK12 fixed bearing bracket, has two deep groove bearings opposed to each other. The bearing at the other end is out of the FF12 floating bearing bracket, which is just a single deep groove bearing (608ZZ or something, I forget now) that just supports the ball screw and doesn't tension it. You can use FK brackets on both ends and tension the screw, but ball screws don't come with both ends with the extended 12mm threaded section as standard, you'd have to request it. As it is, the supported end isn't long enough to fit through both bearings. This is part of the reason I'm using fixed Y screws and not rotating screws- much easier to tension, but also much less reason to tension, no screw whip to worry about.
     
  27. Netechsys

    Netechsys Journeyman
    Builder

    Joined:
    Mar 25, 2020
    Messages:
    149
    Likes Received:
    107
    And, at 16mm thick, there isn’t a lot of whip. Even with the rotation and no tension in. But no, the fixed portion is the only part I didn’t make. The black part. The free floating side, I upgraded the bearing to 7001.
     
  28. Rob Taylor

    Rob Taylor Master
    Builder

    Joined:
    Dec 15, 2013
    Messages:
    1,470
    Likes Received:
    746
    True with 1500mm in a standard fixed/floating arrangement up to about 1100rpm or so, as I recall. My design is intended to be more or less upgrade-proof, shouldn't need altering if/when I move to servos and can happily throw that thing around at 3000rpm (on 1610 screws, that's 30,000mm/min or ~1200IPM :eek:) if I can accelerate fast enough (probably- I can accelerate my cast iron mill surprisingly aggressively with ball screws, though I don't!). How fast I can actually cut at a reasonable chipload when limited to 24,000rpm is another matter (I'd guess about a third of those speeds) but at least rapids will be taken care of, which is a big deal on a large machine.

    16mm isn't actually that big by ball screw standards, but it's night and day over those puny 8mm leadscrews. I don't know that I'd like to use those above about 400mm or so.

    Technically you could upgrade the bearing to either angular contact ($$$) or tapered roller bearing ($) and be able to crank on it a fair bit, if you made a plate with a mechanism to do so. Realistically, stepper motors are limited to about 400-500rpm with usable power, so it's not something to worry about.
     
  29. Netechsys

    Netechsys Journeyman
    Builder

    Joined:
    Mar 25, 2020
    Messages:
    149
    Likes Received:
    107
    The motor mount has Angular contact bearings in it already, well 1 angular and 1 regular. The free floating side was upgraded from regular to angular contact. So I should be fine with that. Since I was making the new plates, might as well make them right! I think I will take the screw back off and have the end machined to allow a double bearing on the free side like the fixed side, and do the same. (1 Angular and 1 normal.)

    For now, its time to take the machine apart again, install all the new plates, retram everything and make sure the linear rails are all good, and have some fun!
     
  30. Rob Taylor

    Rob Taylor Master
    Builder

    Joined:
    Dec 15, 2013
    Messages:
    1,470
    Likes Received:
    746
    Yeah, just remembered what a 7001 is, duh, haha. I wouldn't go double-bearing though, there's just limited purpose unless you did a 16mm ID and a 12mm ID back to back, and even then the inner bearing isn't doing very much work without a screw tension. I'd just allow for the ability to tension the bearing mount against the other end of the screw using the bearings you already have.

    I rough-trammed my Y rails recently. Took 2.5 days to get them to +/-0.0015" over 48"! Lotta work. Hopefully they don't need tweaking much any more, but we'll see. Technically they should be about half that tolerance.
     

Share This Page

  1. This site uses cookies to help personalise content, tailor your experience and to keep you logged in if you register.
    By continuing to use this site, you are consenting to our use of cookies.
    Dismiss Notice